
10 NotebookLM Prompts to Learn Anything Faster(Beat 99%)
Ten NotebookLM prompts to learn anything and make it stick, each one built on how memory actually works.

How do you learn anything and make it stay?
I went looking for the answer. What I found surprised me and made sense at the same time.
The easier learning feels, the faster you forget it.
Re-reading your notes feels productive.
You recognize every line, so your brain tells you it knows the material.
Then the exam asks one question, and nothing comes out.
Researchers call this the illusion of competence.
Real learning runs the other way. You pull the information out of your head instead of pushing it back in.
You let yourself forget a little, then reach for it. The reach is what makes it stick.
Four things trigger that reach.
Retrieval. Spacing. Interleaving. Generation.
Every NotebookLM prompt below is built on one of them, so these are not generic study tips but NotebookLM learning prompts shaped around how memory works.

Each one is paired with the Studio feature that complements it.
And each one forces the reach that makes learning stay.
Each one has a fill-in template you can copy. Each one was tested on a real notebook.
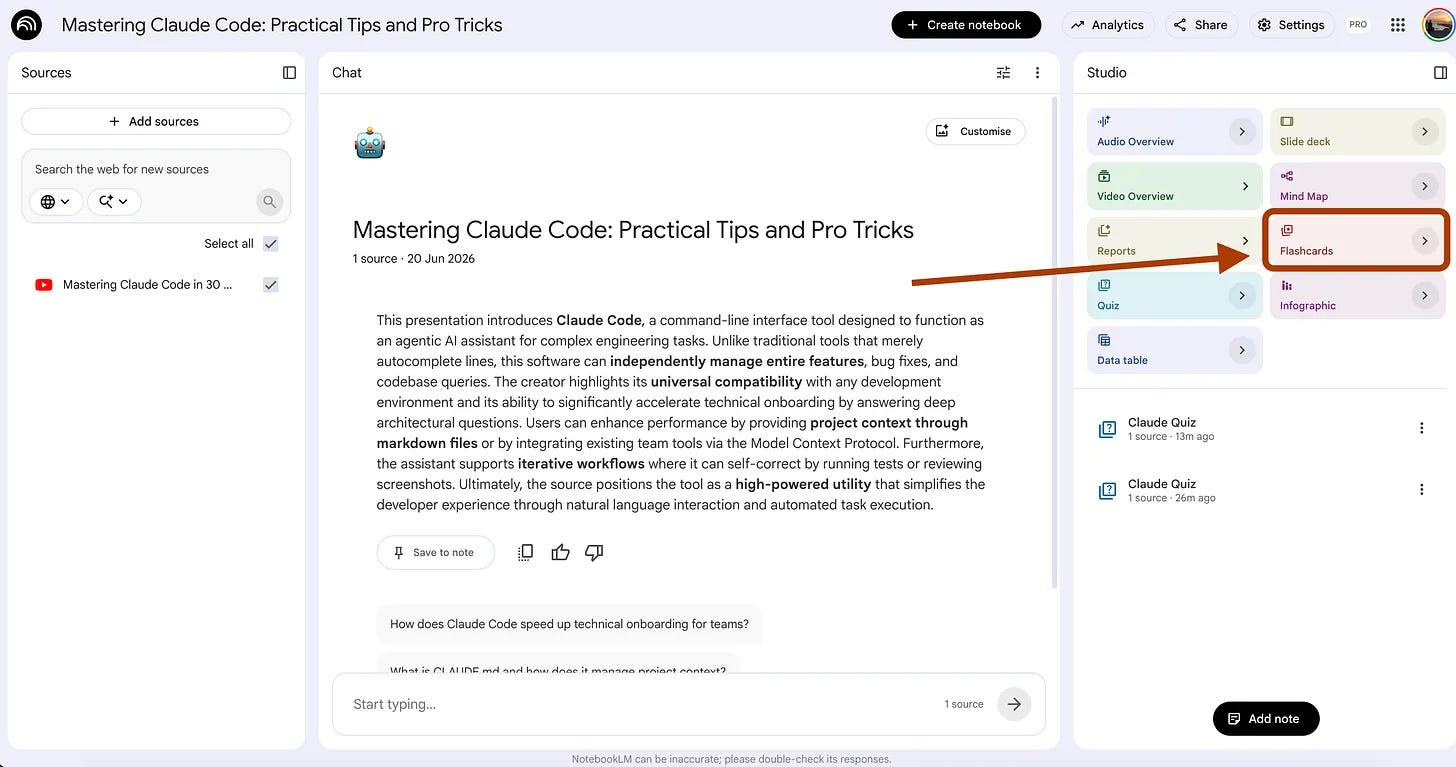
(Mine is trained on Boris Cherny's 30-minute course, Mastering Claude Code in 30 Minutes. He created Claude Code.)
Zero coding. Nothing to install. Everything happens inside NotebookLM.
If you are a student, these turn your notes into a system that makes the material stay.
If you learn things on the job, papers, internal docs, and technical manuals, the same prompts work.
Let’s start with what I found about why most of what you read never sticks.
What is NotebookLM?

NotebookLM is a learning and research tool of Google, so it was first designed to help students with studying or researchers.
You can learn almost anything faster thanks to its multimodal capabilities, including video generation, image generation, and podcasts.
Its grounding feature also helps reduce hallucinations by connecting responses to reliable sources, and its long context window lets it retain and process more information at once.
Google has also linked it with Gemini, so you can now build apps with this connection, even on the free plan.
How to train NotebookLM?
Follow these steps to train it, or watch the screen recording above to see how I did it.
Steps: Visit here → Click on “Try NotebookLM” → Click on “Create new” → Add any source.
And that’s it. The whole setup takes about a minute; it’s really that simple, and it’s completely free.
Take a closer look at the Studio features. We will spend a lot of time here.

Let’s start learning with NotebookLM.
Retrieval: Pull it out of your head
Reading puts information in, but retrieval drags it back out, and that drag is what builds the memory. Every prompt here makes you produce the answer before you see it.
Prompt 1: The Brain Dump That Grades Itself (Retrieval)
You read the chapter twice, and you highlighted half of it, so it felt solid.
Then you close the book and try to write what you remember, and you get half a page. Maybe less.
The highlights looked like knowledge, but they were just ink on someone else’s words.
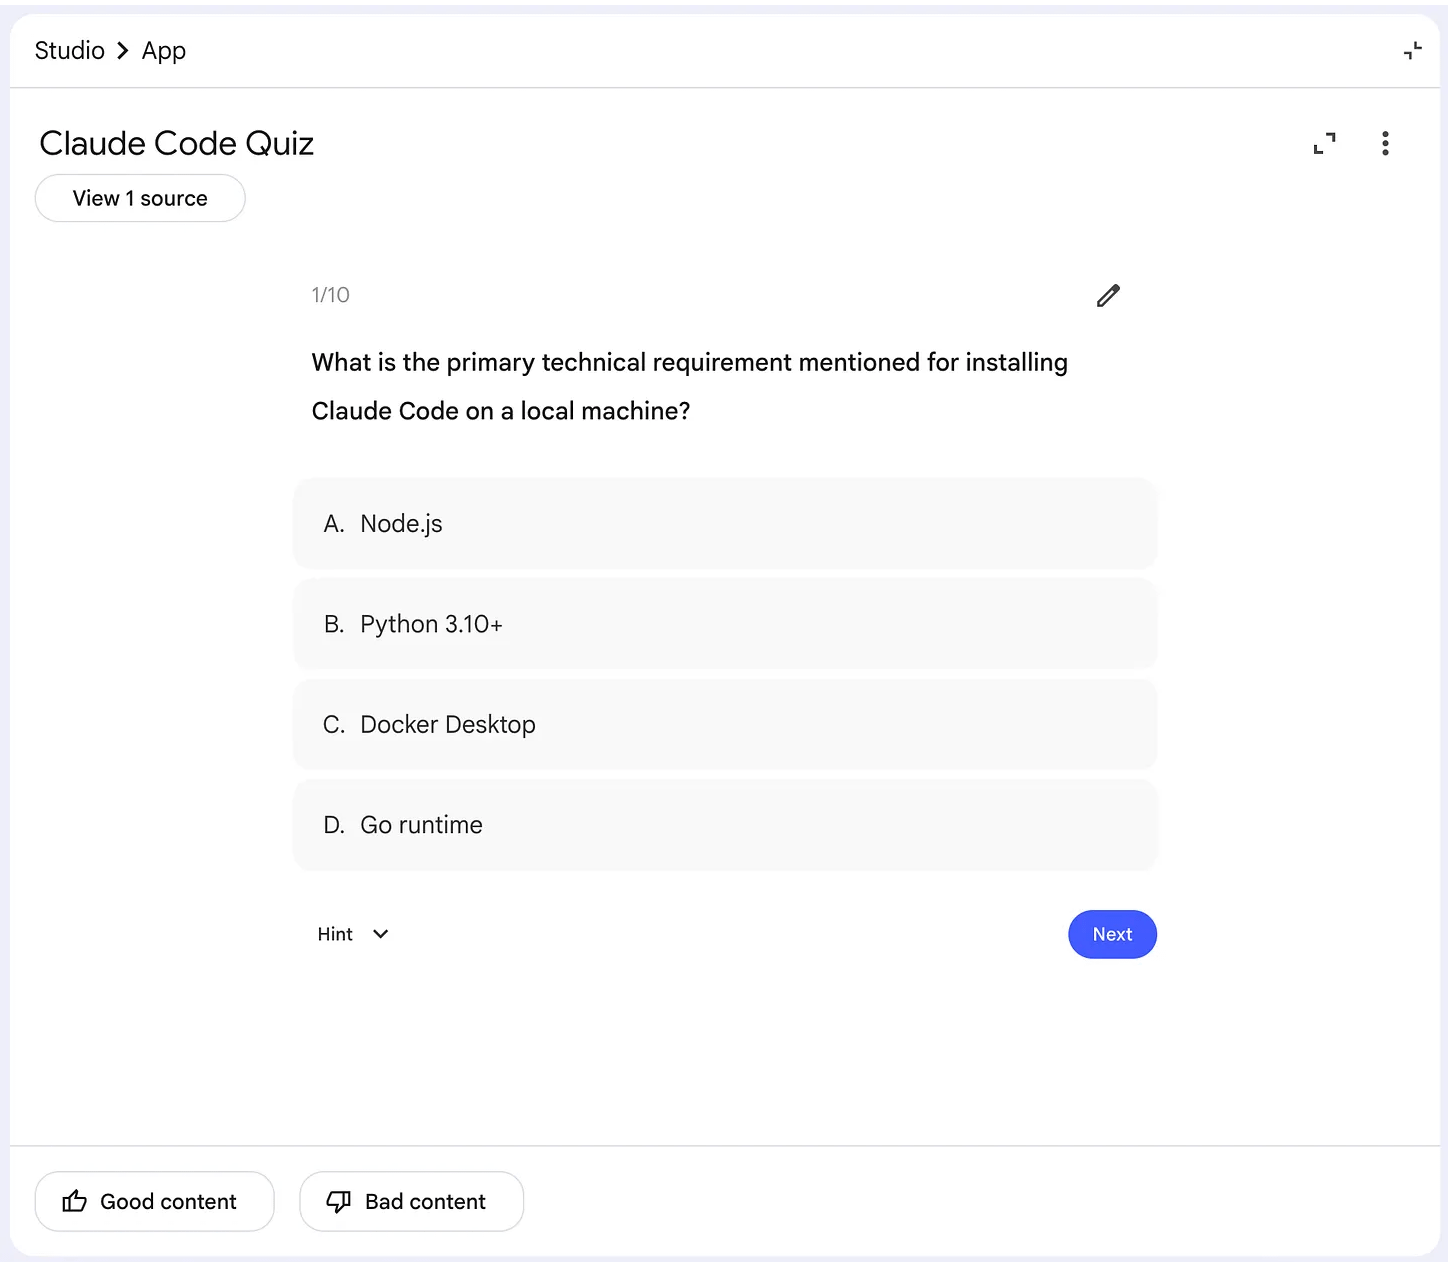
The 1-click way: Quiz feature
Open your notebook, and in the Studio panel, click Quiz.

NotebookLM reads your sources and writes the questions for you, so you answer, it scores, and the gaps show up where you were guessing.

But this quiz does not know you. It does not know what you already understand and what you keep getting wrong, because you never told it. It just pulls questions from the sources at random and hopes some of them land.
So it wastes half your time testing things you already know cold, while the topic that actually scares you shows up once, if at all.
To fix that, the quiz needs to know you first. You tell it what you know, and it points everything else at the gap.
(Select Quiz at the studio, click on > right next to it.)
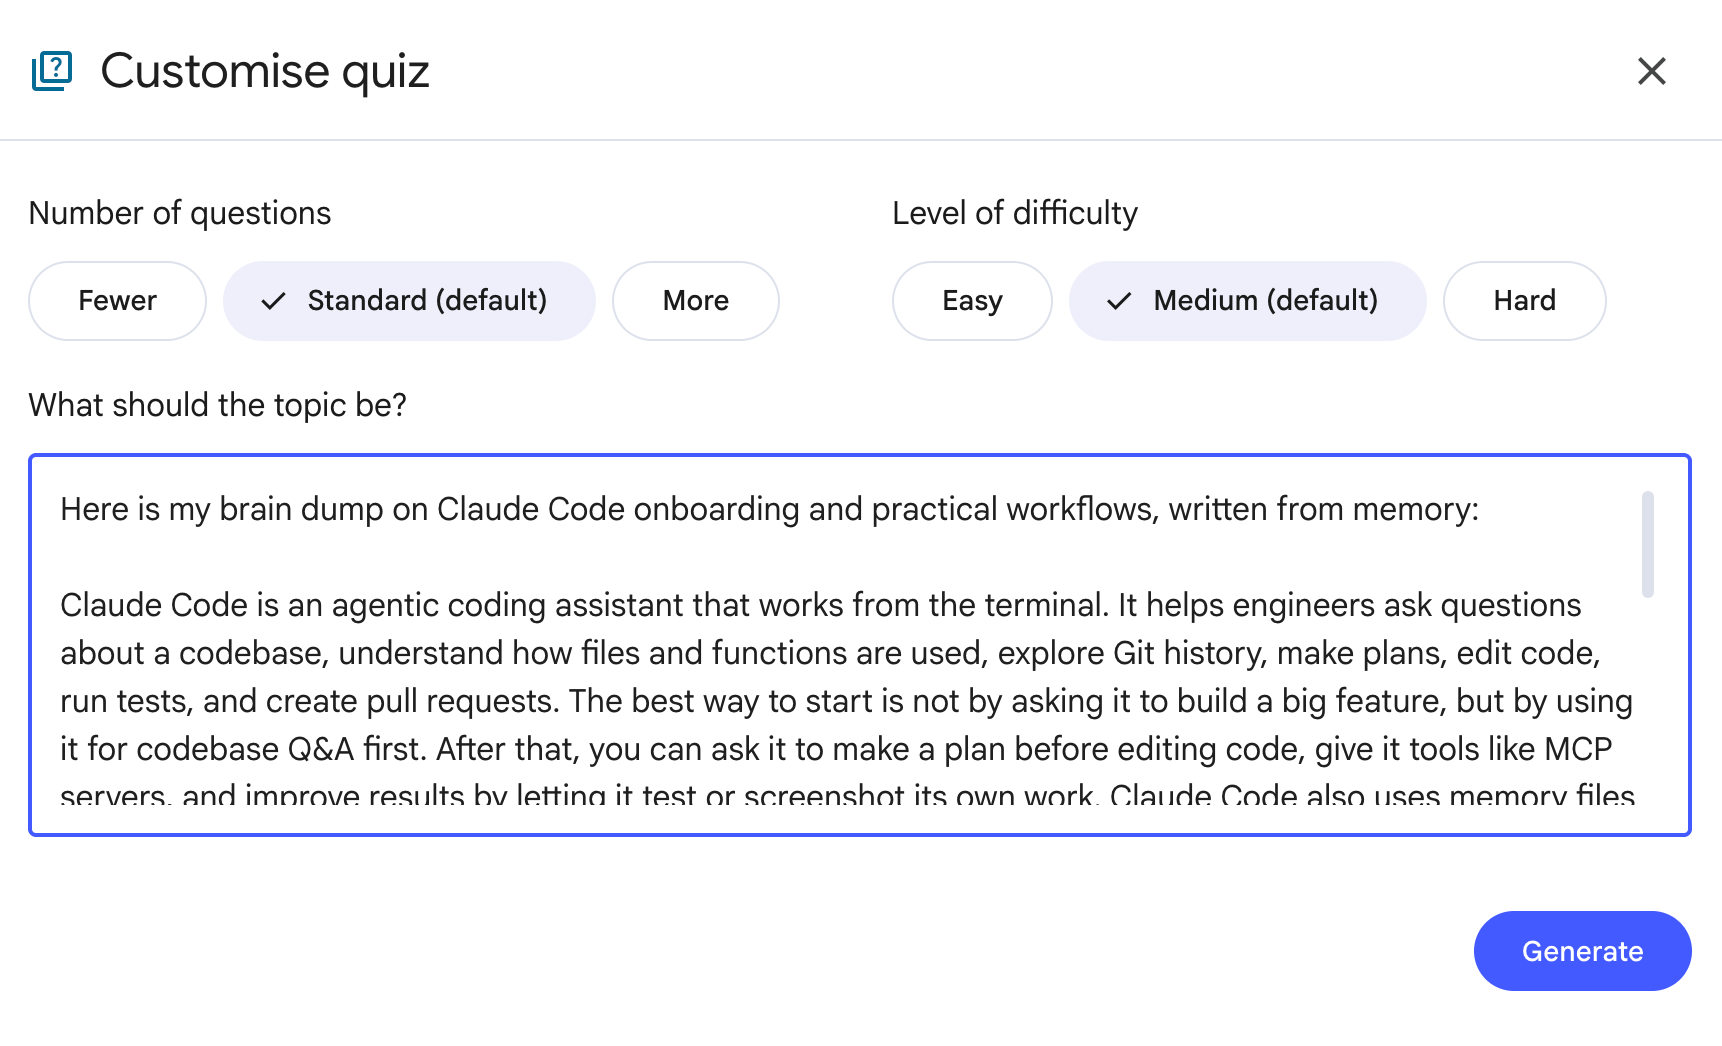
Use this prompt.
Customize the “topic” and the “goal”.
Here is my brain dump on {topic}, written from memory. Compare it against my sources.
List what I got right, what I got wrong, and the key points I missed.
Rank the gaps by how much they matter for {goal}.
Do not add anything I left out until after the comparison.
Now the quiz works on your weak spots instead of handing you a generic round of questions. You feed it what you know, and it spends every question on what you don’t.

Then, you can click one of the topics under Keep learning to turn your weak spots into the next quiz.

From there, click one of the topics under Keep learning, and NotebookLM turns it into a new quiz so you can keep improving.
When to use which?
Quiz feature → A quick check when you have five minutes between classes.
Custom prompt → Real exam prep, when you need to know what comes off an empty page and not just what you recognize.
Prompt 2: Flashcards That Make You Produce the Answer (Retrieval)
Your deck has two hundred cards, and you flip through all of them in twenty minutes. Every back side looks familiar, so you tell yourself you know this.
Then the exam asks for the same term cold, with nothing on the screen, and your mind goes blank.
The 1-click way: Flashcards feature
Open your notebook, and in the Studio panel, click Flashcards.

NotebookLM scans your sources and builds a full deck in a few seconds, with a term on the front of each card and its definition on the back.

But a normal card shows you the whole answer the second you flip it, so your brain coasts.
It sees the term and the full definition sitting together, recognizes both, and moves on feeling smart.
The real exam works the other way. It gives you a half-sentence with a blank in it and waits for you to fill that blank, and the blank is where the actual learning happens.
So you need a card that hides one piece and makes you produce it yourself.
(Select Flashcards at the studio, click on > right next to it.)
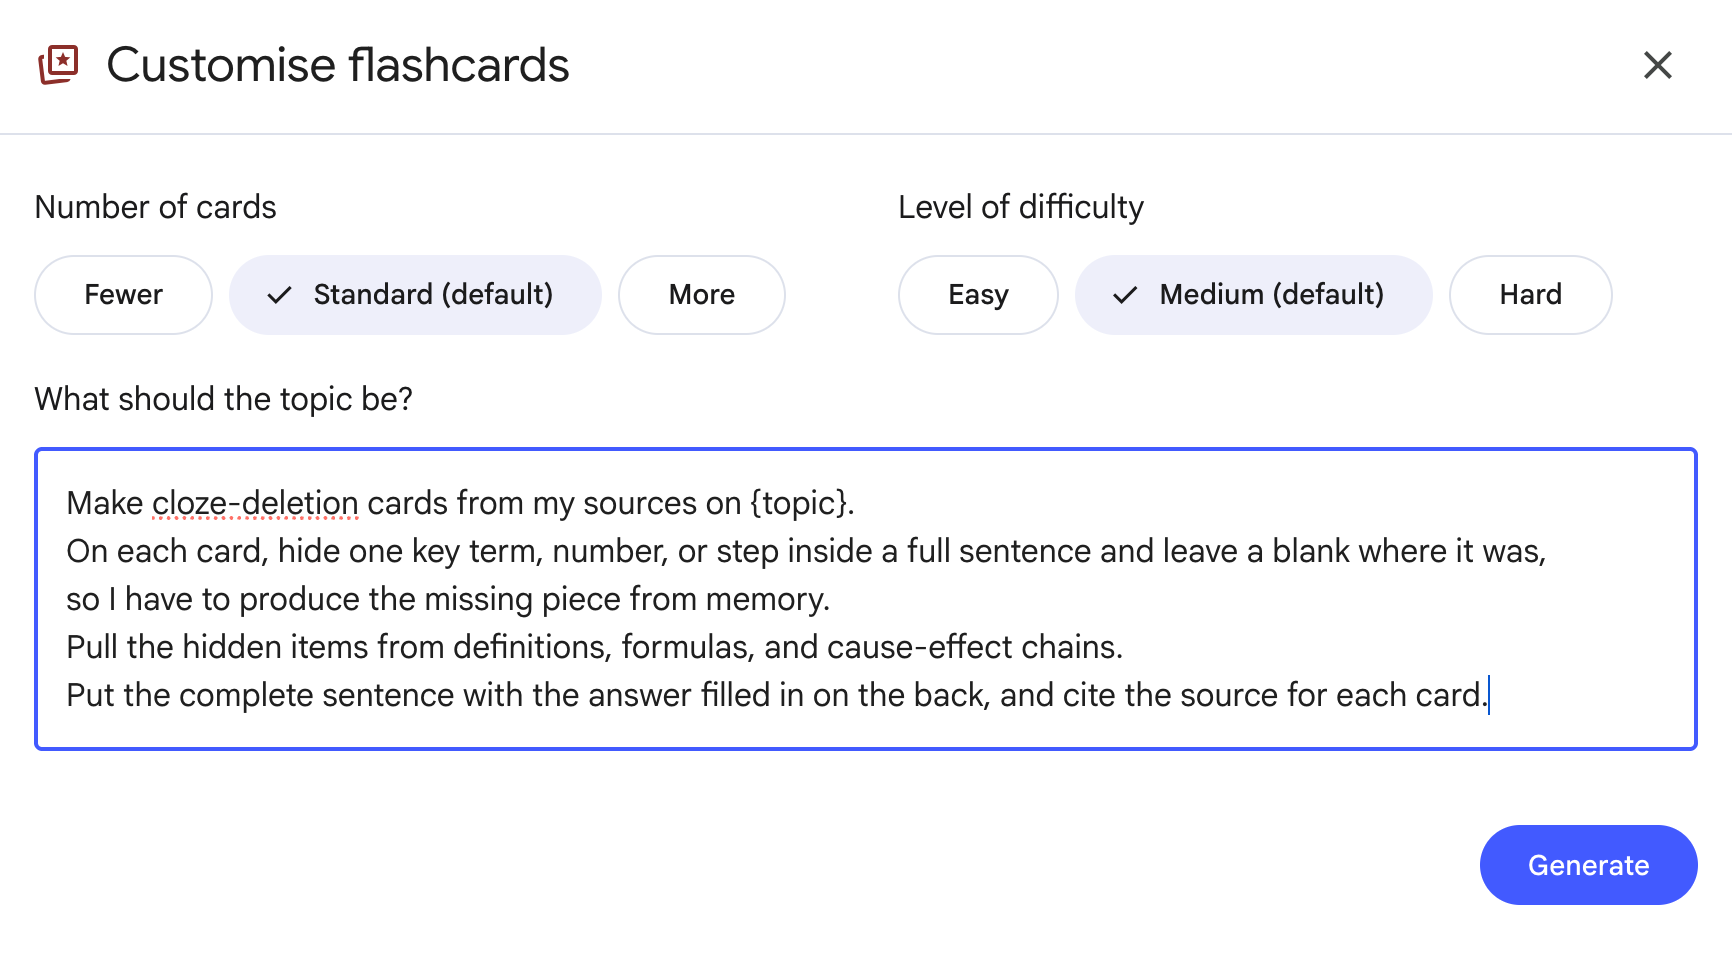
Use this prompt.
Make cloze-deletion cards from my sources on {topic}.
On each card, hide one key term, number, or step inside a full sentence and leave a blank where it was,
so I have to produce the missing piece from memory.
Pull the hidden items from definitions, formulas, and cause-effect chains.
Put the complete sentence with the answer filled in on the back, and cite the source for each card.
Here is what it produces.

Now every card makes you come up with the missing piece instead of reading a finished answer, and that blank does the work your highlighter never did.
If it still feels too easy, open the same panel and set the difficulty to Hard, and the blanks land on the trickier pieces.
When to use which?
Flashcards feature → A first pass on new vocabulary, when you just need the terms in front of you.
Custom prompt → Real review, when you need to pull the answer out yourself, because that is the part that the exam grades.
Prompt 3: The Recall Table You Fill In From Memory (Retrieval)
You study one chapter at a time, and each one feels finished the moment you move on. Then the final lands, it covers chapter two, and chapter two is gone.
You learned it six weeks ago, and you never touched it again.
The 1-click way: Data Table feature
Open your notebook, and in the Studio panel, click Data Table.

NotebookLM pulls the key concepts out of your sources and lays them into a clean grid, with the term in one column and the definition and an example sitting right next to it.

This is good when you want one tidy sheet to look things up on while you study.
But a table like this is something you read, and reading the answer is not the same as recalling it.
The definition sits one column over from the term, so your eyes slide across and your memory never has to do anything. You finish the sheet feeling caught up, and you have tested nothing.
So you blank out the answer column, and the same grid turns into a test you fill in from memory.
(Select the Data Table at the studio, and write your prompt in the description box.)

Here is the entire prompt.
Customize the {subject}
Build a recall table from all my sources on {subject}, not only the most recent one.
Use three columns named Topic, Question, and Answer, and write one short question
for each key point that makes me produce the answer from memory.
Give me two versions of the table, one with the Answer column filled in and one with it
left blank, so I can fill it first and check after.
Weight the rows toward older material I am more likely to have forgotten.
Here is what this prompt generates when I customize the subject like this:
Claude Code workflows, onboarding, memory systems, MCP tools, planning, context management, and parallel agent workflows

Now you work down the blank version, write each answer yourself, and only then open the filled one to check. The grid stopped feeding you the answers, and it started asking for them, and it leans on the old chapters that quietly slipped while you were busy with the new ones.
When to use which?
Data Table feature → A reference sheet, when you want every concept in one place to look up while you read.
Custom prompt → Cumulative review, when the old chapters keep fading and you need to drag them back before the final.
Spacing: One long session feels productive, but most of it leaks out within a week. The same hours are split across several days, with gaps in between that let you forget a little and then pull it back, hold far longer.
These next two prompts put time itself into the plan.
Prompt 4: Turn Any Subject Into a Forgetting-Curve Calendar (Spacing)
You have two weeks until the exam, so you block out Saturday and plan to study all of it in one sitting.
By next Saturday, most of it has faded, so you sit down and study the same material again from scratch.
Spacing works because forgetting happens first.
Two back-to-back review sessions only strengthen familiarity.
The 1-click way: Report feature
Open your notebook, and in the Studio panel, click Reports, then pick Study guide.
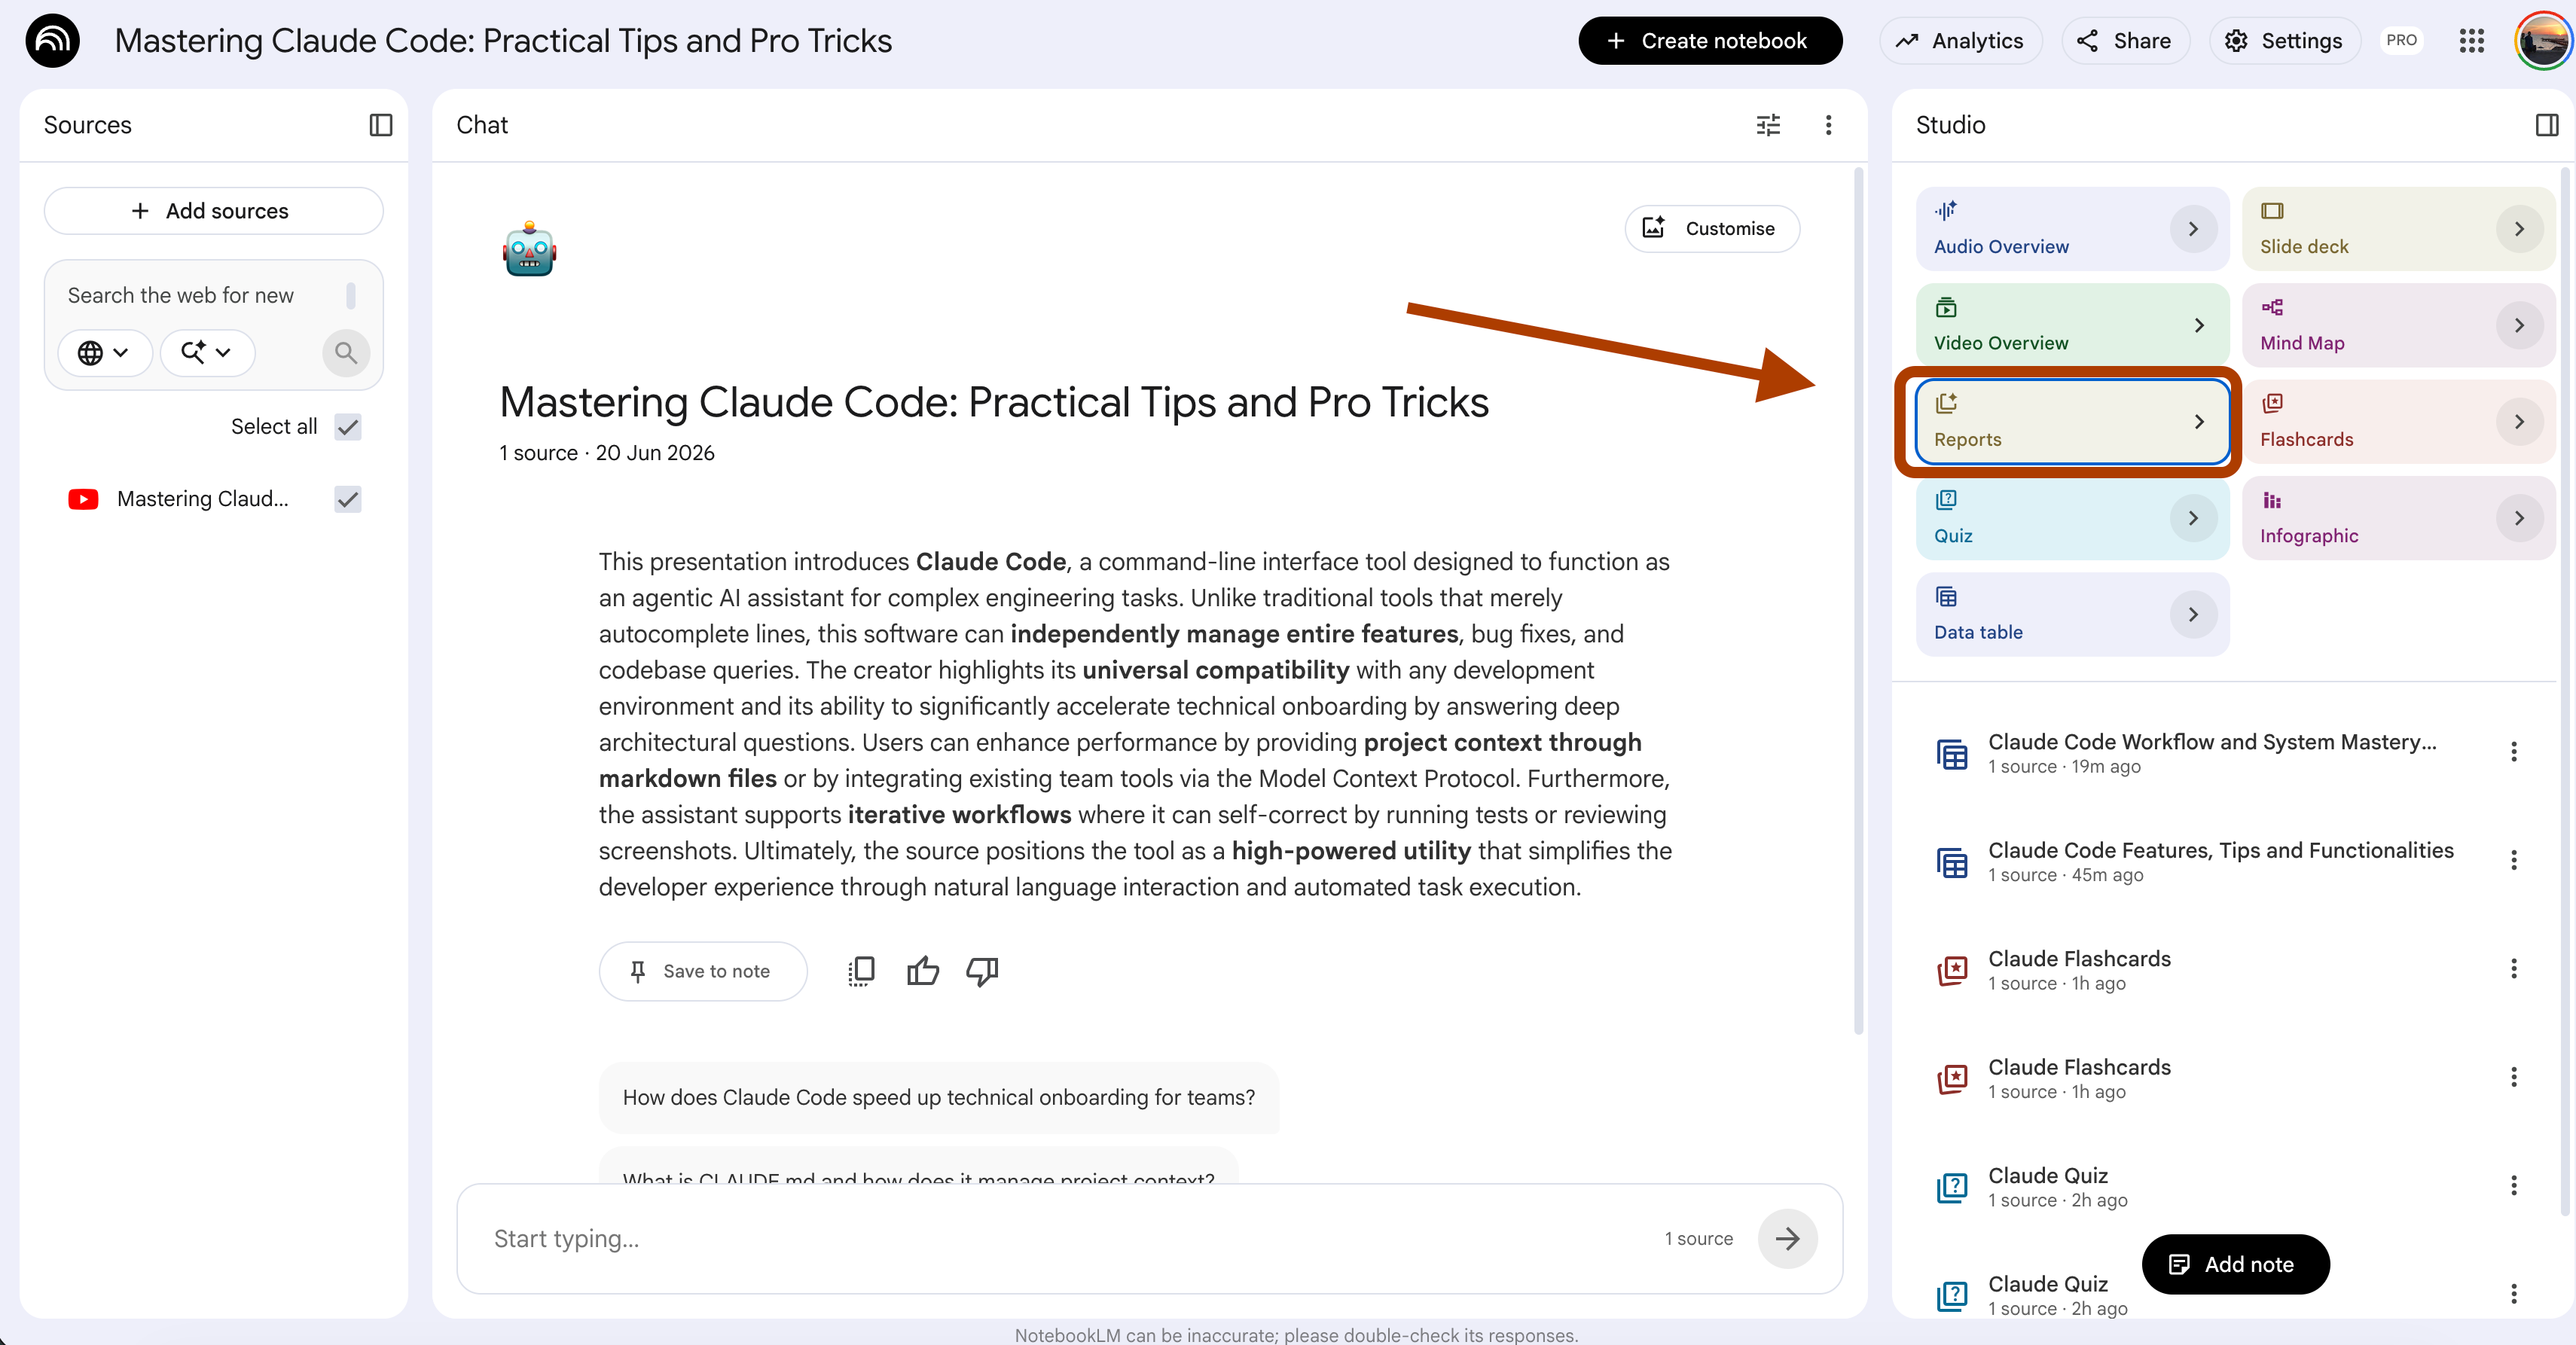
NotebookLM turns your sources into one document with questions, key terms, and a glossary, all stacked together in a single pass.

Here is what it looks like.

But a study guide hands you everything at once, on one day, with no sense of when to come back to any of it. You read it Saturday, you feel on top of the material, and then the forgetting starts the moment you close the tab. What actually holds a memory is meeting the same thing again a few days later, and then again a week after that, right as it is about to slip.
So you need a schedule, not a pile, and the schedule has to tell you what to review on which day.
(Select Reports at the studio, click Create your own.)

Here is the entire prompt.
Customize the {subject} and the {start_date}.
Turn my sources on {subject} into a spaced review calendar that starts on {start_date}.
List every major topic, and for each one set review dates at day 1, day 3, day 7, and day 14.
Spread the topics across those dates so no single day repeats the same subject twice.
Lay it out as a table with three columns named Date, Topic, and the one retrieval action I do in that slot.
Here is the report.
Now the same material comes back four times on a schedule instead of once in a panic, and each return lands right as the last one is starting to fade.
You stop relearning chapters from zero, because you never let them fall all the way out.
When to use which?
Report feature → A single study guide, when you want everything in one sheet for one sitting.
Custom prompt → A two-week run-up, when you want the same topics to resurface four times, spaced out so they actually stick.
Prompt 5: Your 10-Minute Daily Recall Set (Spacing)
A calendar tells you which day to review, but it does not put the questions in front of you when that day arrives.
So you finish a topic, you feel done with it, and you never open it again.
The plan said to come back Thursday, and Thursday came and went.
The 1-click way: Audio Overview feature
Open your notebook, and in the Studio panel, click Audio Overview.
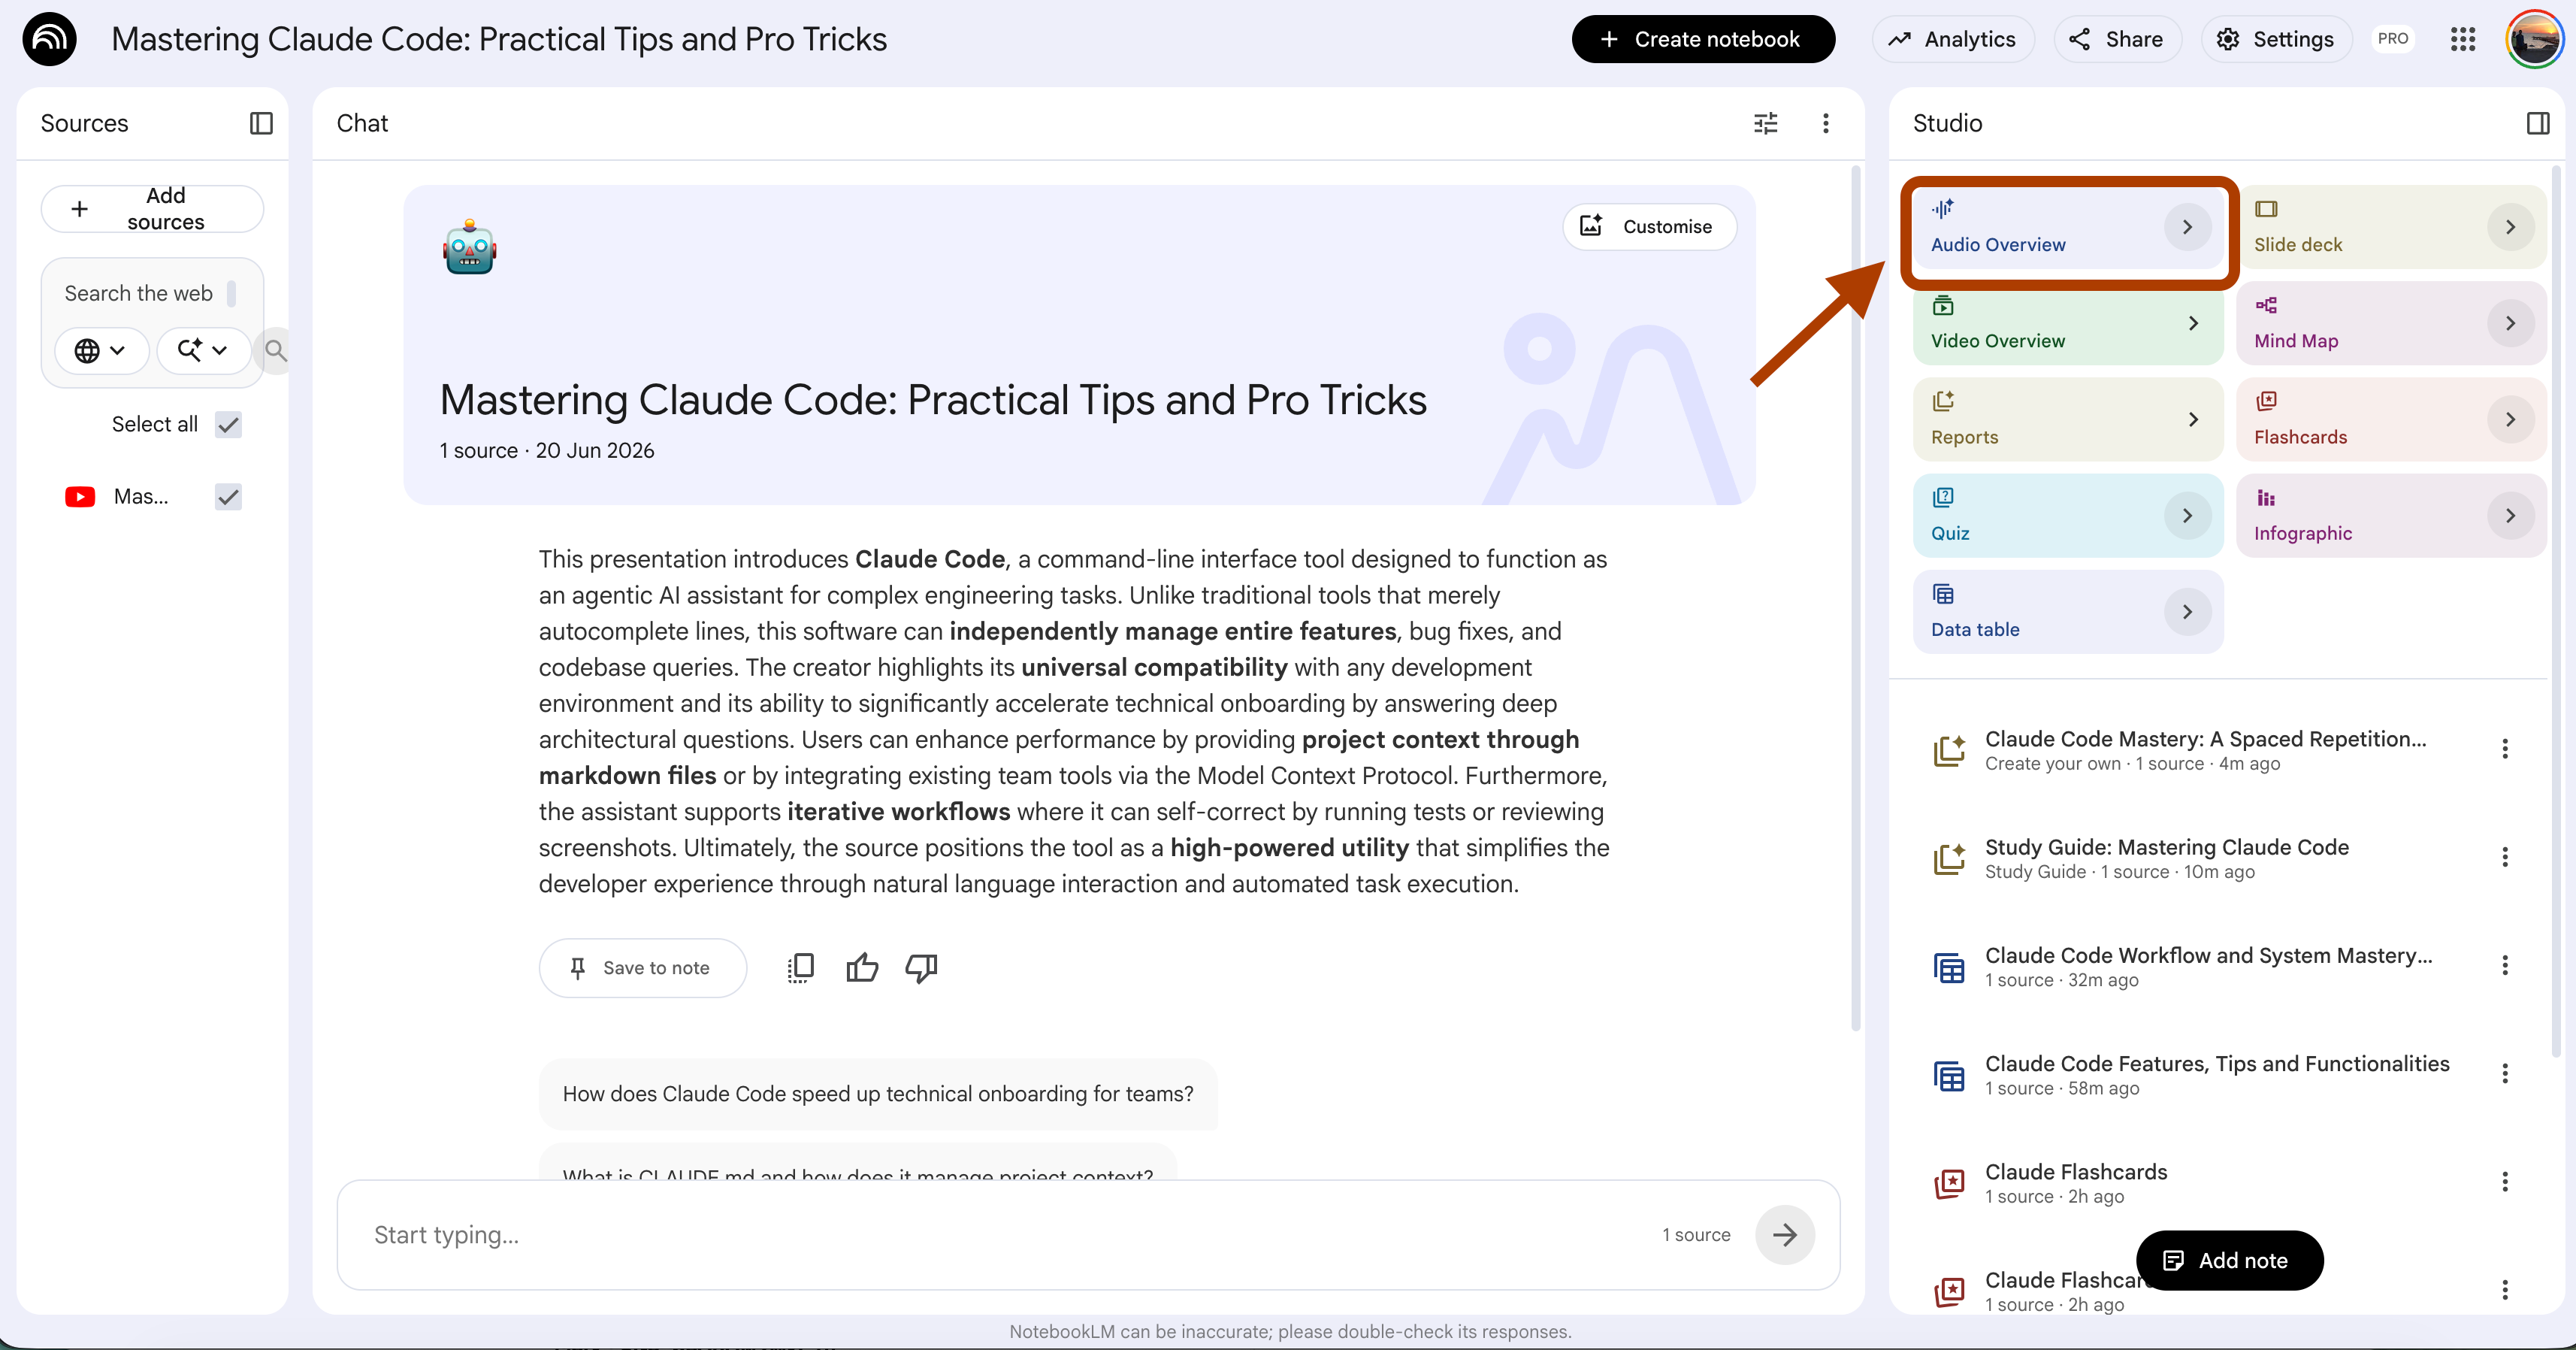
NotebookLM turns your sources into a short narrated recap, and you can play it on the walk to class or while you make coffee.
This is good when you want to keep a topic warm without opening the book.
But by default, the hosts cover the whole source evenly, so they spend just as long on the parts you already know cold as on the parts that scare you.
You end up half-listening to a recap of things you nailed last week, and the one topic you actually keep failing slides by in fifteen seconds. The recap should do the opposite. It should park itself on your weak spots and barely mention the rest.
So you feed the hosts the exact topics you got wrong, and the audio turns into a private recap of your gaps.
(Select Audio Overview at the studio, and write your focus in the customize box.)

Use this prompt.
Customize the {weak spots} with the ones the quiz flagged.
From my sources on {weak spots}, build me today's recall set for {date}.
Pick five items I most likely studied a few days ago and would be starting to forget now.
For each one, ask a question that makes me retrieve the answer before I see it,
and put all five answers together at the end so I cannot peek early.
Here is the audio overview generated.
Now each morning gives you five questions pulled from what you studied earlier in the week, and you answer them cold before you check. Ten minutes, and the old material gets dragged back up right as it is slipping, which is the whole point of spacing.
When to use which?
Audio Overview feature → Passive review on a commute, when you just want the topic playing in the background.
Custom prompt → If you know your weak spots and want to fix them, use it.
Interleaving (mix the topics up)
Studying one topic all the way to the end before you touch the next one feels clean and organized. The trouble is that the exam does not arrive one topic at a time, so mixing them while you study forces you to figure out which method even applies before you use it, and that choice is half of what the test is really checking.
Prompt 6: The Mixed Problem Set That Mimics the Real Exam (Interleaving)
You drill chapter four until every problem clicks, and by the end you feel sharp.
Then the exam puts a chapter four question between one from chapter two and one from chapter six, with no labels, and suddenly you cannot tell which method the question even wants.
You practiced solving the problems. You never practiced spotting which problem you were looking at.
The 1-click way: Quiz feature
Open your notebook, and in the Studio panel, click Quiz.
You know the output; we already did this before.

Here is what it looks like.
This is good when you are drilling one topic you just learned and want to see if it stuck.
But by default the quiz keeps the questions grouped, so you get ten in a row on the same idea, and the topic itself already tells you which method to use, so you never have to choose.
That is the easy version, and it hides the skill the exam actually tests.
The real test mixes everything together and tells you nothing, so the first thing you have to do is work out what kind of question you are even staring at.
So you want the questions shuffled across topics, with the labels stripped off.
(Select Quiz at the studio, click on > right next to it.)
Use this prompt.
Build a mixed problem set from my sources on {subject}.
Pull questions from at least four different topics, and shuffle them so no two questions in a row
come from the same topic.
Do not tell me which topic each question belongs to, so I have to work out which concept applies
before I solve it.
Put an answer key at the end that reveals the topic and the solution for each one.
Here is what it generates.
They look similar, but they are not.
A grouped quiz never makes you pick. Ten questions come from the same topic, so the method is already decided before you read a word, and you just apply it. A mixed quiz takes that away.
Each question could be anything, so first you have to figure out which approach it needs, and only then can you solve it. That first step, picking the right method for a question nobody labeled, is the one the real exam grades.
When to use which?
Quiz feature → Drilling a single topic you just learned, when you want a quick check on that one thing.
Custom prompt → The final week, when the real exam will mix everything together, and you need to practice telling the questions apart.
Prompt 7: The Drill That Stops You Mixing Up Two Concepts (Interleaving)
Two terms sit close together in your notes, and you know both definitions cold.
Then the exam describes one of them in a sentence and asks which it is, and you pick the wrong one.
You never studied them side by side, so you learned each on its own and they blurred into each other the moment they showed up together.
The 1-click way: Flashcards feature
Open your notebook, and in the Studio panel, click Flashcards.
We already did this before.
This is good when you are meeting the concepts for the first time and just need to learn each one.
But one concept per card is exactly what leaves you mixing them up later.
The card teaches each idea alone, in its own clean little box, and it never once puts the two lookalikes next to each other.
So you walk in knowing both definitions and still lose points, because the thing you were never tested on is the difference between them. The cards that actually help are the ones that force you to choose.
So you build cards that put two similar concepts together and make you say which one fits.
(Select Flashcards at the studio, click on > right next to it.)
Use this prompt.
Customize the {subject}

Here is what it looks like.
Look through my sources on {subject} and find the pairs of concepts that are easiest to confuse with each other.
For each pair, make a card that gives me a short scenario or example on the front,
and asks which of the two concepts it is.
On the back, give the answer and one line on the tell that separates the two.
Cite the source for each card.
Let’s see the flashcards.
Now, each card drops you into a scenario and makes you choose between the two lookalikes, which is the exact moment you keep failing on the exam.
You stop reciting two clean definitions in isolation, and you start practicing the one thing that trips you, telling them apart when they show up together.
When to use which?
Flashcards feature → A first pass on new concepts, when you just need to learn what each one is.
Custom prompt → When two ideas keep blurring together and you lose points picking the wrong one.
Generation (produce it before you see it)
The strongest memory comes from making your brain reach for an answer it does not have yet, because the reach is what wires the answer in, and even a wrong guess leaves a hook the correct one can hang on later. This is the one thing a button cannot do for you, so two of the three prompts here drop the 1-click feature entirely.
Prompt 8: Guess Before You Read (Generation)
You open the explainer and let it walk you through the whole thing, and it all makes sense while you watch. Then you close the tab an hour later and almost none of it stays.
Watching is not the same as producing, because the answer never cost you anything, so your brain filed it as something it could always look up again.
The 1-click way: Video Overview feature
Open your notebook, and in the Studio panel, click Video Overview, then pick Explainer.

Here, you should also prompt it to generate new options. I only selected from the preselected ones.

NotebookLM turns your sources into a narrated video that walks through the topic with visuals, like a short lecture built from your own material.
This is good when you are seeing a new topic for the first time and want the shape of it before you go deep.
But by default, the video just tells you everything in order, so you sit there nodding while it does all the thinking out loud. Nothing asks you to come up with anything, and the answer you never reached for is the answer you forget first.
The fix is to make the video pose the question first and tell you to pause and answer before it moves on, so the guessing happens in the gap you create.
You steer that from the same panel, in the box that asks what the hosts should focus on.
(Select Video Overview at the studio, open Explainer, select the whiteboard, and write this in the focus box.)
Here is the prompt.
Make this an explainer on {topic} that turns me into a participant.
Before each new idea, have the narrator pose a question about it and tell me out loud
to pause the video and answer in my head before continuing.
After that, give the answer and explain why it is right.
Move through the key points this way, one question and one pause cue at a time, and use only my sources.
Here is what it looks like.

Now you commit to an answer before the source opens its mouth, and that single act of guessing does more for memory than three rewatches ever could. The misses are the most useful part, because once you guess wrong and see the right answer land, that correction sticks in a way a video never managed.
When to use which?
Video Overview feature → A first look at something new, when you just want the shape of the topic.
Custom prompt → Real encoding, when you want the topic to stay instead of making sense for a minute and then leaving.
Prompt 9: Teach It Back Until It Breaks (Generation)
You read the chapter, you understood every line, and you wrote clean notes. Then someone asks you to explain it out loud, and you freeze. The words are there, but they will not come out in order, and you realize that understanding a sentence while you read it is not the same as being able to produce it on your own.
The 1-click way: None
This is the first prompt with no feature behind it, and that is the whole point of it. A quiz checks whether you recognize the right answer from a list, but teaching is the opposite move.
You start from a blank space and build the explanation yourself, out loud, and then something pushes back on the parts you got fuzzy. No button does that, so you set it up in the Chat instead.
(Open the Chat, click Configure)

Next, customize it like this.

Use this prompt.
Customize the
{topic}and your{level}.
We are going to flip roles. You are the student, and I am the teacher explaining {topic} to you.
My level is {level}, so play a student just below that, curious and willing to ask why.
I will explain the topic in my own words first, and you will let me finish without interrupting.
Then ask me three questions, one about something I skipped or oversimplified, one that tests whether I understand why it works and not just what it is, and one harder one that pushes on an edge case or a link to another idea in my sources.
Check my answers only against my sources, and if I say something the sources do not support, tell me.
At the end, give me a score out of ten and name the one thing I should go back and study.
Now you have to build the explanation from nothing, in your own words, before anything helps you.
Let’s test it.
Paste this prompt to the chat.
Here is my explanation.
Claude Code is an agentic assistant that works across your whole codebase, so instead of
finishing one line at a time, it can build
a feature and fix bugs across several files on its own.
Here is the answer.
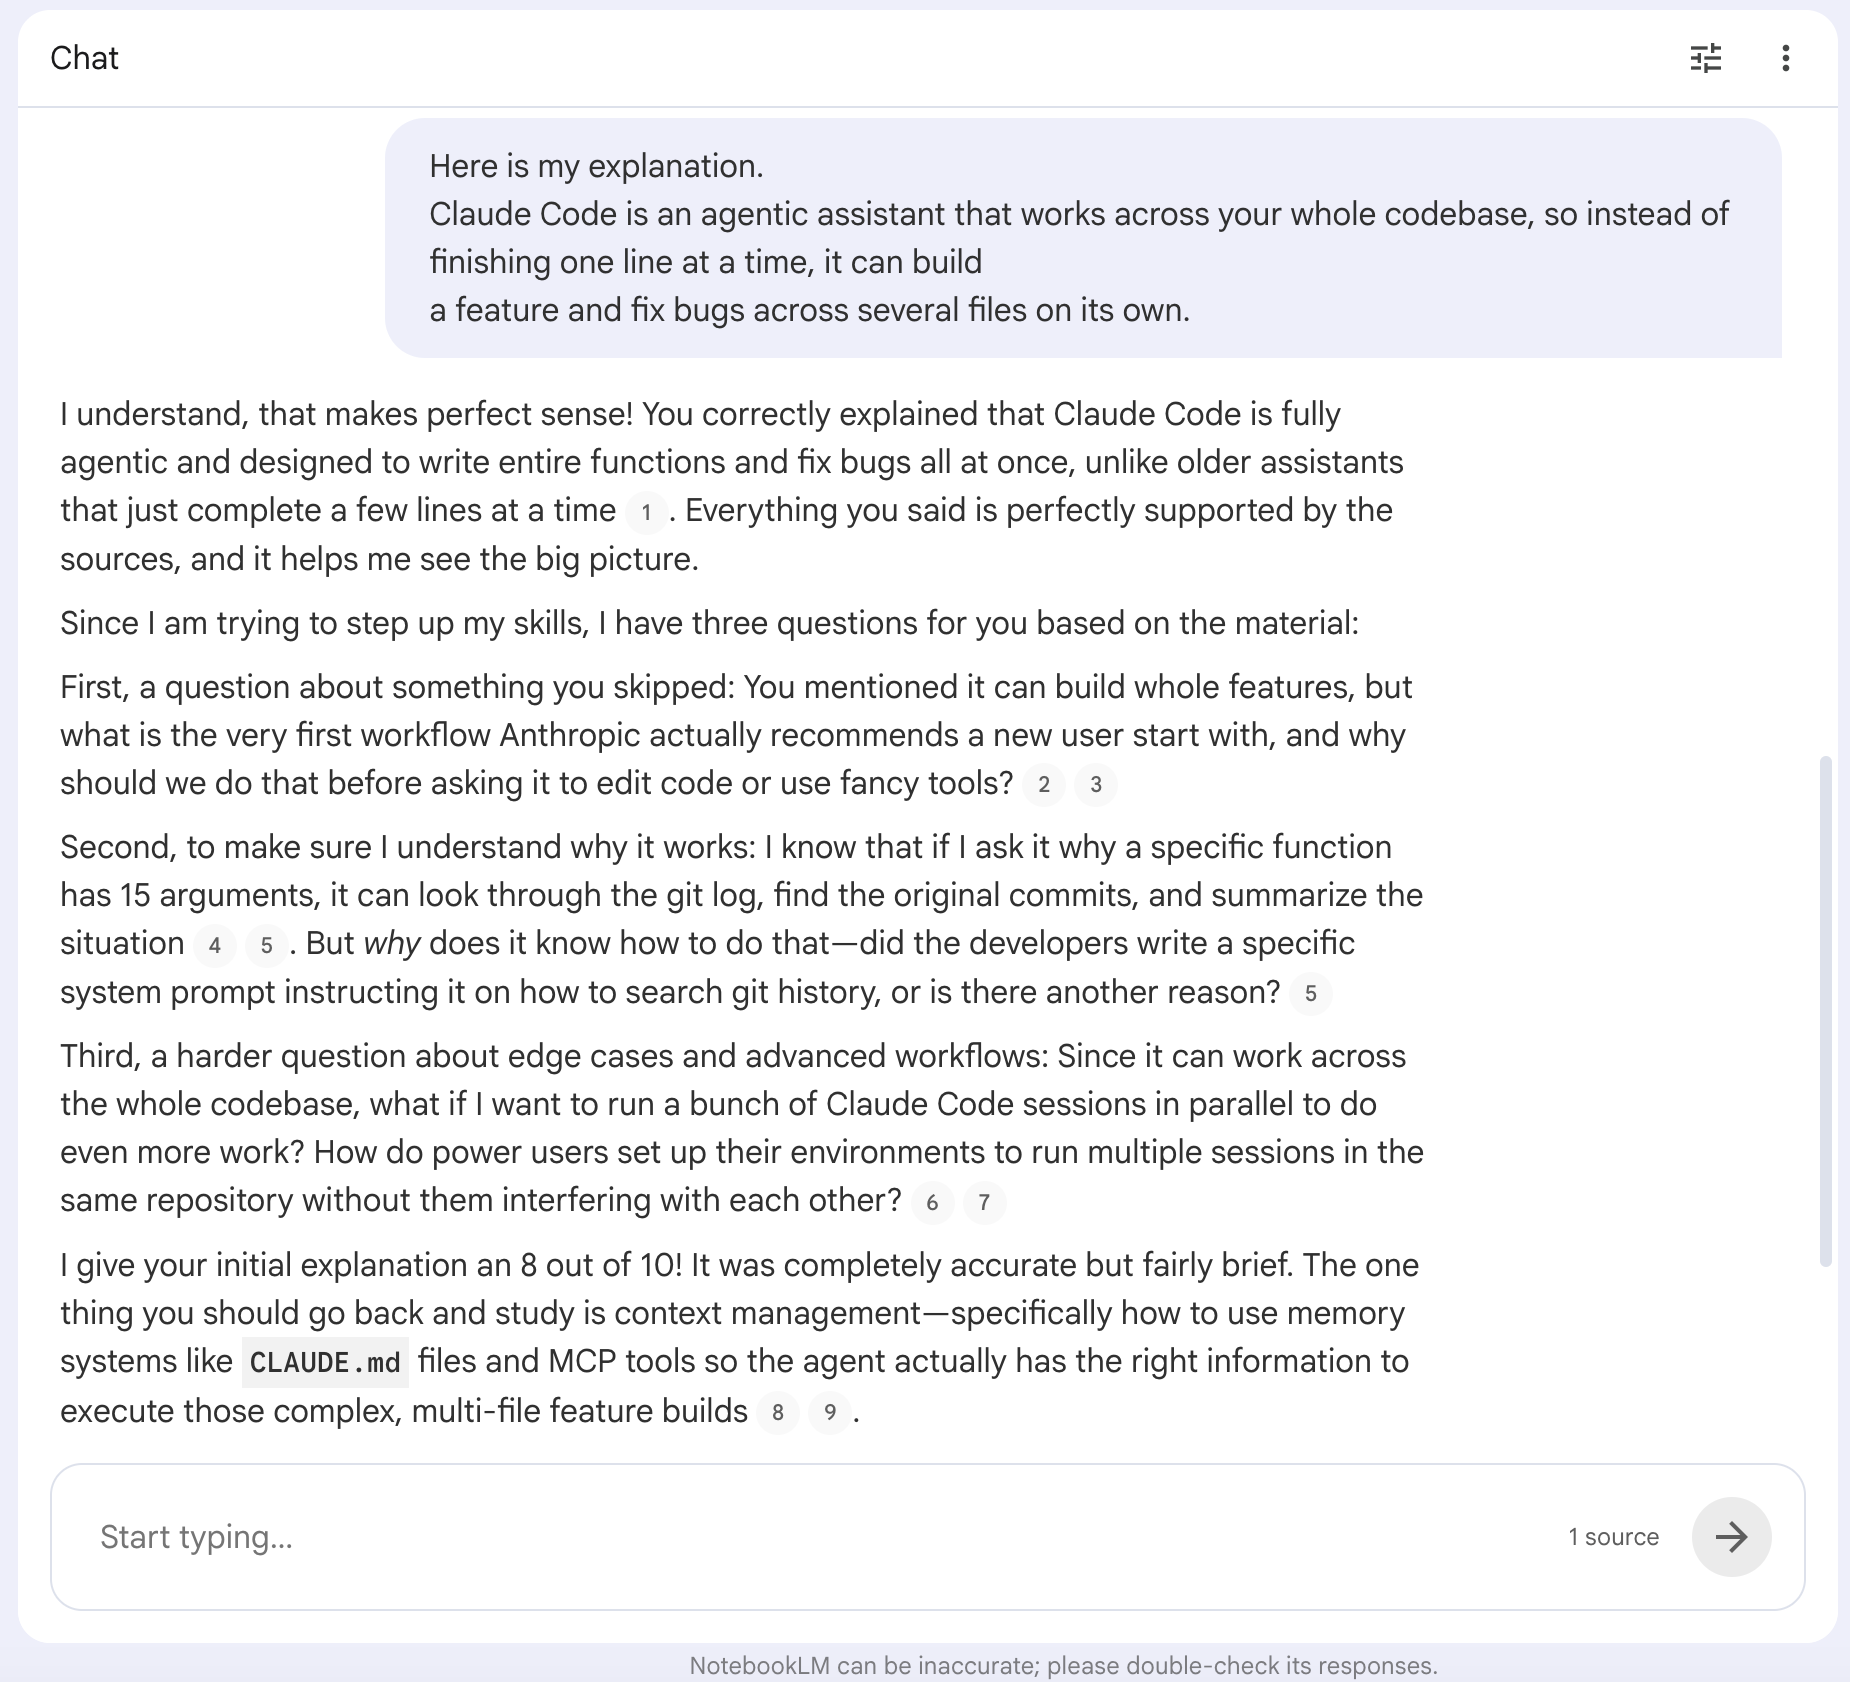
Look at what it did with two plain sentences. It let your explanation stand, confirmed the part you got right, and came back with three questions at three depths. The first caught what you skipped. The second pushed on the why, not that it reads a git log but how it knows to. The third went past the material into an edge case, running sessions in parallel without them colliding.
Then it scored you an 8 and named the one gap to fix, context management with memory files and MCP tools. That score and that single target are the whole point. You walked in feeling like you knew Claude Code, and you walked out knowing exactly where you did not.
When to use which?
Plain Chat → A quick answer, when you just want to look something up in your sources.
Custom prompt → Real understanding, when you need to produce the explanation yourself and find out where it breaks. Use it the day before an exam or a presentation, anywhere you have to say the thing out loud instead of pointing at it on a page.
Prompt 10: Build a Tutor That Makes You Do the Thinking (Generation)
You ask NotebookLM a question, it gives you a clean answer, and you close the tab. It works, but it feels like searching, not learning, because the answer arrives finished and you never had to reach for any of it. A real tutor never just hands it over. They ask you one back and make you find your way to it.
The 1-click way: plain Chat
The default Chat is a vending machine. A question goes in, an answer comes out, and nothing gets produced on your side. That is fine when you need a fact, but it is the weakest way to learn, because the work that builds memory is the work it does for you.
A tutor who asks before it tells is not a feature you click. It is a persona you write once, and then every answer for the rest of the notebook makes you generate instead of receive. You set it in the same Configure box as the teach-back, but this time it stays on for good.
(Open the Chat, click Configure, and paste it into the Custom box.)
Use this prompt.
Fill in {teacher_name}, the {traits}, and the {interest} your analogies should come from.
Act like {teacher_name}, the kind of tutor who makes me do the thinking.
{teacher_name} is {traits}, and explains everything with analogies drawn from {interest}.
When I ask a question, do not hand me the full answer.
Give me a push in the right direction, then ask me one question back that makes me take the next step myself.
Connect every new idea to something I already know, and when I drift or guess lazily, pull me back and make me try again.
Use only my sources for the content, but stay in character the whole time.
Here is what mine looks like.

Now every answer turns into a question you have to finish, so the notebook stops feeding you and starts pulling things out of you.
Set it once at the start of a subject and leave it on, and a month of normal questions quietly becomes a month of small reps, each one making you produce a little more than you came in with.
Let’s test it.
Here is my question for the Chat.
What is a CLAUDE.md file and why does it matter?Here is the output.

This is the difference in one screen. A plain Chat would define CLAUDE.md, drop a citation, and stop. The tutor gave you a frame you already know, the briefing note a director hands an actor, laid out what the file does, then turned the question around. If your frontend and backend folders need different commands, how does the memory system handle that without one bloated root file?
Now you have to answer, and that is the whole point. You are not reading about CLAUDE.md anymore; you are working out how it scales in your own head before anyone tells you. Leave the persona on for the subject, and every question you ask turns into one you have to help answer.
When to use which?
Plain Chat → A quick fact, when you just need to look something up and move on.
Custom prompt → A whole subject, when you want every question you ask to teach you something instead of just answering you.
What’s next?
You just turned NotebookLM into something that makes learning stick.
That is the whole job for learning, but it is only half of what the tool can do.
The four reach all points the same way. They work because you produce instead of consuming. And the biggest version of producing is not answering a question, it is building something with what you learned.
That is where NotebookLM stops being a study tool and starts being an engine. Once you connect it to Gemini, your notebook stops answering you and starts running as an app you made.
If those made you think you could ship a real product from a notebook, you are right, and that is where Claude Code comes in.
It is the tool I use every day, for client work and for my own apps.
Most people miss that you can run Claude Code for free, using Ollama connection with an alteration, and I wrote the full setup here.
If you like building with AI, creating new things, I’ve started a series, named Build-it in may and we’ve built 17 systems so far.
The latest post of “Build it” was using NotebookLM, through CLI, inside Claude Code. I use NotebookLM a lot with Claude Code because, due to its implementation, it does not hallucinate much. I also have safeguards in place.
So if you want to do more than just learn, start building with AI and take advantage of it. Join our community. We’re growing fast, and one day, everyone will understand the importance of creating instead of consuming.