
10 NotebookLM Prompts To Learn AI From Zero (Beat 99%)
AI is not a topic. It is a stack. Ten NotebookLM prompts for learning AI from zero, ordered by dependency. Tested on Anthropic's prompt engineering video.

Most people start learning AI by typing what is AI into ChatGPT.
Six months later they are still on YouTube, scrolling tutorials.
They know what RAG stands for but they cannot build anything.
AI is more than a topic. It is a stack of concepts built on top of each other.
This is the point where most beginners get stuck.
NotebookLM gives them a way through.
You upload the sources. You prompt it the right way. It becomes a tutor that meets you at zero.
So let’s discover the ten best notebookLM prompts for learning AI.
All tested on Anthropic’s “AI Prompt Engineering: A Deep Dive” YouTube video.
Copy-paste ready.
If you are starting from zero, these will replace half the apps in your learning stack.
10 NotebookLM Prompts for Learning AI
NotebookLM has 8 features.
Most beginners use one. Audio Overview. They click generate. They get a generic podcast.
They close the tab.
That is not learning. That is downloading.
Real learning happens when you customize.
The prompt box on every feature is where the work happens.
Type the right thing there, NotebookLM stops being a search engine and starts being a tutor.
Here is what we will cover.
Each prompt is paired with the NotebookLM feature that complements it.
Each one has a fill-in template.
Each one is tested on Anthropic’s “AI Prompt Engineering: A Deep Dive” youtube video.
Zero coding. Nothing to install. Everything happens inside NotebookLM.
Let’s go.
How to train NotebookLM?
Before starting, let me show you how I trained the notebookLM, using Anthropic’s “AI Prompt Engineering: A Deep Dive” YouTube video.
Steps: Copy the YT link - Visit NotebookLM - Click on Try - Click on Create New - Select websites- Paste the link
1. Onboarding Prompt That Explains AI Like You Are 10 Years Old
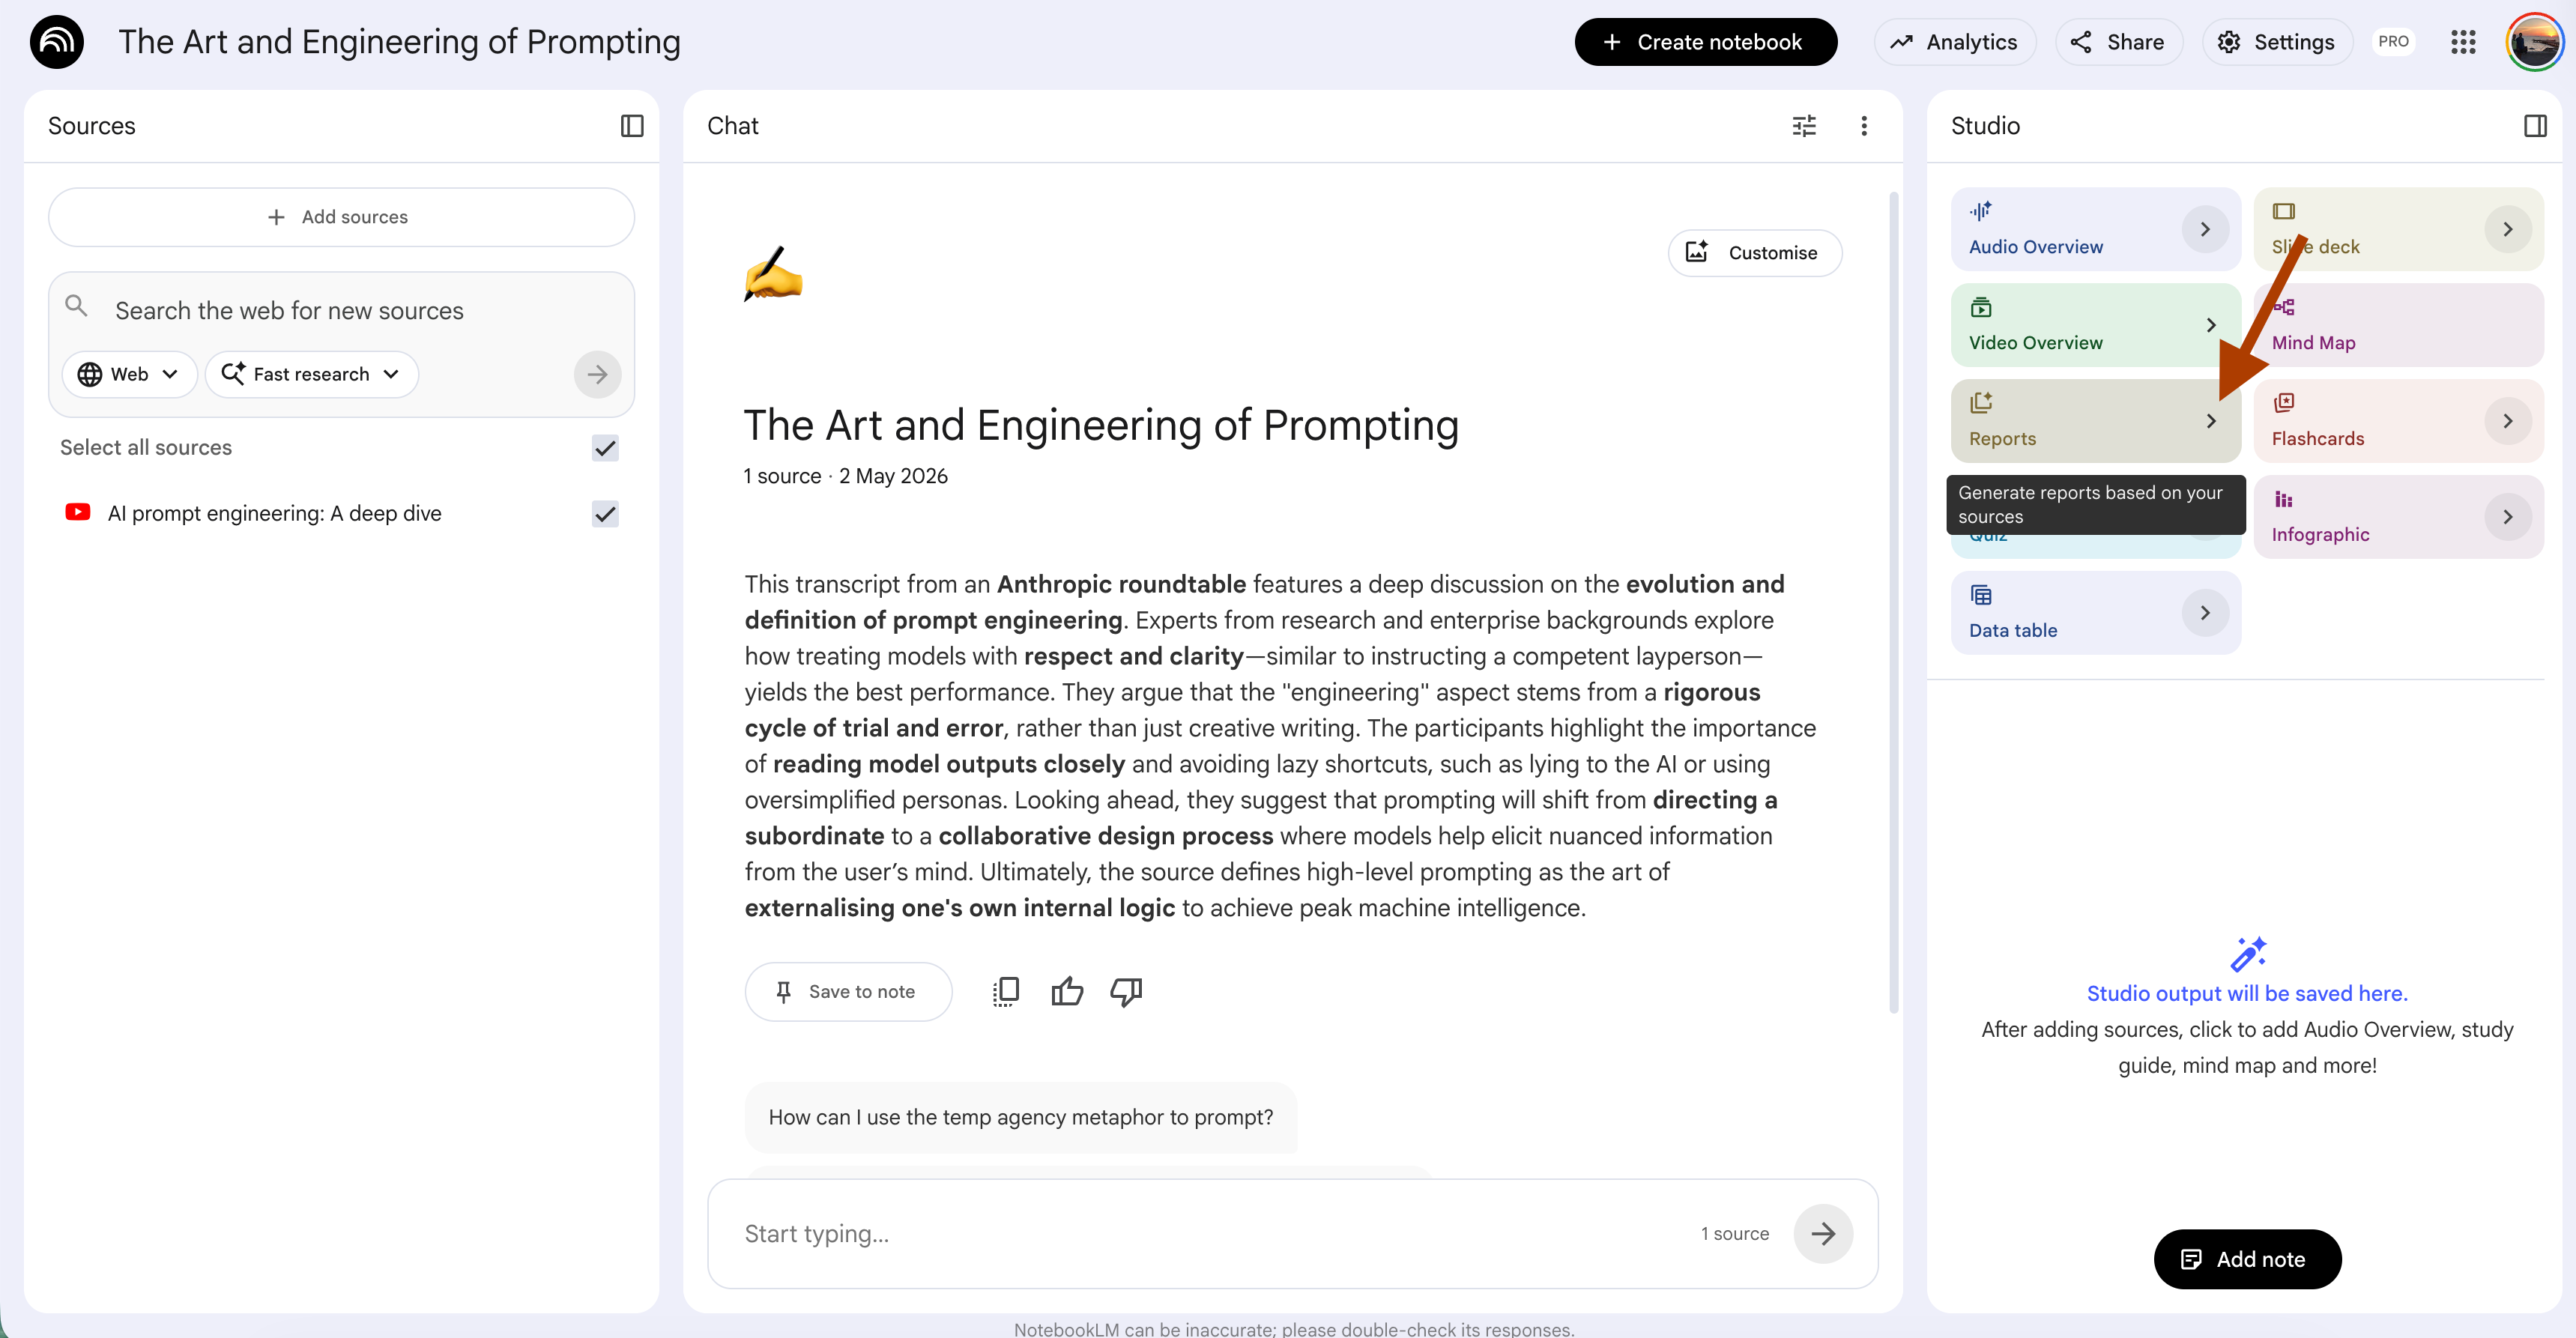
NotebookLM Feature: Report (Create your own)
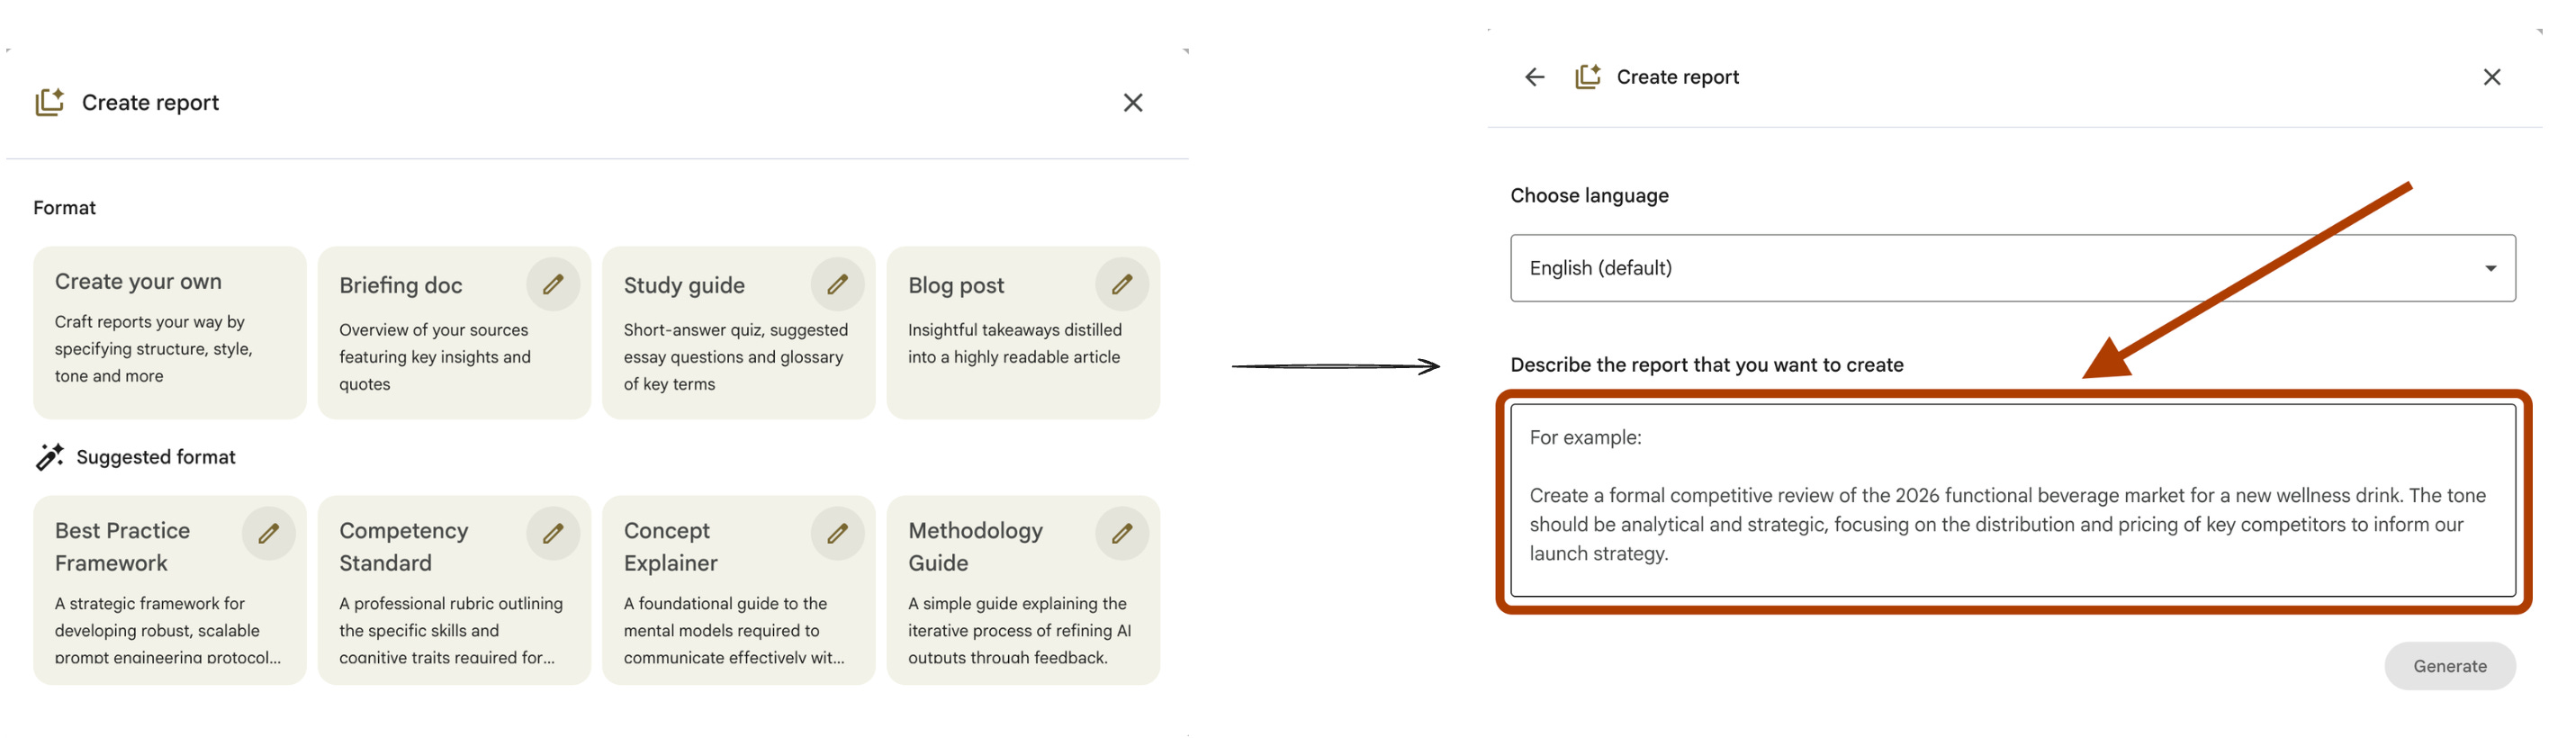
UI selections: Format → Create your own. Length → Default.
The first wall when you learn AI from zero is jargon.
RAG. Tokens. Embeddings. Fine-tuning. Chain of thought.
Most people ask ChatGPT “what is RAG”. They get a textbook definition.
Two hours later they still cannot explain it to a friend.
The problem is not the definition. The problem is the layer.
A 10-year-old explanation strips jargon. An adult explanation gives the working knowledge. A practitioner layer shows the trade-off. Three layers. One concept. Each earns its place.
This is one of the best NotebookLM prompts for learning AI because it forces the model to do the work most beginners skip.
Steps: Open your notebook → In Studio, click Reports → Choose “Create your own”.
For every key concept in the sources, write a three-layer explanation.

Layer 1. Explain it to a 10-year-old. One sentence. Use a real-world
analogy. Zero jargon. If a term needs another term to be understood,
break it down further.

Layer 2. Explain it to a curious adult learning AI from zero. Three to
four sentences. Define one technical term per concept, but only after the
analogy makes the idea click first.

Layer 3. Explain it to a junior engineer who needs to use it tomorrow.
What is the trade-off. When does it break. What does the documentation
forget to mention.

Order concepts by dependency, not by source order. Concepts that depend
on other concepts come after their dependencies. Mark each concept with
the prerequisites needed to understand it.

If a source contradicts another source on a concept, flag it in Layer 3
and explain which definition is more current.
I tested this on the Anthropic notebook. Here is one concept it produced.
Three layers. One concept. One pass.
If the Layer 1 analogy does not click, the model did not understand the concept either. Re-prompt with a source quote.
Run this once on a new notebook, and you get a complete glossary, ordered by dependency, ready to study.
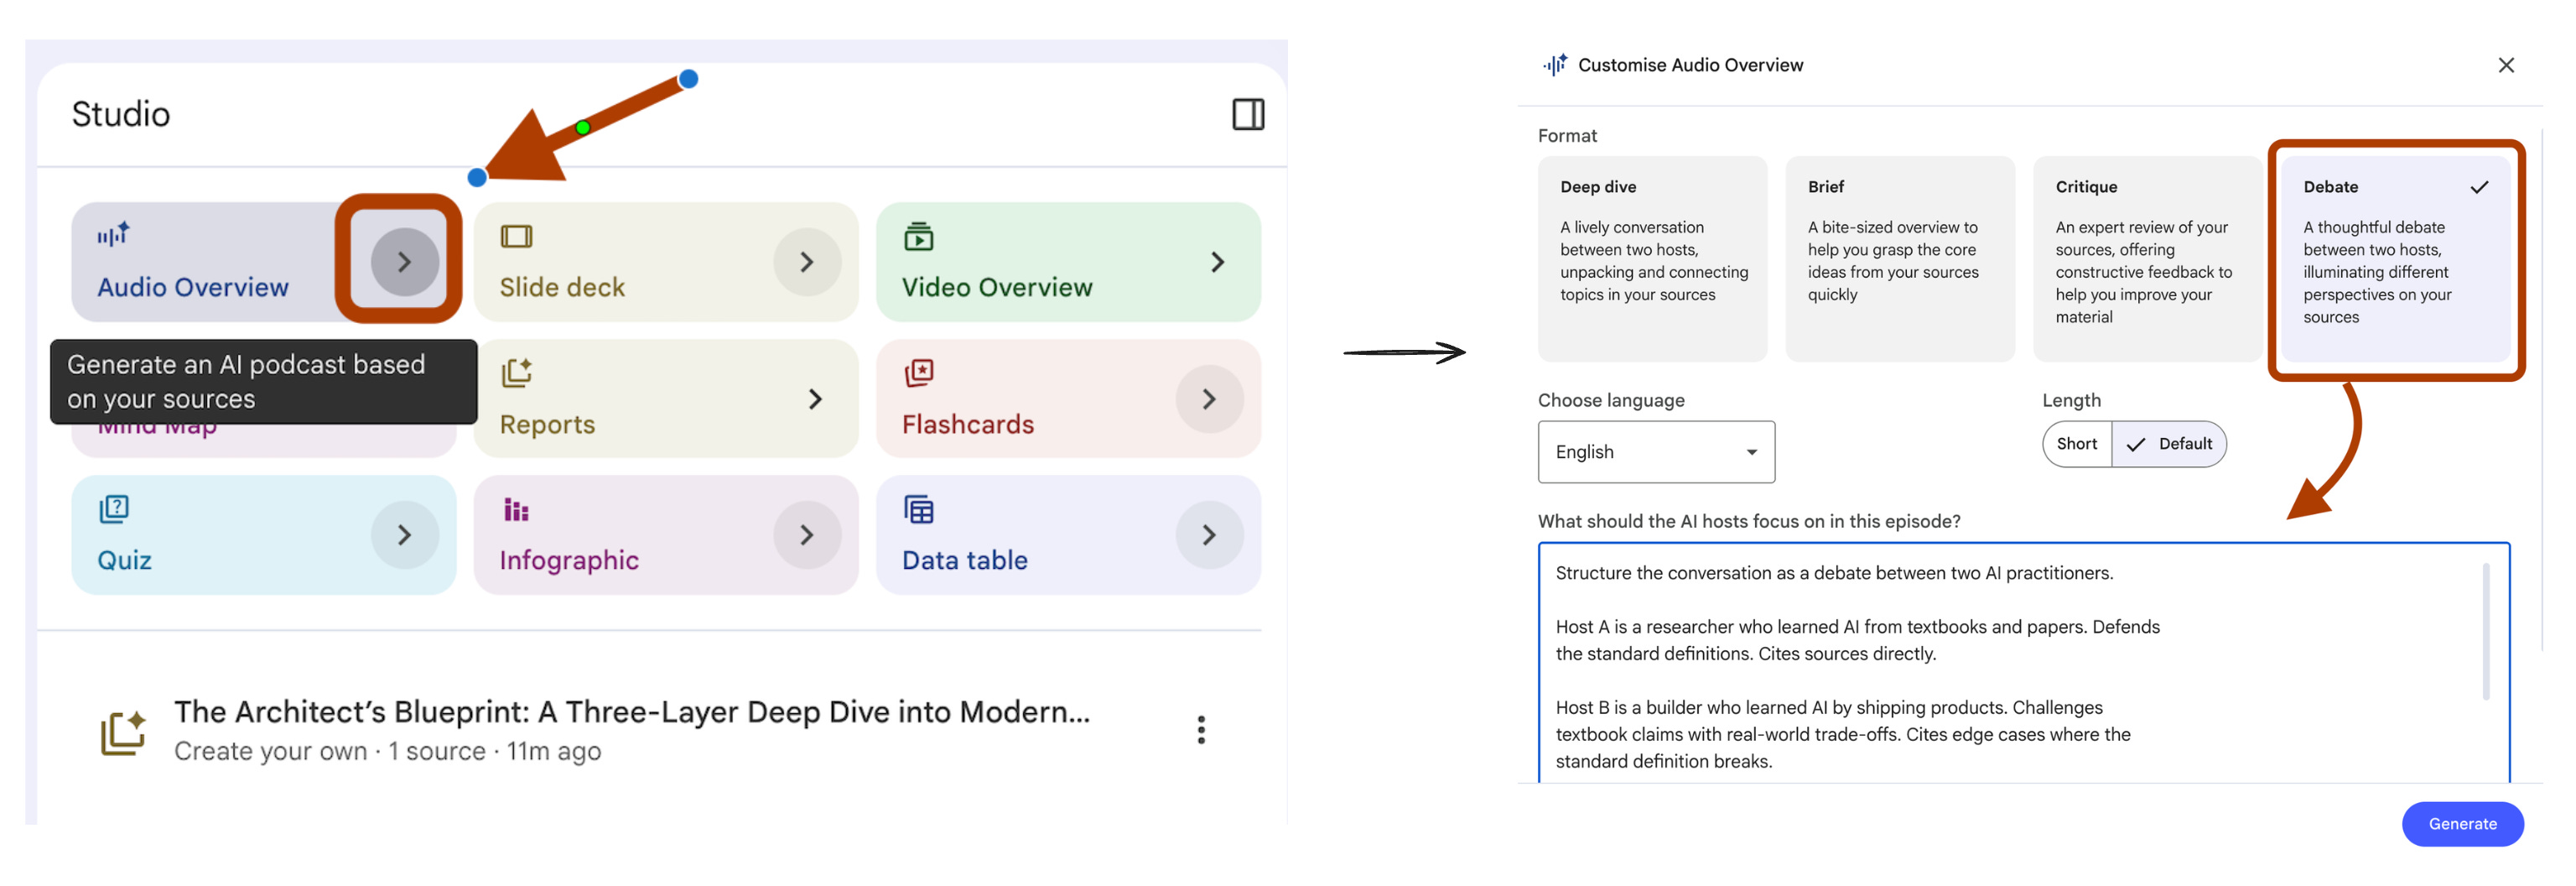
2. Audio Overview That Debates Two AI Experts on the Same Topic
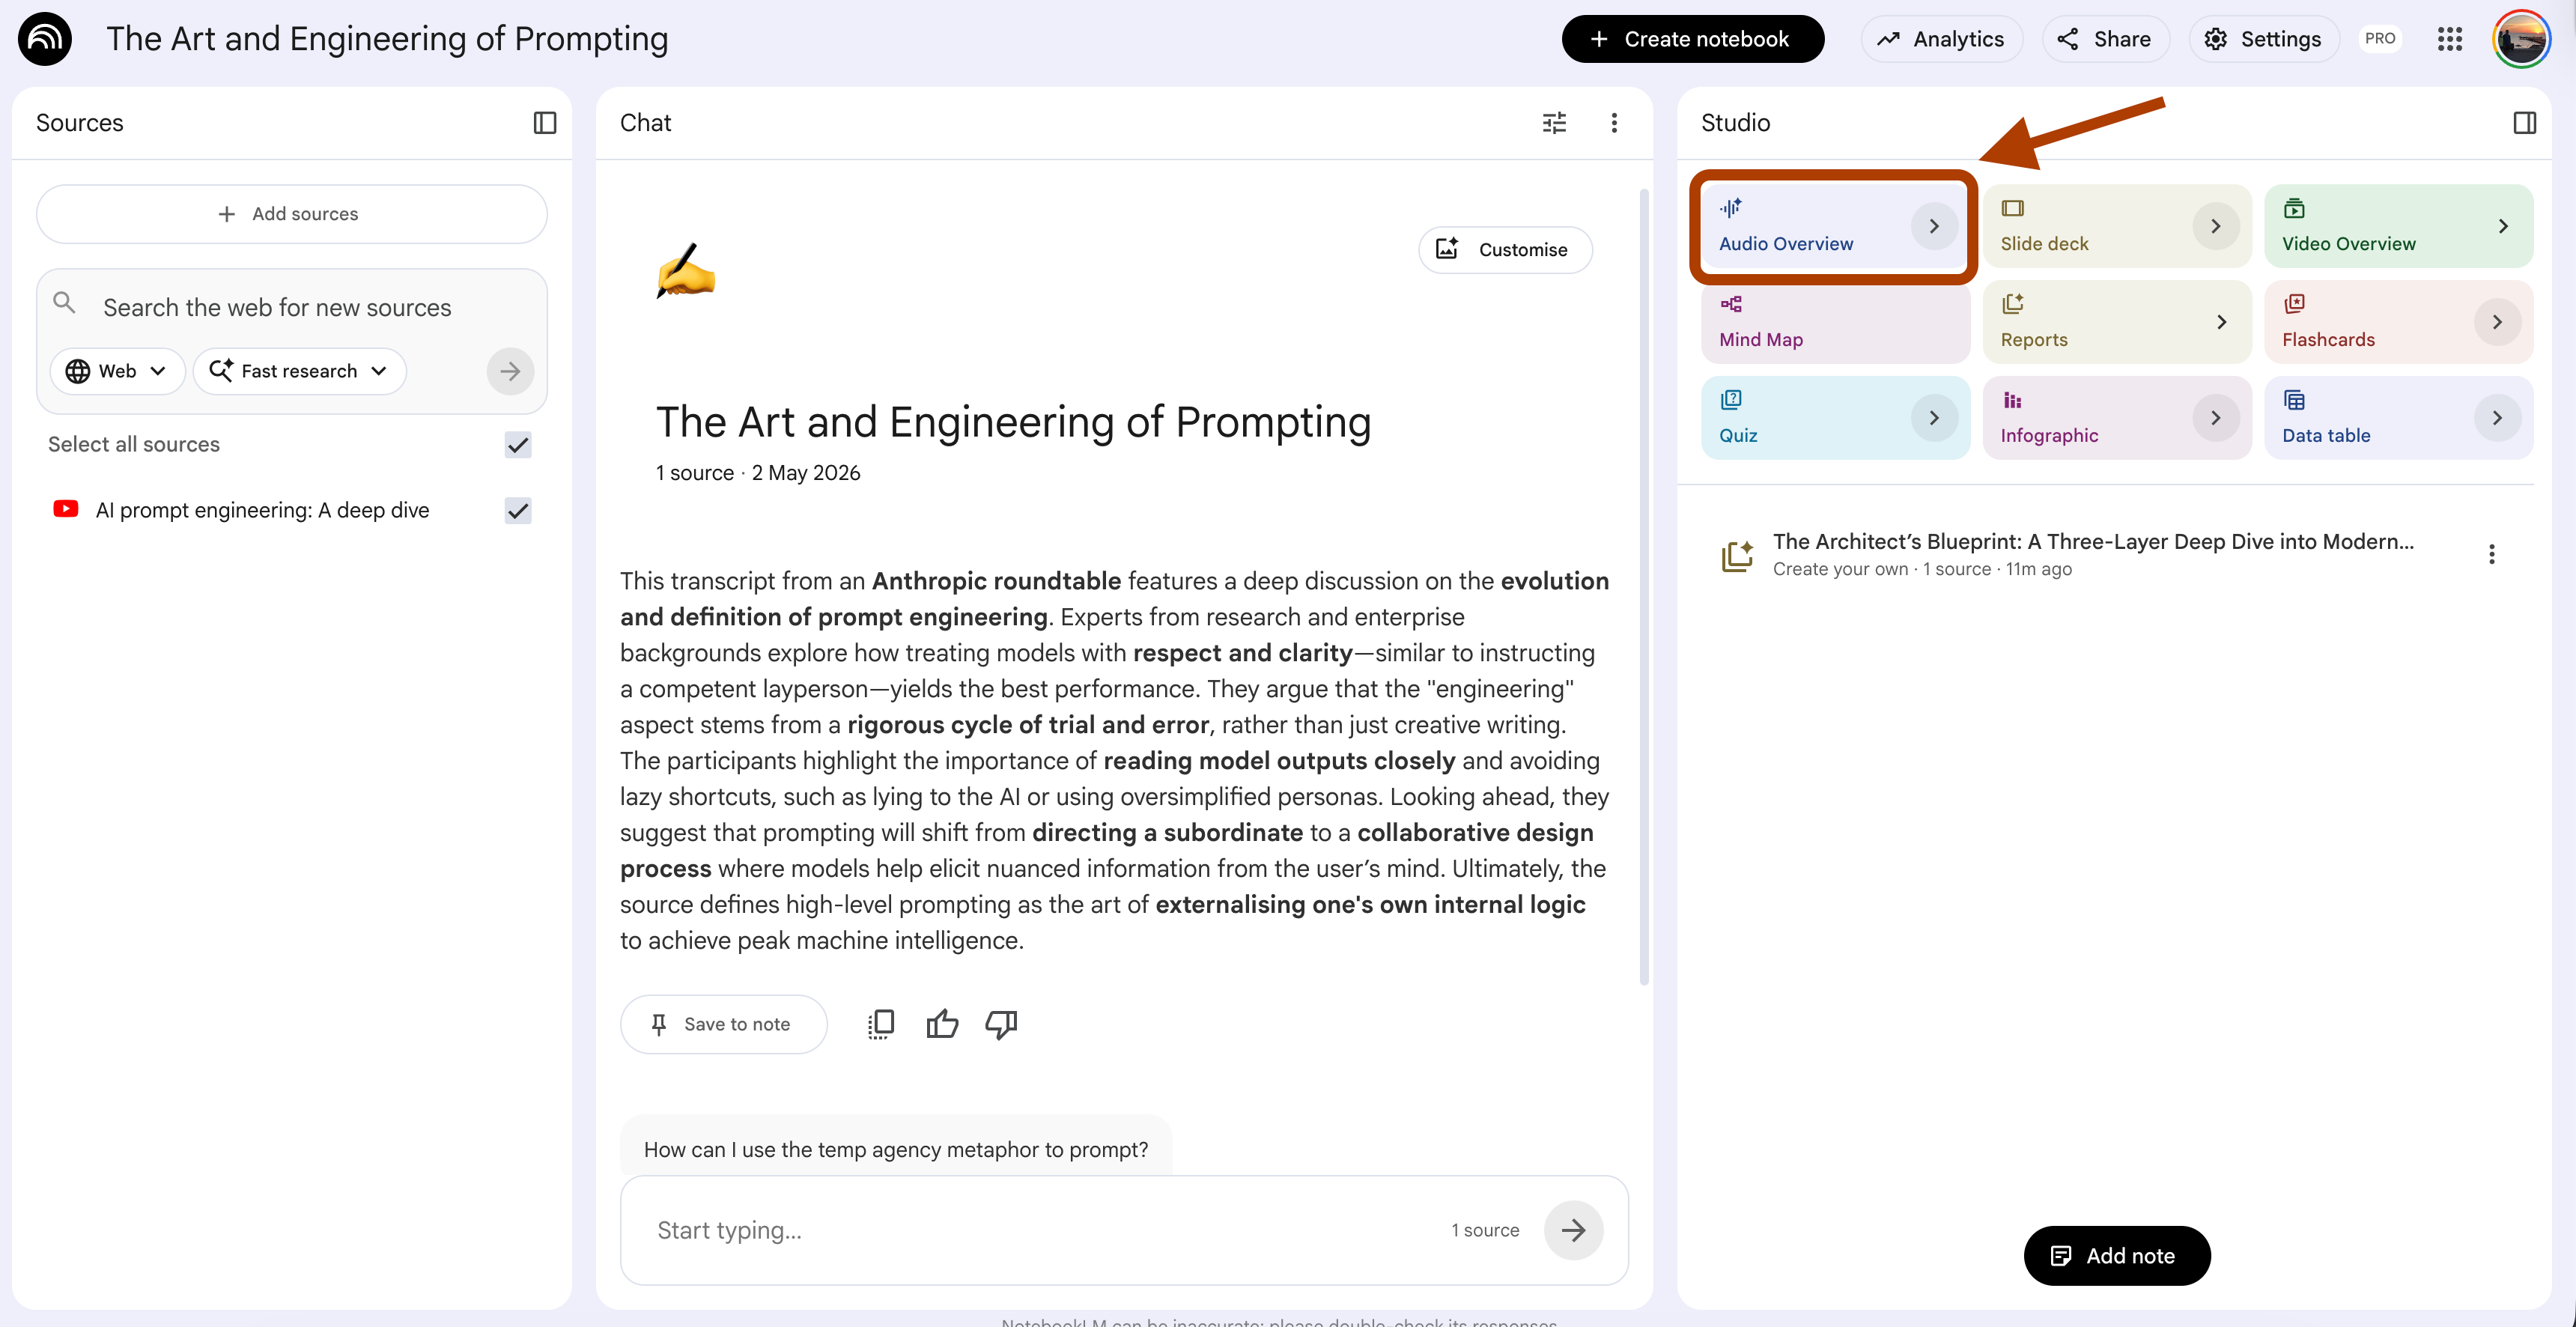
NotebookLM Feature: Audio Overview
UI selections: Format → Debate. Length → Default. Language → English.
The default Audio Overview gives you two hosts agreeing with each other for 15 minutes.
Calm voices. Clear summary. Zero friction.
That is the problem.
When you learn AI from zero, you need to hear where experts disagree.
RAG vs fine-tuning. Pretrained vs RLHF.
Prompt engineering vs prompt programming.
The disagreement is where the real understanding lives.
This prompt turns the Audio Overview into a structured debate.
One host defends the textbook view. The other host challenges it with the practitioner view.
You learn both sides in one listen.
Steps: Open your notebook → In Studio, click Audio Overview → Choose Debate format.
Structure the conversation as a debate between two AI practitioners.

Host A is a researcher who learned AI from textbooks and papers. Defends
the standard definitions. Cites sources directly.

Host B is a builder who learned AI by shipping products. Challenges
textbook claims with real-world trade-offs. Cites edge cases where the
standard definition breaks.

For every key concept in the sources, run this pattern. Host A defines
the concept in plain language. Host B agrees on the definition but
challenges one assumption. Host A defends with a citation. Host B counters
with a scenario where the definition fails.

End each concept with a one-sentence synthesis both hosts agree on.

Avoid generic agreement. If Host B has nothing to challenge, skip the
concept. Force tension on every topic that gets airtime.
I tested this on the Anthropic notebook. Here is what came out.
Two angles. One concept. Real tension.
The trick is the synthesis line. It forces the model to commit to a takeaway instead of leaving you with two opinions and no decision.
Listen to this on a walk.
By the end you understand the concept better than after reading three articles.
3. Mind Map Prompt That Builds the AI Stack From Zero to Advanced
NotebookLM Feature: Report (Create your own)
UI selections: Format → Create your own. Length → Default.
When you learn AI from zero, the biggest trap is order.
You watch a tutorial on RAG before you understand what an embedding is.
You read about fine-tuning before you know what pretraining did.
Each video assumes you already learned the prerequisite.
NotebookLM has a built-in Mind Map.
It shows hierarchy. It does not show dependency.
Hierarchy answers “what are the categories”.
Dependency answers “what do I learn first”.
For a beginner, the second question is the only one that matters.
This prompt builds a dependency-ordered learning path from your sources.
Steps: Open your notebook → In Studio, click Reports →Choose “Create your own”.
Build an AI learning stack from the sources. Order it by dependency, not
by topic.

Output structure.

Level 0 - Foundations. List concepts that depend on nothing else in the
sources. These are the entry points. One sentence per concept.

Level 1 - Built on foundations. List concepts that need exactly one
Level 0 concept to make sense. For each, name the prerequisite.

Level 2 - Composite. List concepts that combine two or more Level 1
concepts. For each, name both prerequisites and explain the combination
in one line.

Level 3 - Frontier. List concepts the sources mention but do not fully
explain. These are what to learn next, outside the current notebook.

For every concept, mark whether the sources teach it directly, mention
it in passing, or assume the reader already knows it. Flag the assumed
ones. Those are the gaps.

End with a recommended study order. Number each concept 1 through N.
I tested this on the Anthropic notebook. Here is the output.
Now you have a path. Not a list of topics. A path.
The “gaps” section is the most useful part. Those are the prerequisite concepts the sources skipped, which is why beginners feel lost halfway through any AI tutorial.
Run this once, and you stop watching tutorials in the wrong order.
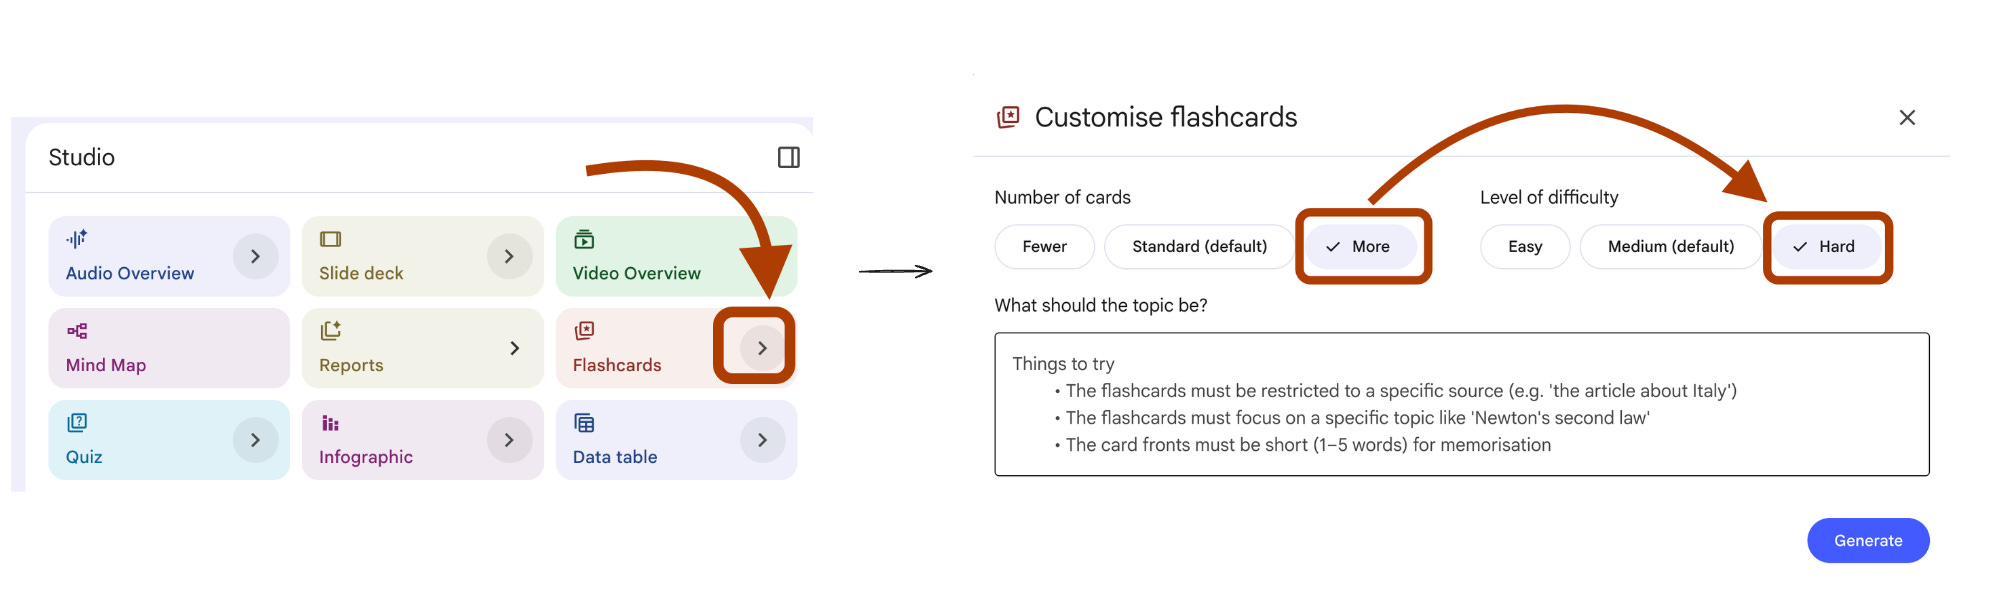
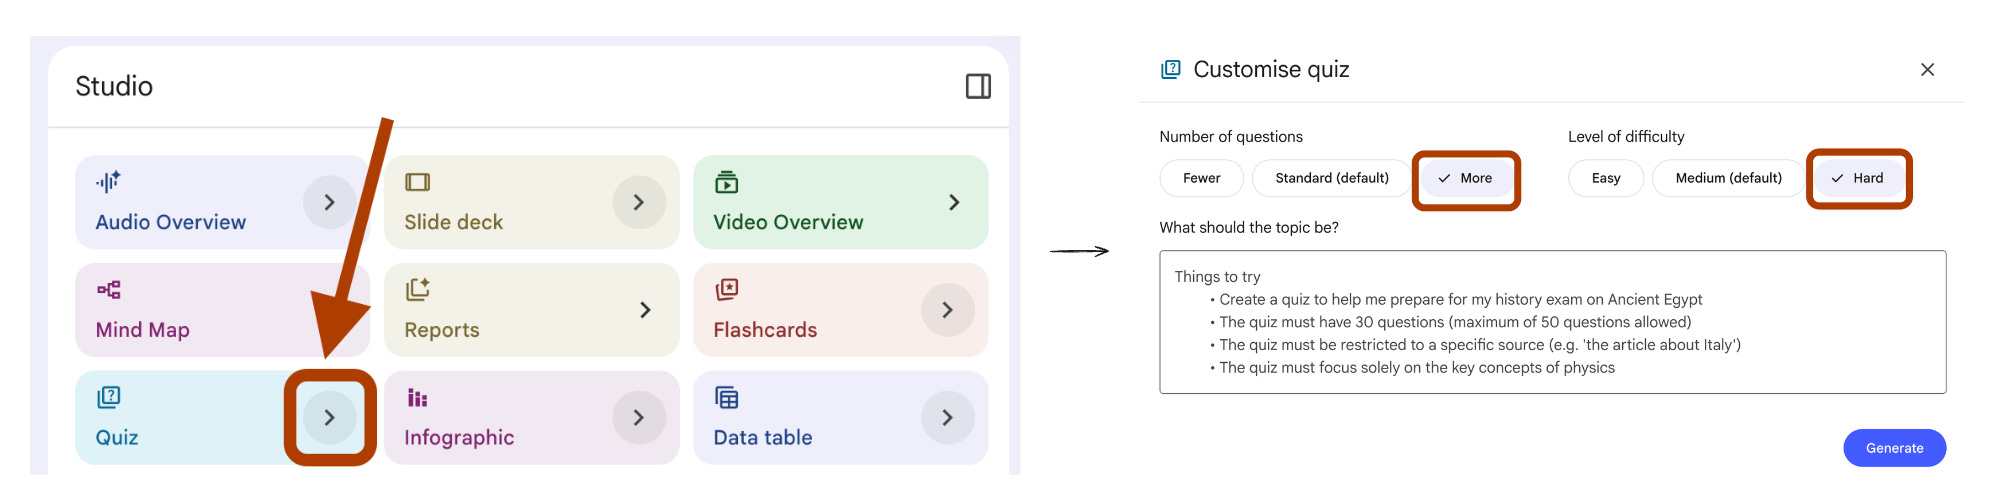
4. Flash Cards That Test Scenarios, Not Definitions
NotebookLM Feature: Flash Card
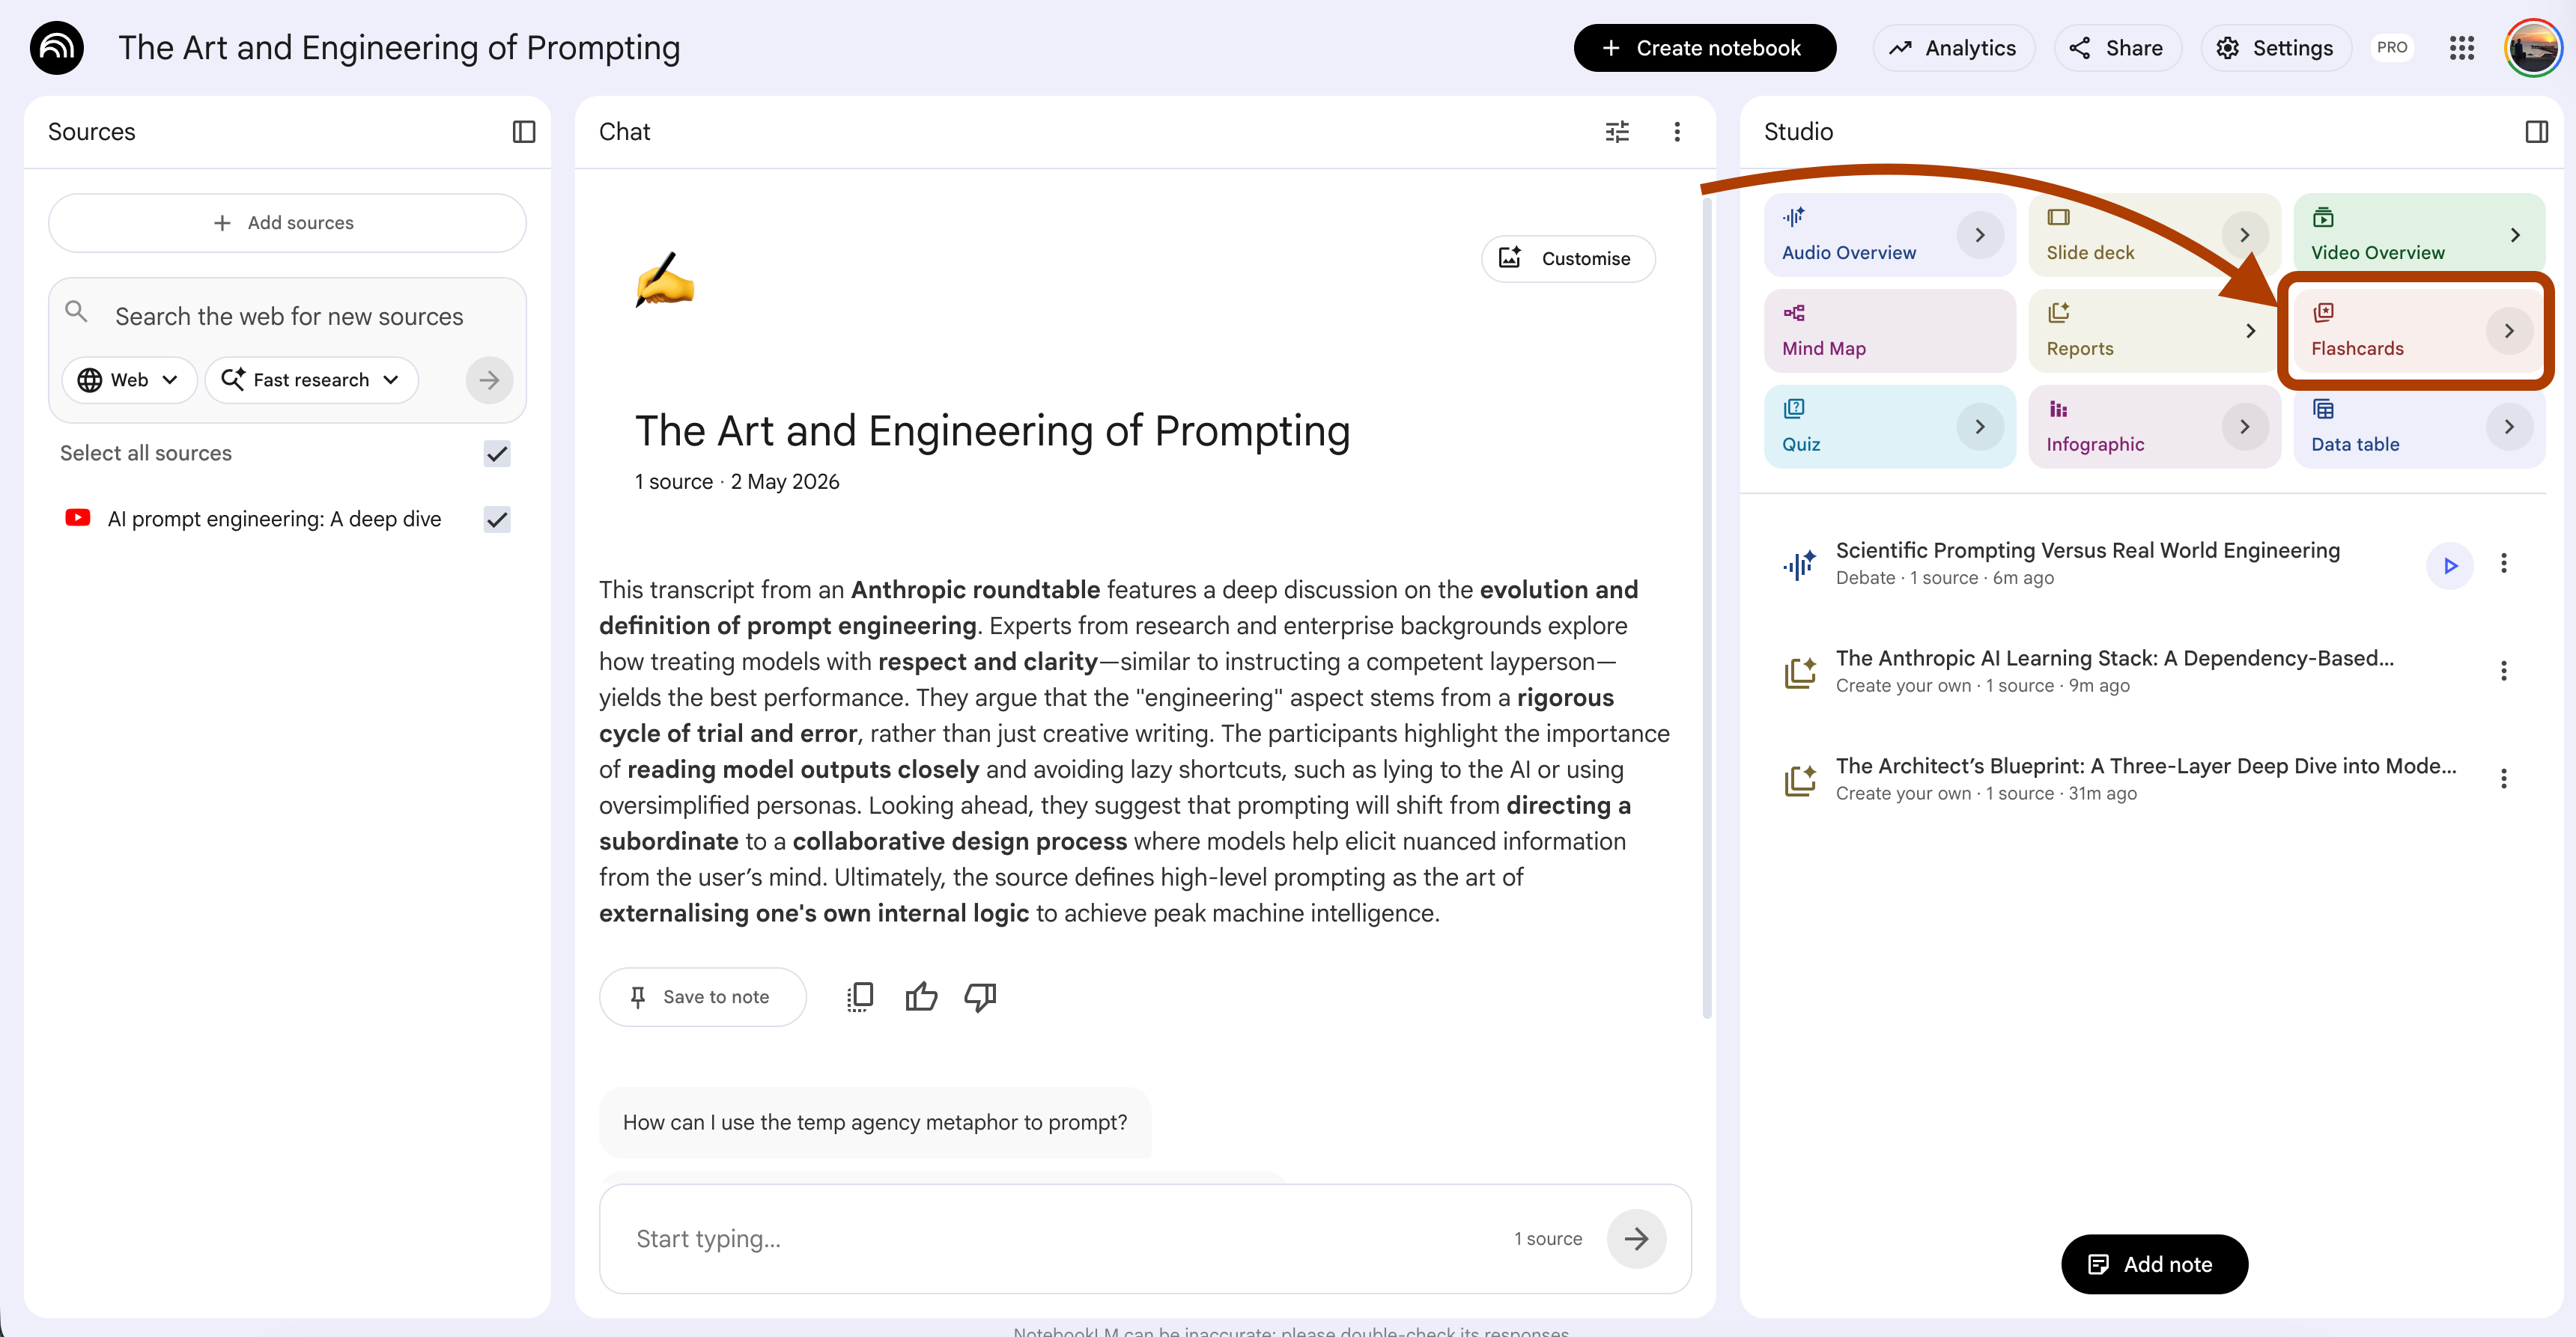
UI selections: Number → More. Difficulty → Hard.
NotebookLM’s default flash cards work like a textbook index.
Q: “What is RAG?”
A: “Retrieval-augmented generation.”
You memorize the answer. You still cannot use the concept.
This is the same trap Amanda Askell describes in the Anthropic prompt engineering roundtable. Real testing is not “can you recall the definition”. Real testing is “can you pick the right tool when the situation is messy”.
When you learn AI from zero, the gap between knowing a term and using it is where most beginners get stuck. Scenario cards close that gap.
Steps: Open your notebook → In Studio, click Flashcards.
Generate flash cards that test decision-making, not recall.

Each card has two parts.

Front. A specific scenario where the user must choose between two or
more concepts from the sources. Include realistic constraints. Token
limits, latency, dataset size, cost, accuracy requirements. Make the
choice non-obvious.

Back. The correct choice. A one-sentence reason grounded in the sources.
A note on what the wrong choice would cost in this scenario.

Cover these scenario types.

1. Tool selection. User wants outcome X. Pick between technique A and B.
2. Failure diagnosis. Output looks wrong. Pick the most likely cause
from two or three candidates.
3. Trade-off. Pick the option that fits the constraint, not the option
that sounds best in isolation.

Skip cards where the answer is in the question. Skip cards that test
vocabulary. If a concept only has a definition in the sources and no
applied example, do not card it.
I tested this on the Anthropic notebook. Here are the flashcards.
This card forces you to balance four constraints.
You cannot answer it by recalling a definition.
You answer it by reasoning about the scenario.
If you can answer 20 cards like this, you understand RAG.
If you can only answer “what does RAG stand for”, you do not.
Run this on every new notebook. Skip the default cards.
5. Quiz Prompt That Catches What You Almost Understood
NotebookLM Feature: Quiz
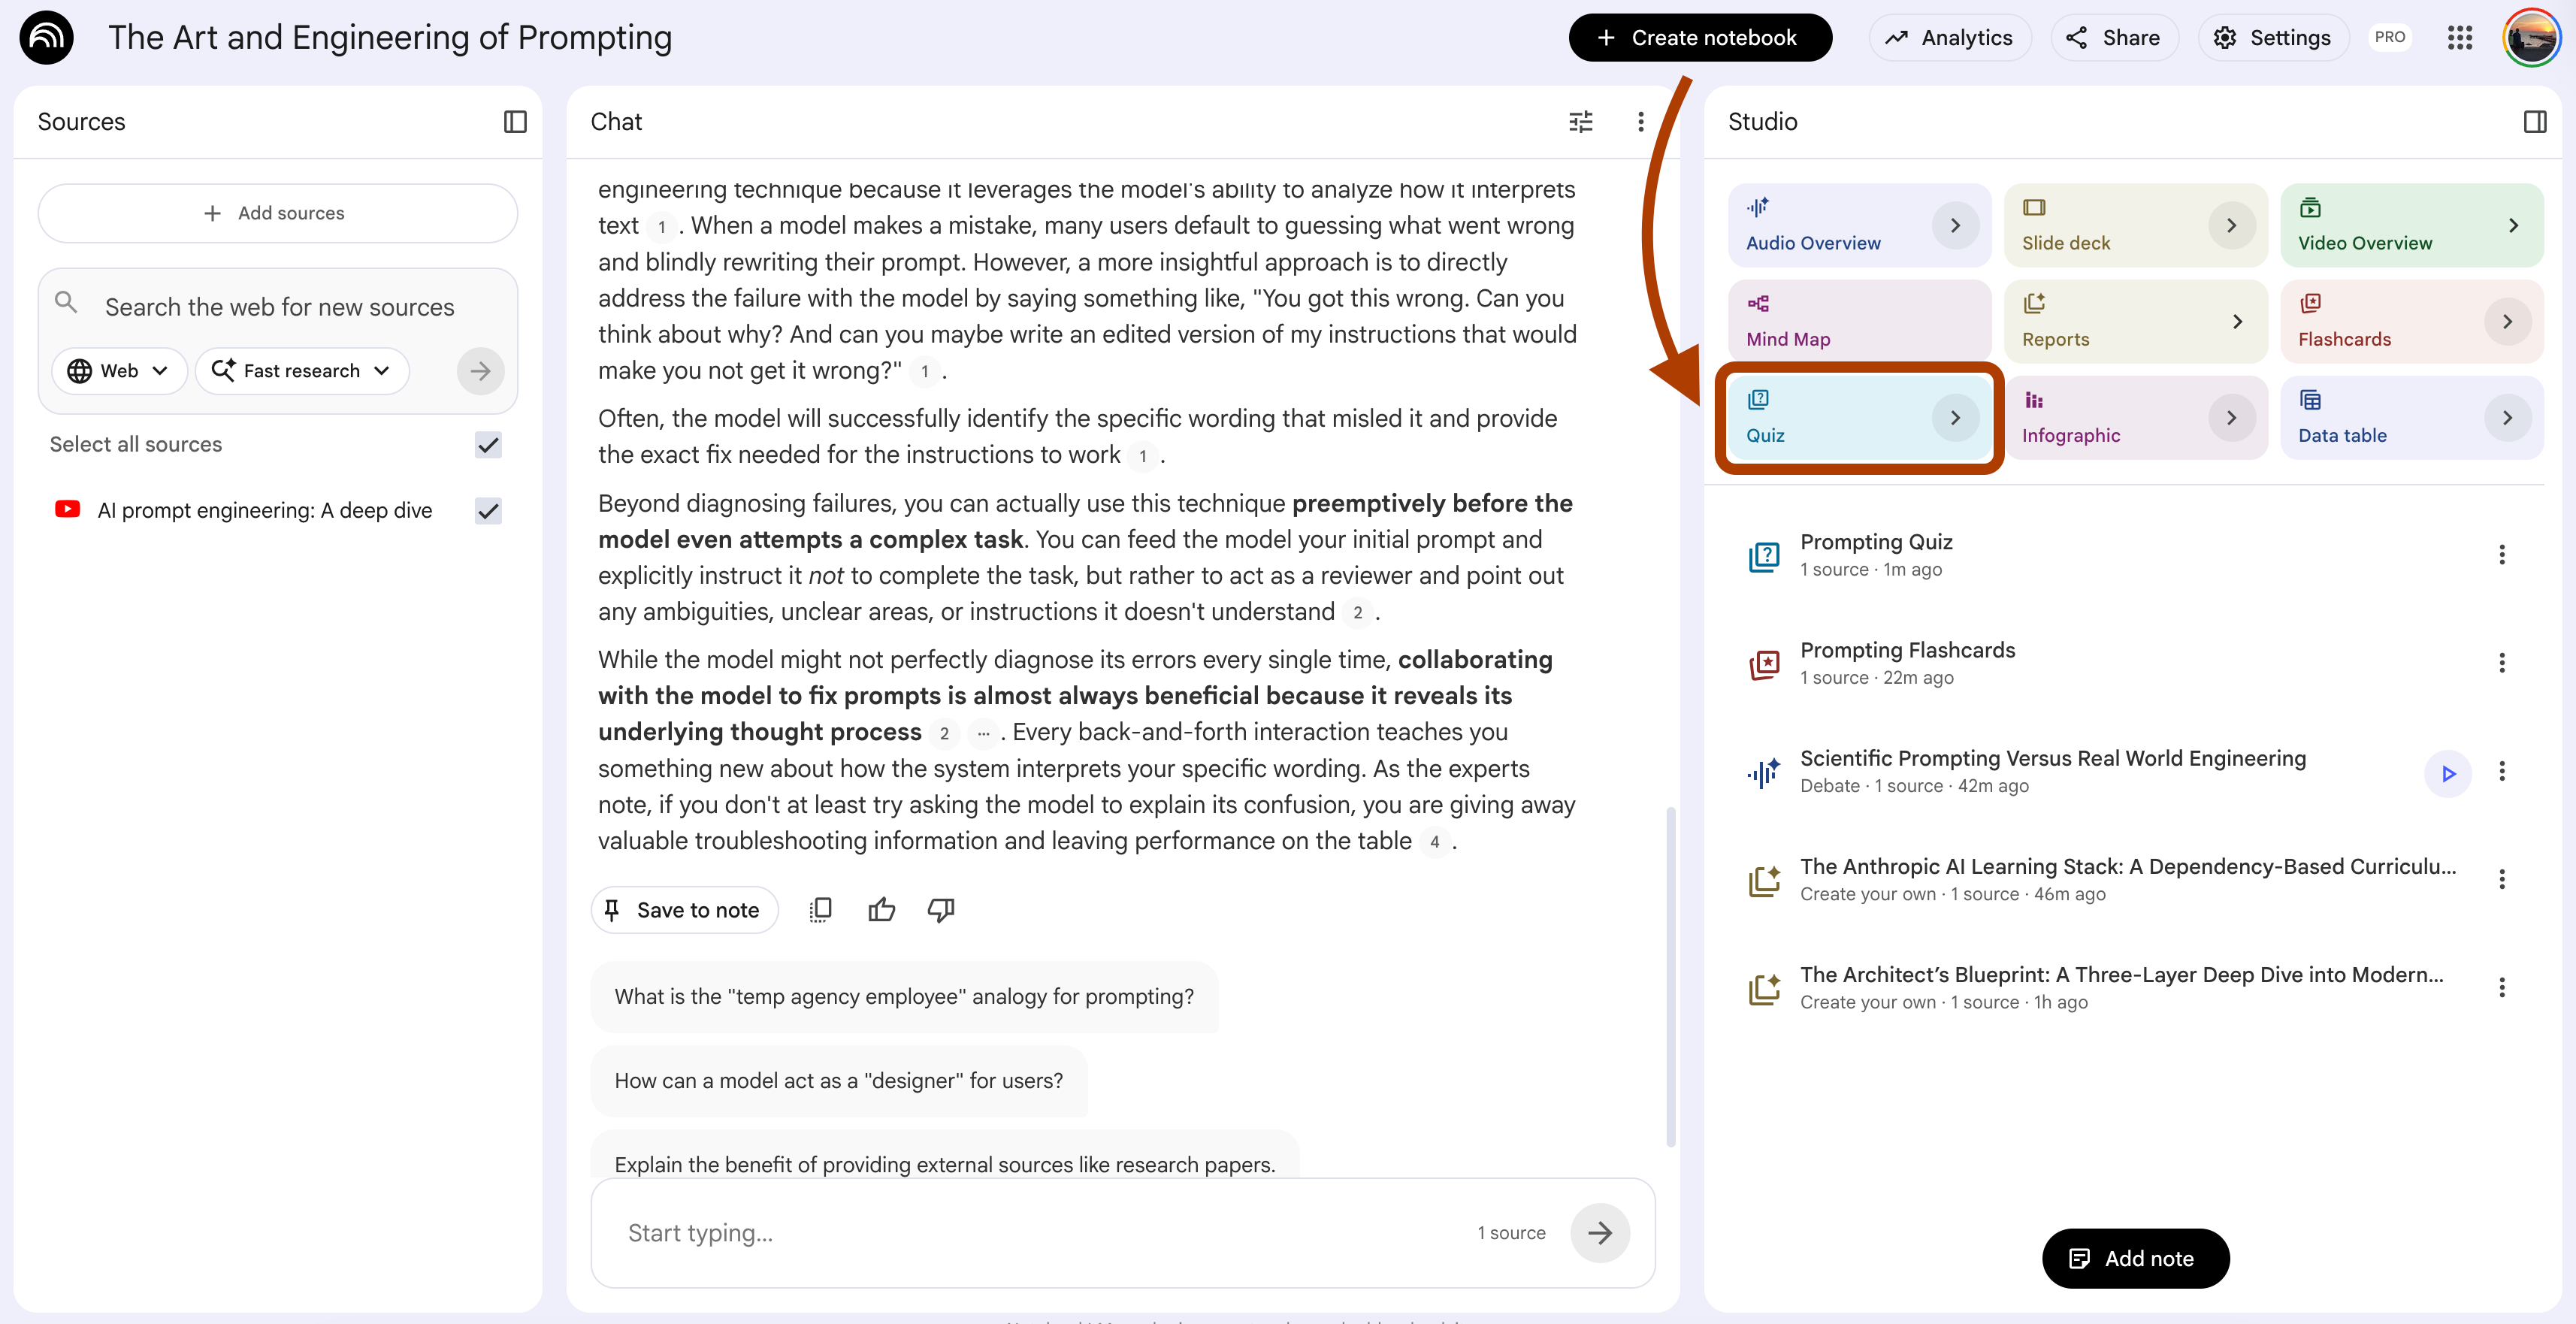
UI selections: Number → More. Difficulty → Hard.
When you learn AI from zero, the most dangerous state is “I think I get it”. You read the chapter. You nodded along. You can summarize it back. But you cannot solve a problem with it.
Amanda Askell calls this the “almost understood” zone. The model passes a generic quiz but breaks on edge cases. The same is true for you.
Default quizzes test the happy path. “What does RAG stand for?” If you can answer that, the quiz says you understood. You did not. You just memorized.
This prompt builds quiz questions that target the exact spots where almost-understanding hides.
Steps: Open your notebook → In Studio, click Quiz.
Generate questions that target partial understanding.

For each concept in the sources, build one question that follows this
pattern.

The question describes a situation where the concept applies. The
correct answer identifies the specific mechanism the sources describe.
Wrong or tempting answers must come from these confusion sources.

Confusion 1. A neighboring concept that does something similar but works
differently.
Confusion 2. A common misconception the sources explicitly correct.
Confusion 3. An oversimplification that drops the key detail.

After each question, include a one-sentence explanation for why the
common confusion is tempting and what specific detail rules it out.

Skip questions that can be answered by recognizing keywords. The
question must require the user to think about which concept fits the
situation, not which word matches the definition.
I tested this on the Anthropic notebook. Here is the quiz it produced.
This question is hard not because it is obscure. It is hard because every wrong answer sounds reasonable to someone who almost understood chain of thought.
If you can answer all questions like this without checking notes, you actually understand the concept. If you skip the explanations, you do not.
Run this after every study session. The wrong answers tell you what you almost knew.
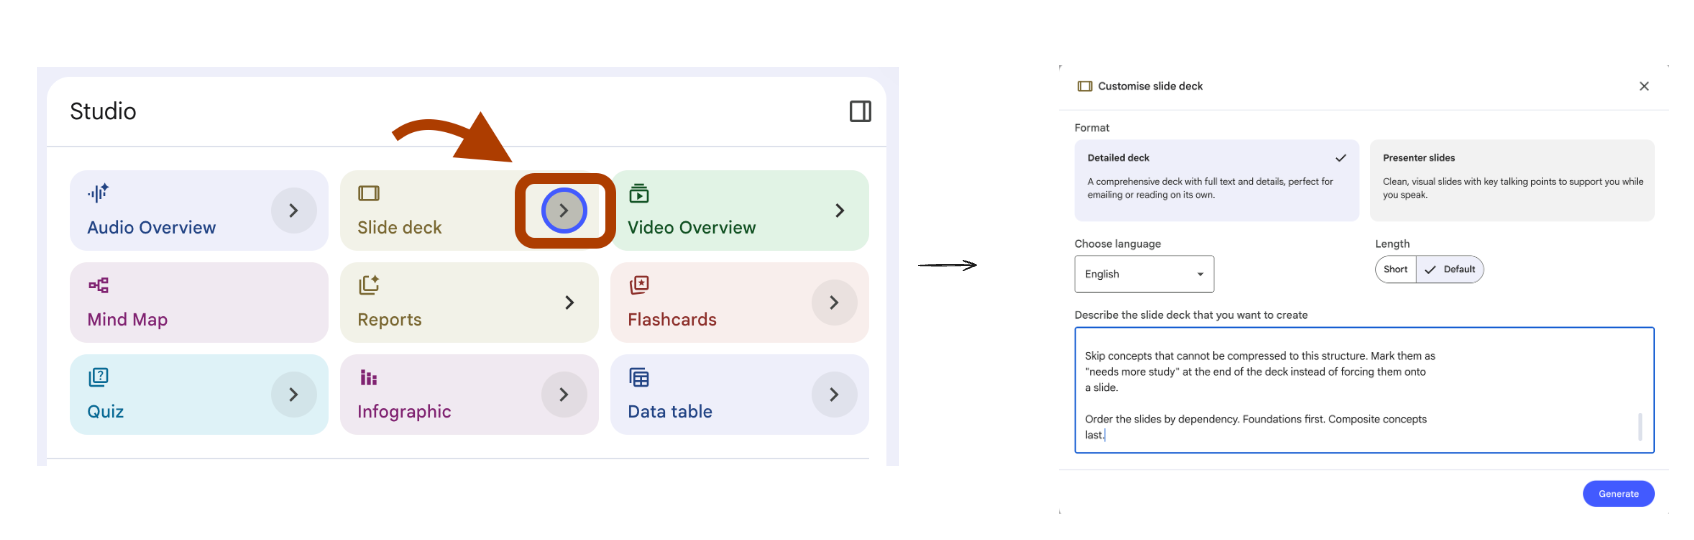
6. Slide Deck for Teaching Back What You Learned
NotebookLM Feature: Slide Deck
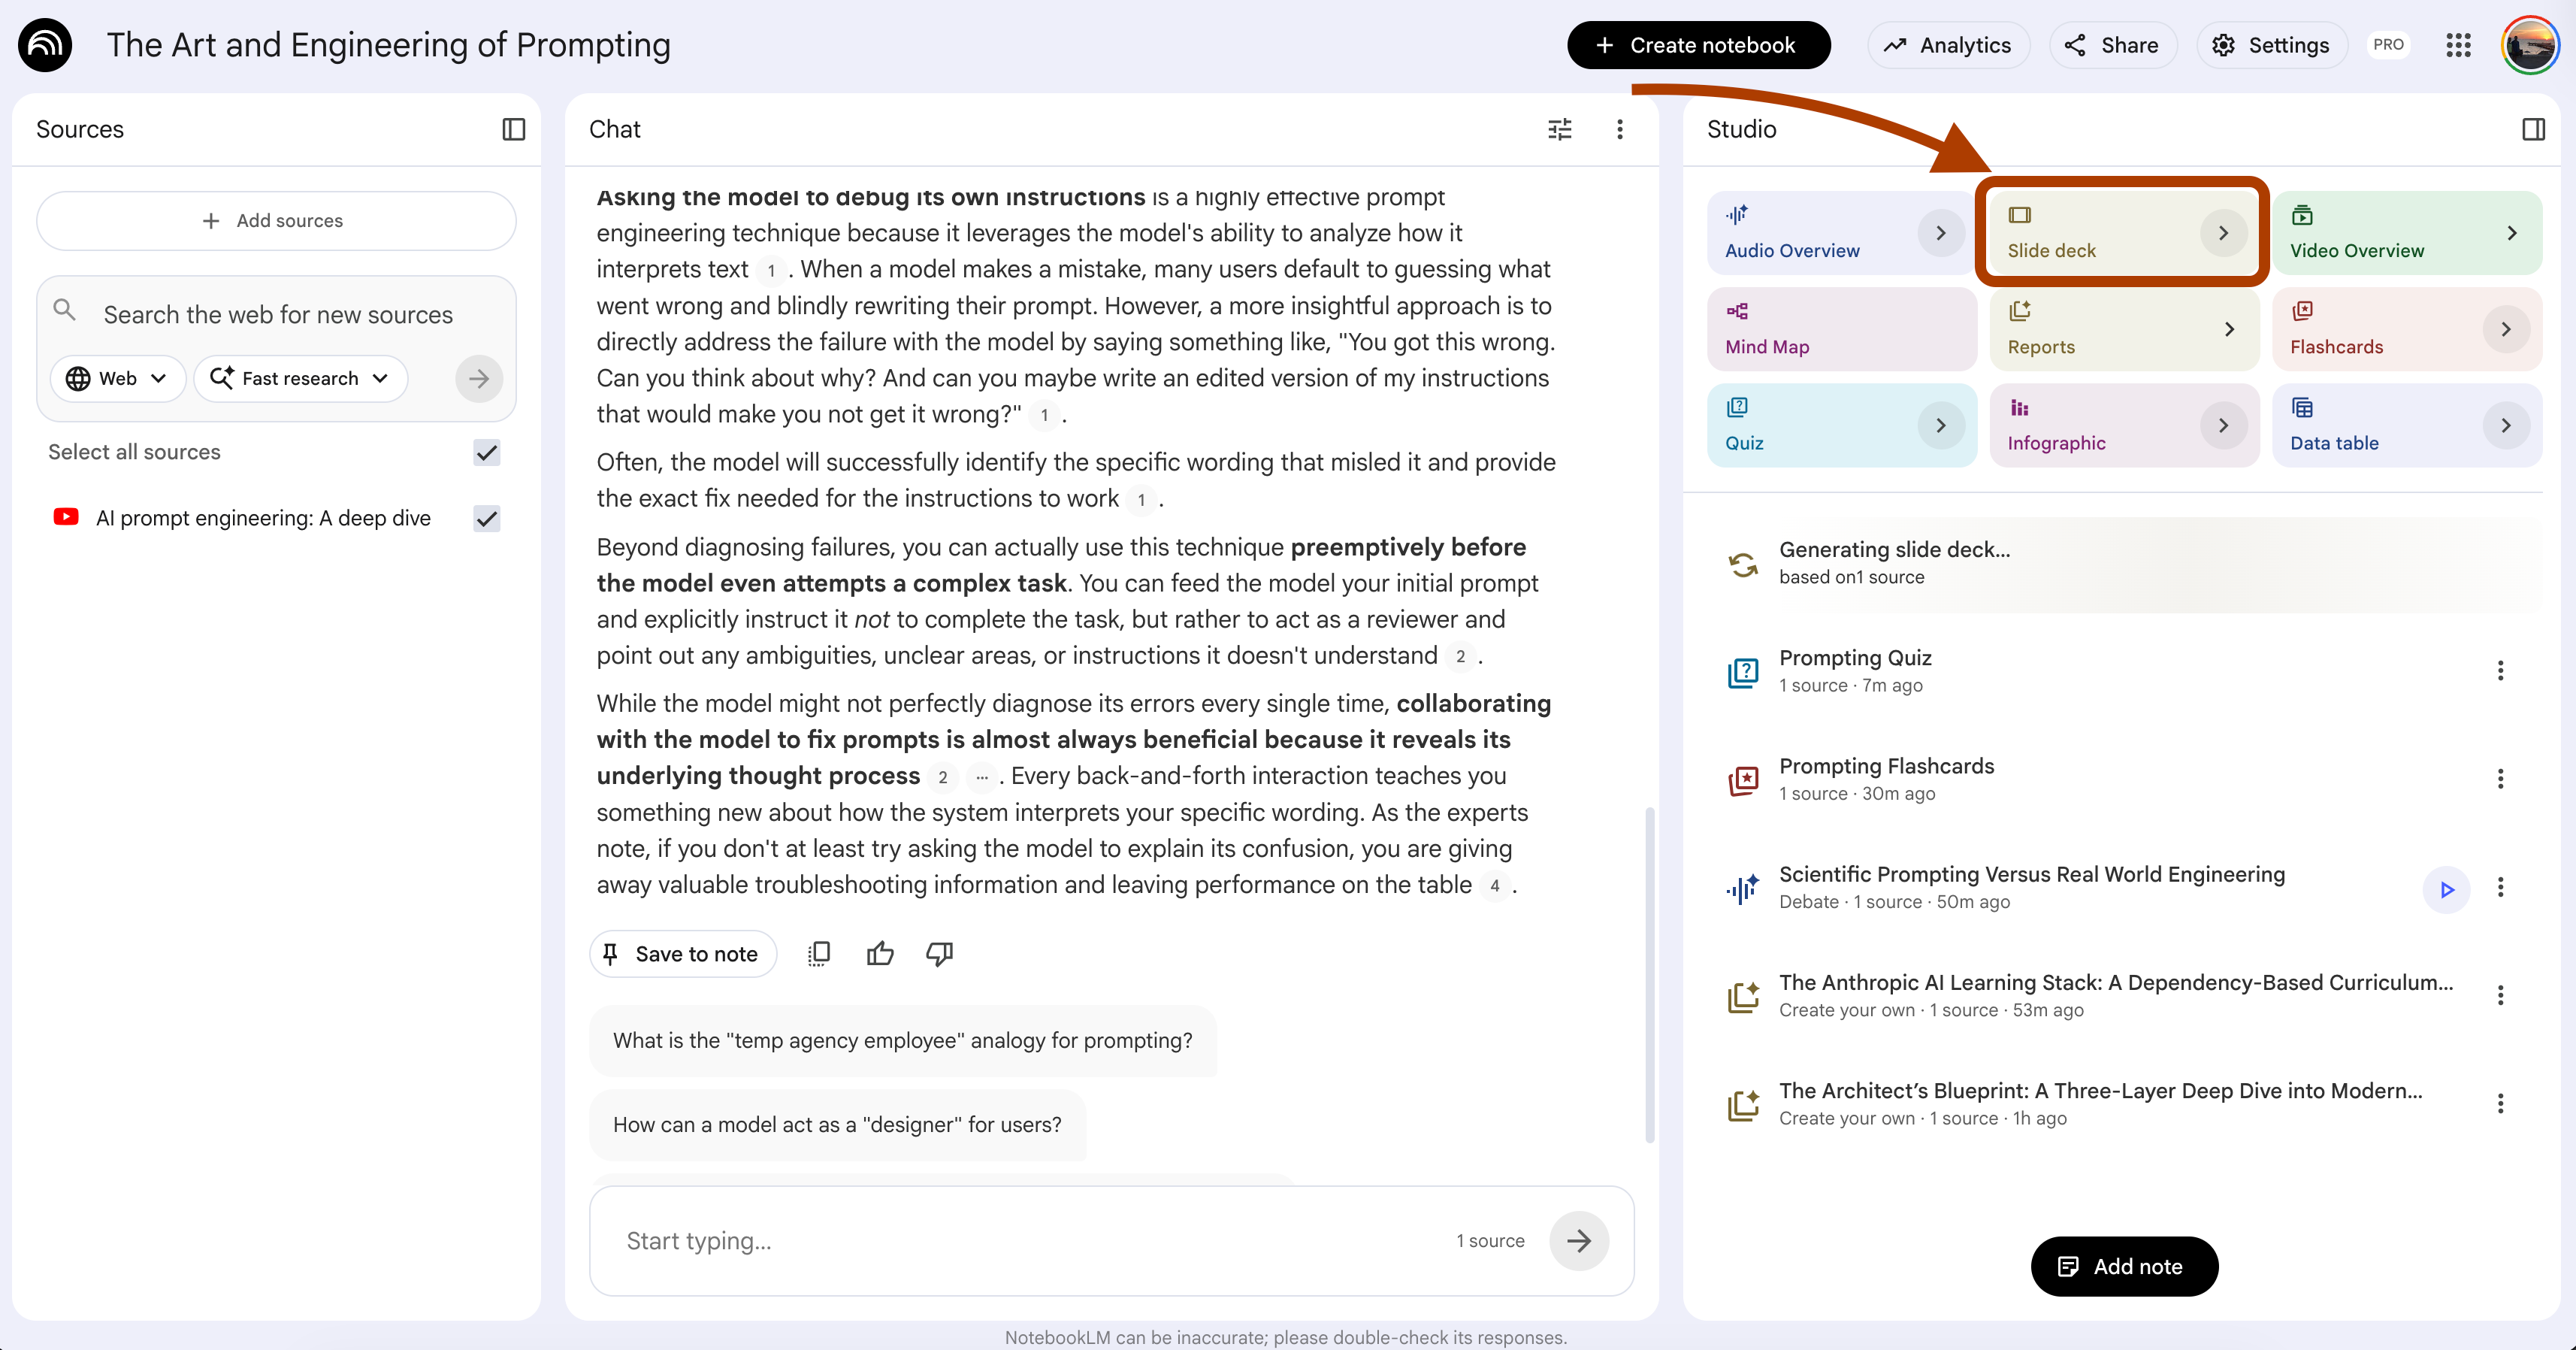
UI selections: Length → Default.
When you learn AI from zero, the fastest test of real understanding is teaching it back. Richard Feynman’s rule.
If you cannot explain a concept on a slide, you do not understand it yet.
Most beginners skip this step.
They read, watch, take notes, then move to the next topic.
The concept fades in two days.
A teach-back deck forces structure. One concept per slide.
The slide must be self-contained, someone who never read the source must understand it from the slide alone.
If you cannot fit the concept on one slide without losing the meaning, you have not compressed it correctly. That gap shows you what to re-study.
Steps: Open your notebook → In Studio, click Slide Deck.
Generate a teach-back deck where each slide explains one concept to a
peer who has not read the sources.

For every slide, follow this exact structure.

Slide title. The concept name. No subtitle. No clever phrasing.

Three bullets. Each bullet is one short sentence. Maximum 10 words.
Bullet 1 is the definition in plain language. Bullet 2 is the mechanism
or reason it works. Bullet 3 is the most common misuse or limitation.

Speaker notes. Three sentences maximum. Sentence 1 is the analogy that
makes the concept click. Sentence 2 is the example from the sources.
Sentence 3 is the question a confused listener would ask, and the
one-line answer to it.

Skip concepts that cannot be compressed to this structure. Mark them as
"needs more study" at the end of the deck instead of forcing them onto
a slide.

Order the slides by dependency. Foundations first. Composite concepts
last.
I tested this on the Anthropic notebook. Here is one slide it produced.
This slide passes the teach-back test.
A peer who never read the sources can understand chain of thought from this slide alone.
If a slide does not pass that test, the concept is not yet yours.
Run this after each study session. Present three slides to yourself out loud. The ones you stumble on are the ones to re-study.
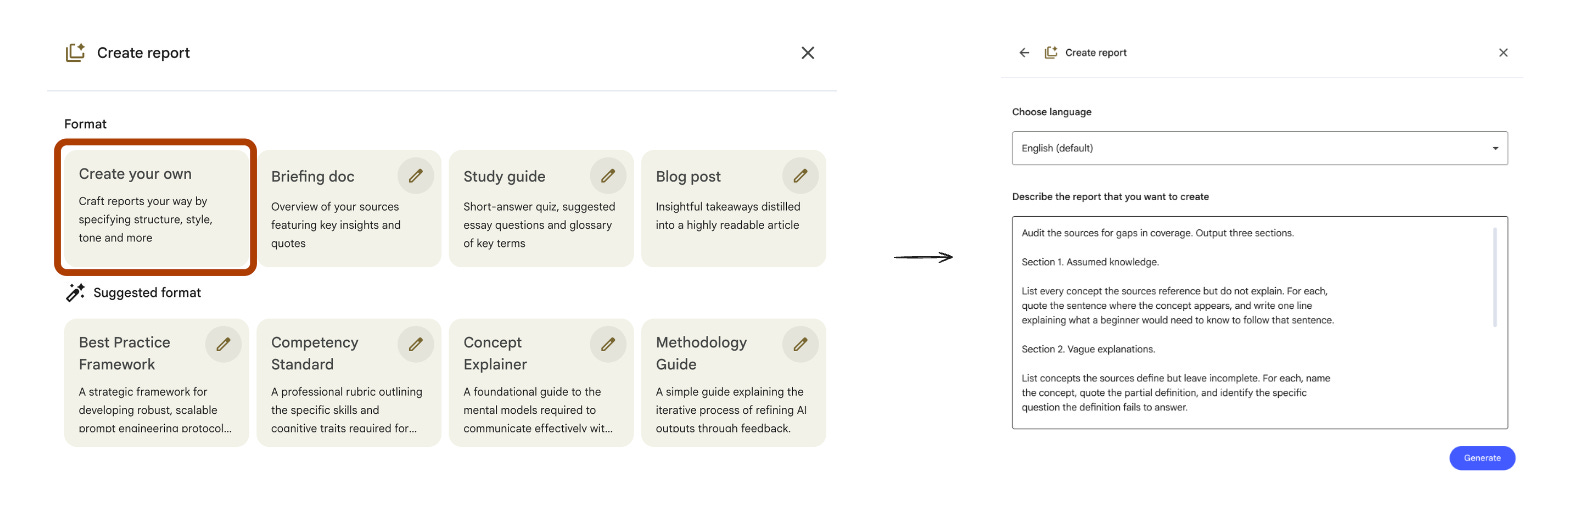
7. Report Prompt That Finds the Gaps in Your Understanding
NotebookLM Feature: Report (Create your own)
UI selections: Format → Create your own. Length → Default.
When you learn AI from zero, the hardest part is not learning. It is knowing what you do not know. You read a chapter, feel confident, then hit a question that exposes a gap you did not see coming.
Amanda Askell described the same problem in the Anthropic roundtable. Before she trusts a prompt, she asks the model to flag where the instructions are unclear. The same trick works for your own learning.
This prompt turns NotebookLM into a gap detector. It reads the sources and tells you what the sources assume you already know, where they are vague, and where they contradict each other. Those three categories are the exact spots where beginners get stuck without realizing it.
Steps: Open your notebook → In Studio, click Reports → Choose “Create your own”.
Audit the sources for gaps in coverage. Output three sections.

Section 1. Assumed knowledge.

List every concept the sources reference but do not explain. For each,
quote the sentence where the concept appears, and write one line
explaining what a beginner would need to know to follow that sentence.

Section 2. Vague explanations.

List concepts the sources define but leave incomplete. For each, name
the concept, quote the partial definition, and identify the specific
question the definition fails to answer.

Section 3. Source contradictions.

List concepts where two or more sources disagree. For each, quote both
sides, name the disagreement in one sentence, and flag which version
appears more current based on the publication context.

Do not invent gaps. Only flag a gap if you can quote the source text
that creates it.

End with a study recommendation. Rank the gaps by which one would block
the most downstream concepts if left unfilled.
I tested this on the Anthropic notebook. Here is the trimmed output.
Now you have a list of what to study next. Not from a generic curriculum. From the gaps your specific sources left open.
This prompt prevents the most common beginner failure: studying in a loop without realizing the foundation is missing.
Run this on every new notebook before you start studying. The gaps come first.
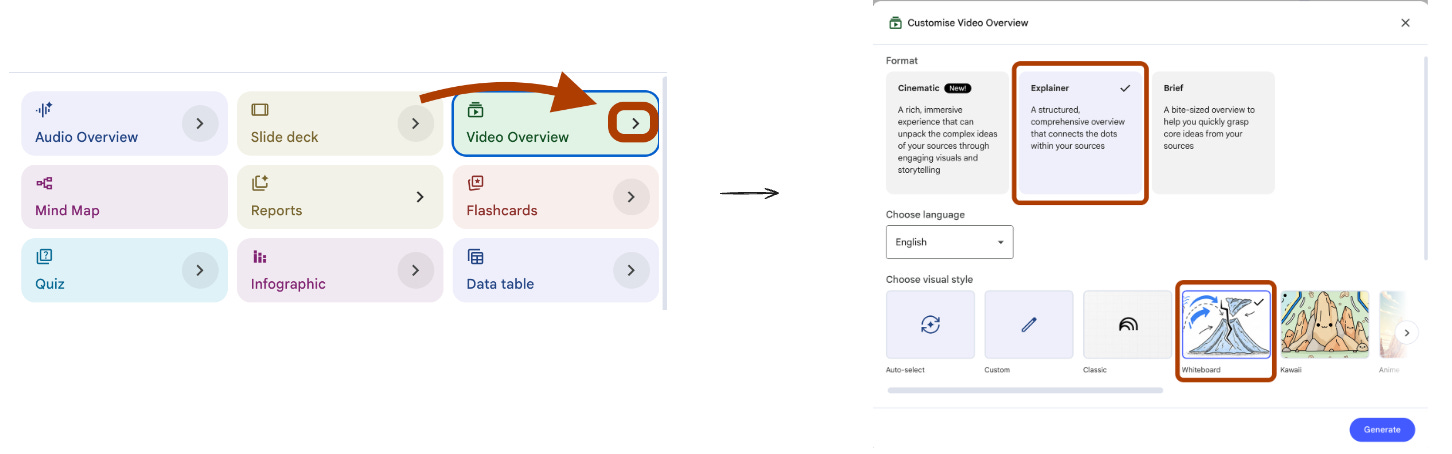
8. Video Overview for the Topic That Lost You in Class
NotebookLM Feature: Video Overview
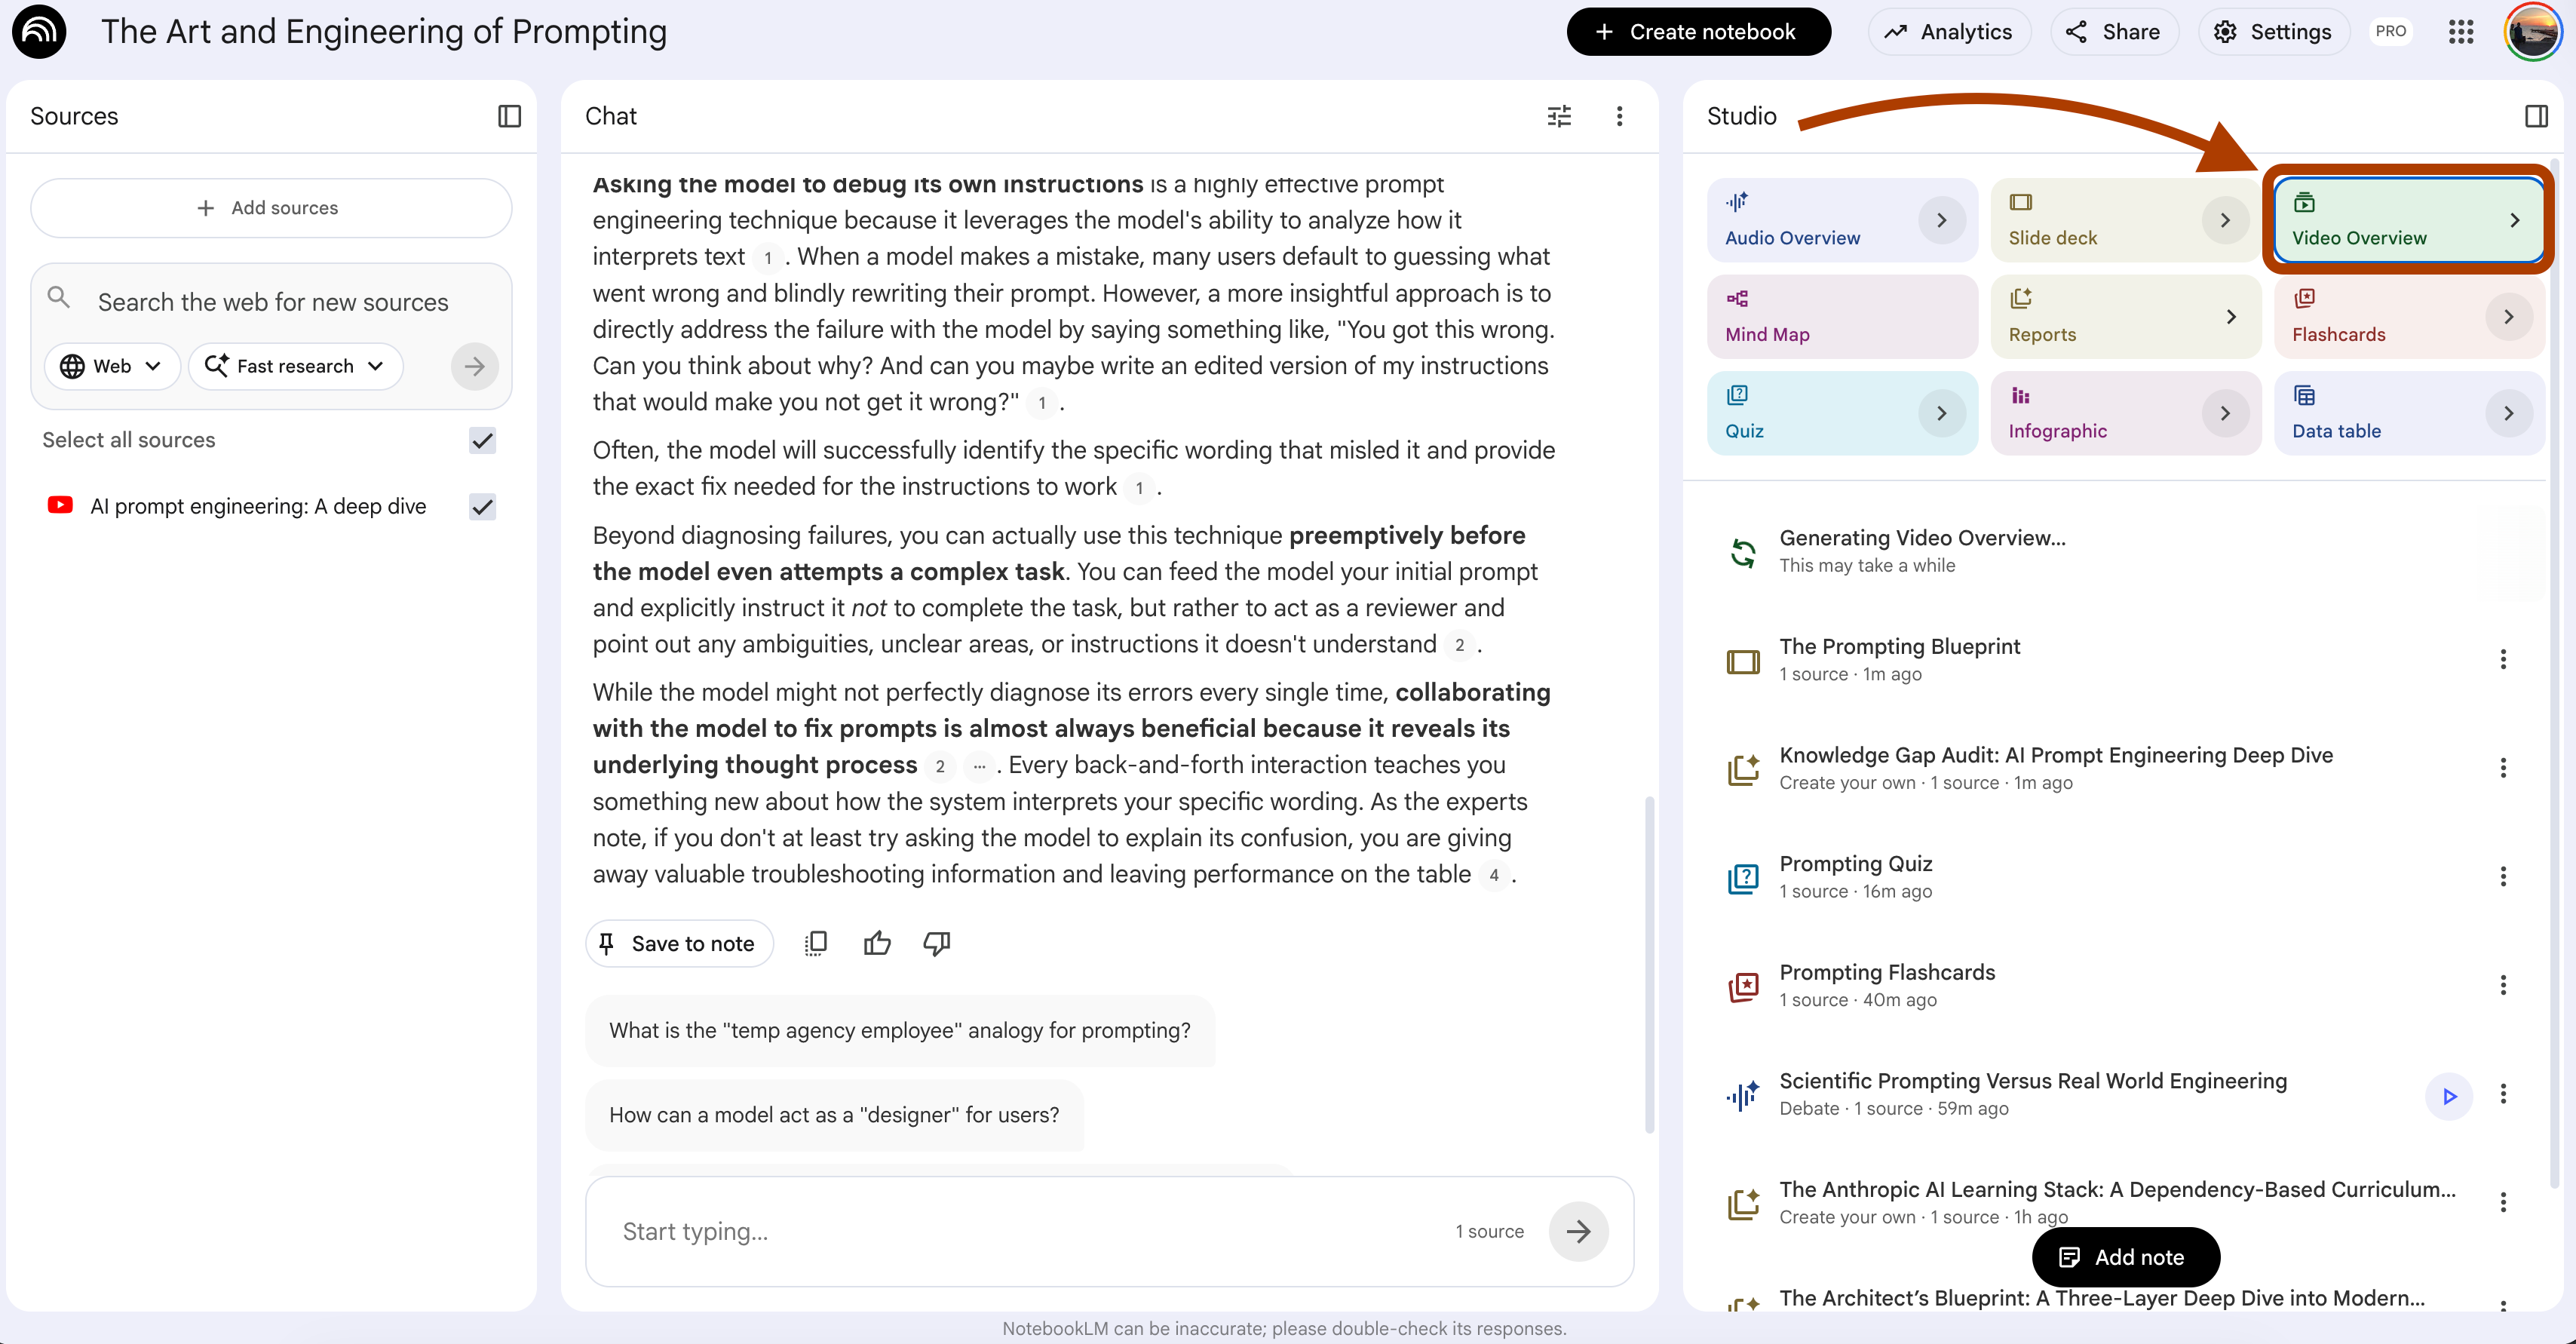
UI selections: Format → Explainer → “Whiteboard” as a Visual Style
When you learn AI from zero, every topic has one moment where you lose the thread. The lecturer moves on. The textbook moves on. You are still stuck on slide 12 trying to figure out what an embedding actually is.
The default Video Overview gives you a generic walk-through of all the sources. Useful for an overview. Useless for the one concept that lost you.
This prompt turns the Video Overview into a targeted rescue mission. You name the exact concept that broke your understanding. The video focuses everything around that single concept — the prerequisites you need, the analogy that makes it click, the example that proves it, the misconception that probably tripped you.
One concept. One video. One unstuck moment.
Steps: Open your notebook → In Studio, click Video Overview → Choose Explainer format → Select “Whiteboard” as a Visual Style
Build the entire video around one concept: {concept_name}

Structure the narrative in five parts.

Part 1. The prerequisite check. Name the two or three concepts the
viewer must already understand to follow this one. Define each in one
sentence. If a prerequisite is missing from the sources, flag it
explicitly so the viewer knows to study it first.

Part 2. The misconception. State the most common wrong way beginners
understand this concept. Show why it is wrong using a quote from the
sources.

Part 3. The mechanism. Explain how the concept actually works. Use a
concrete analogy from everyday life before introducing any technical
term. Visual theme should reinforce the analogy.

Part 4. The example. Walk through one specific example from the
sources where this concept is applied. Show the input, the process,
and the output.

Part 5. The trade-off. Explain when this concept is the right tool and
when it is not. Name the alternative the sources mention and the
condition where the alternative wins.

Do not summarize the other concepts in the sources. Stay locked on
{concept_name}. If the sources do not cover one of the five parts, say
so directly instead of filling space.
I tested this on the Anthropic notebook with {concept_name} set to Chain of Thought.
Here is the structure it produced.
The video stays on Chain of Thought for every minute of its runtime.
This is the difference between a video that summarizes the chapter and a video that unsticks the one part you missed.
Run this every time a concept loses you in class.
Name the concept in {concept_name} and let the video do the rest.
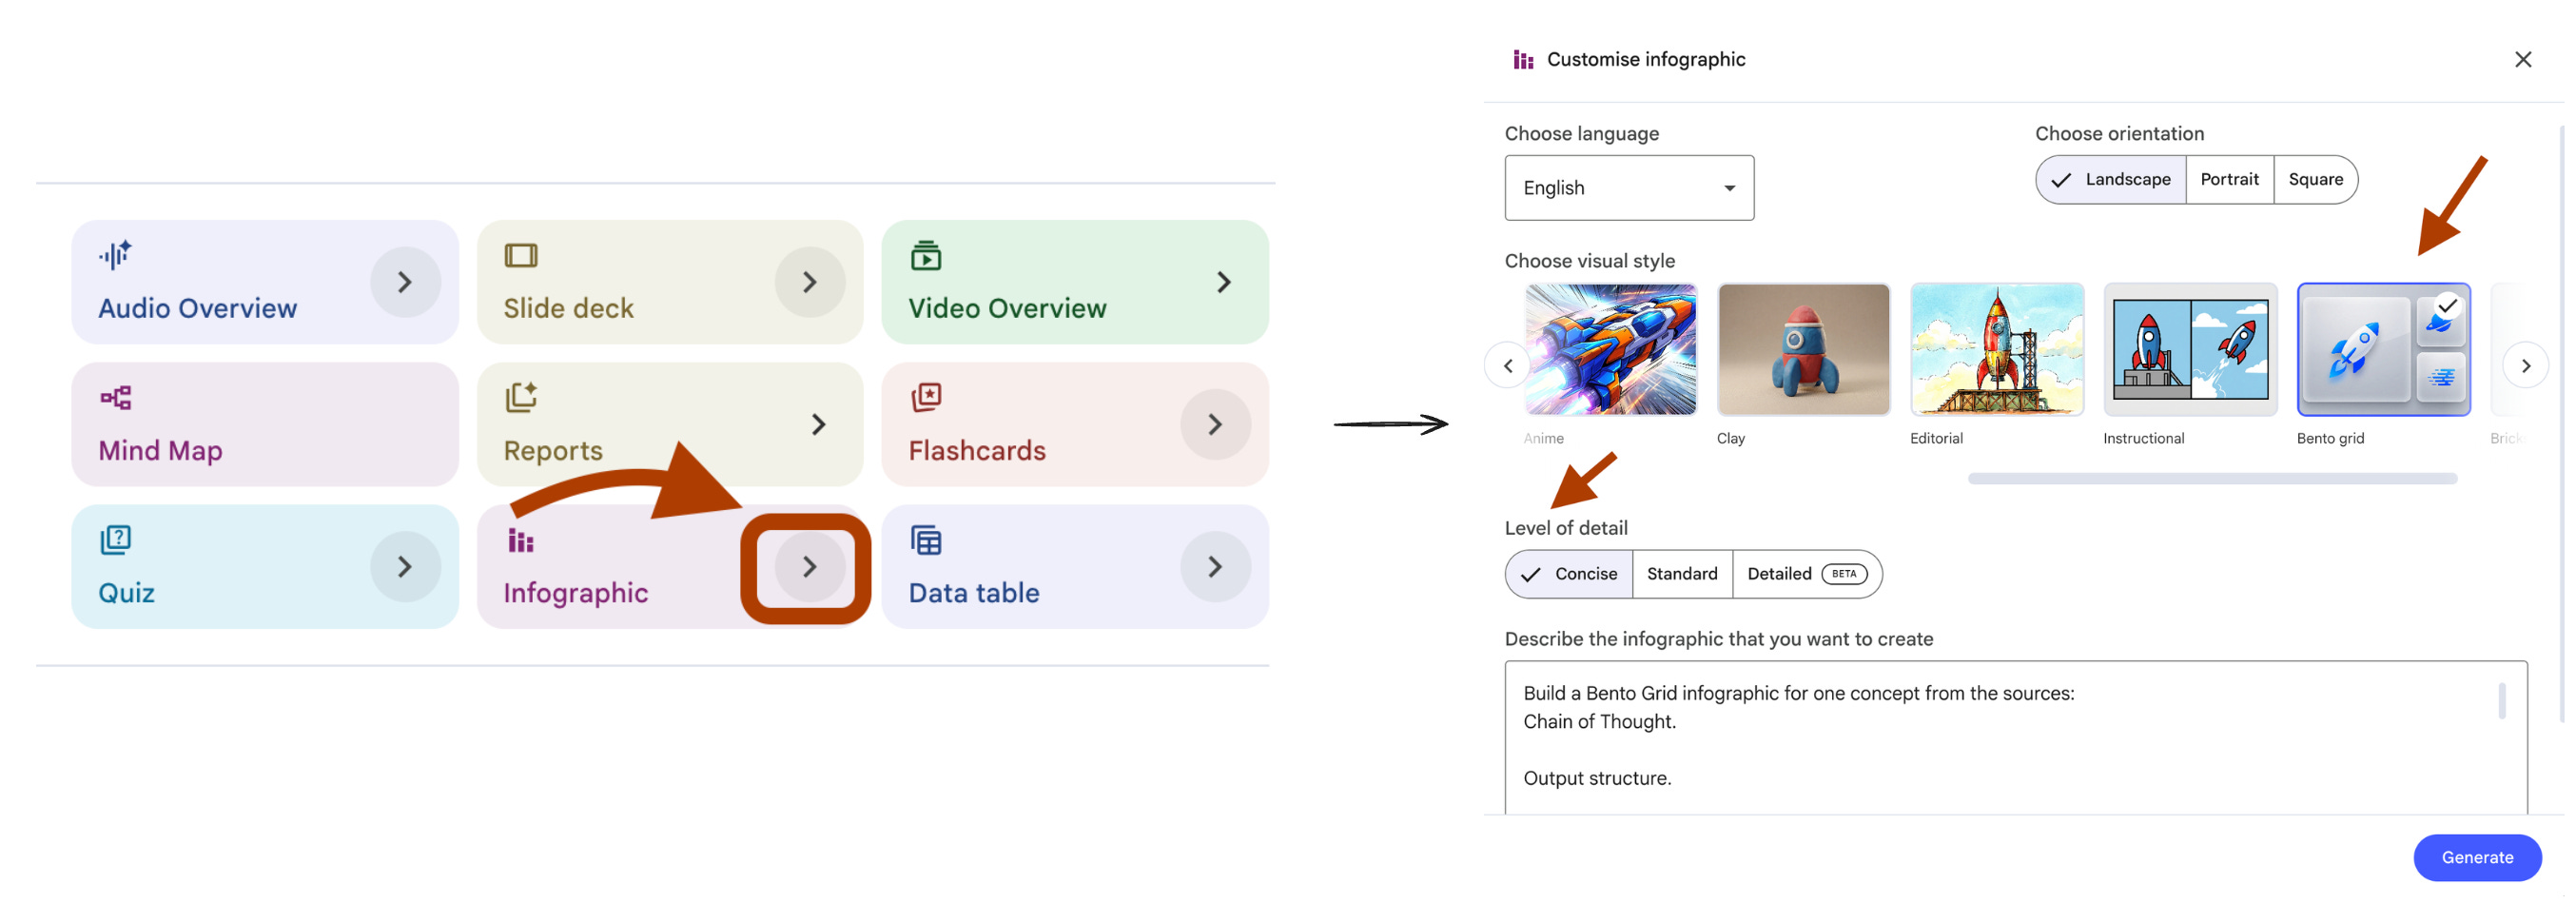
9. Infographic That Turns Dense Theory Into One Screen
NotebookLM Feature: Infographics
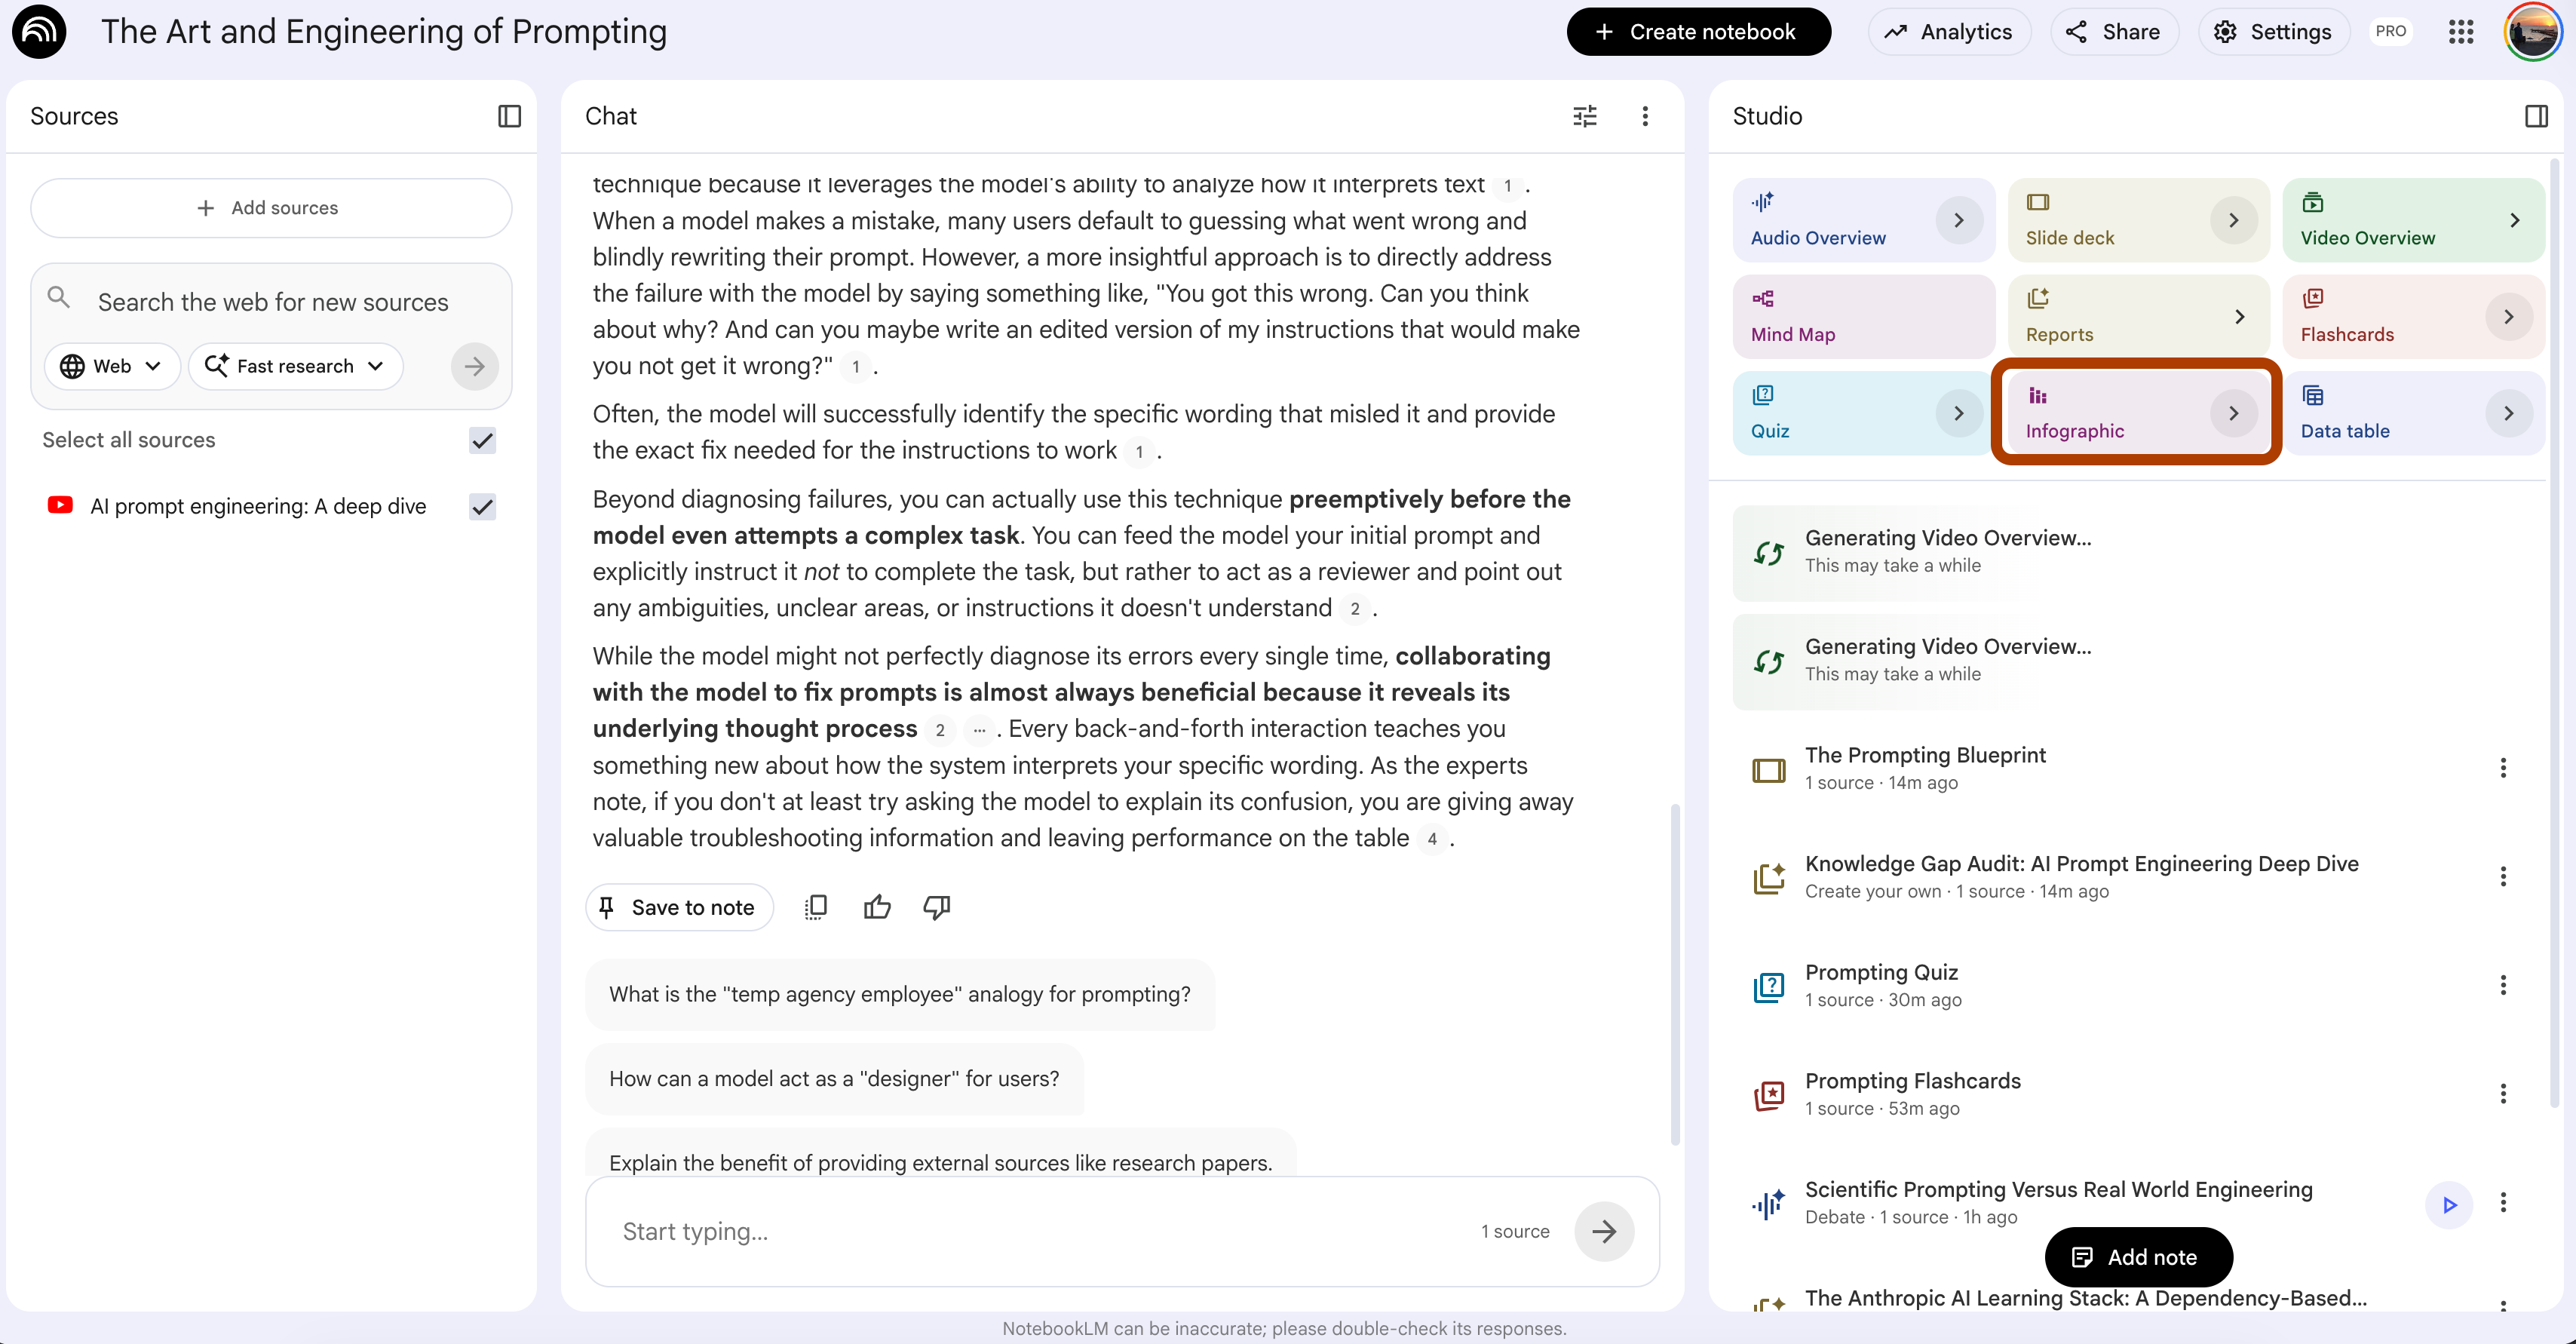
UI selections: Visual Style → Bento Grid. Orientation → Portrait. Detail Level → Concise.
When you learn AI from zero, the worst content format is a wall of text explaining a process. You read paragraph 1, by paragraph 4 you forgot what paragraph 1 said. The information was there. The structure was missing.
An infographic forces structure. One concept becomes one screen with a visual hierarchy you can take in at a glance. Bento Grid layout breaks the screen into clean blocks, each block carries one piece of the concept, no block carries two.
This is not a poster. This is a study aid you actually use.
Steps: Open your notebook → In Studio, click Infographics → Choose Bento Grid.
Build a Bento Grid infographic for one concept from the sources:
{concept_name}.

Output structure.

Headline block. The concept name and a one-line definition. Maximum 12
words combined.

Block 1. The core mechanism. One sentence. One visual metaphor reference
the designer can illustrate.

Block 2. One hard statistic or measurable fact from the sources. Quote
the source phrasing. Maximum 8 words of context.

Block 3. The most common misuse. One sentence describing what beginners
get wrong about this concept.

Block 4. The trade-off. Two short labels separated by "vs". Each label
is the condition where one approach beats the other.

Block 5. The next concept. Name the concept that builds on this one and
should be studied next.

Block 6. The prerequisite. Name the concept the viewer must already
understand before this one makes sense.

Constraints. No block exceeds 8 words of body text. If the sources do
not contain a hard statistic for Block 2, replace it with a direct
quote from the sources that captures the concept in 8 words or less.
I tested this on the Anthropic notebook with {concept_name} set to Chain of Thought. Here is the structure it produced.
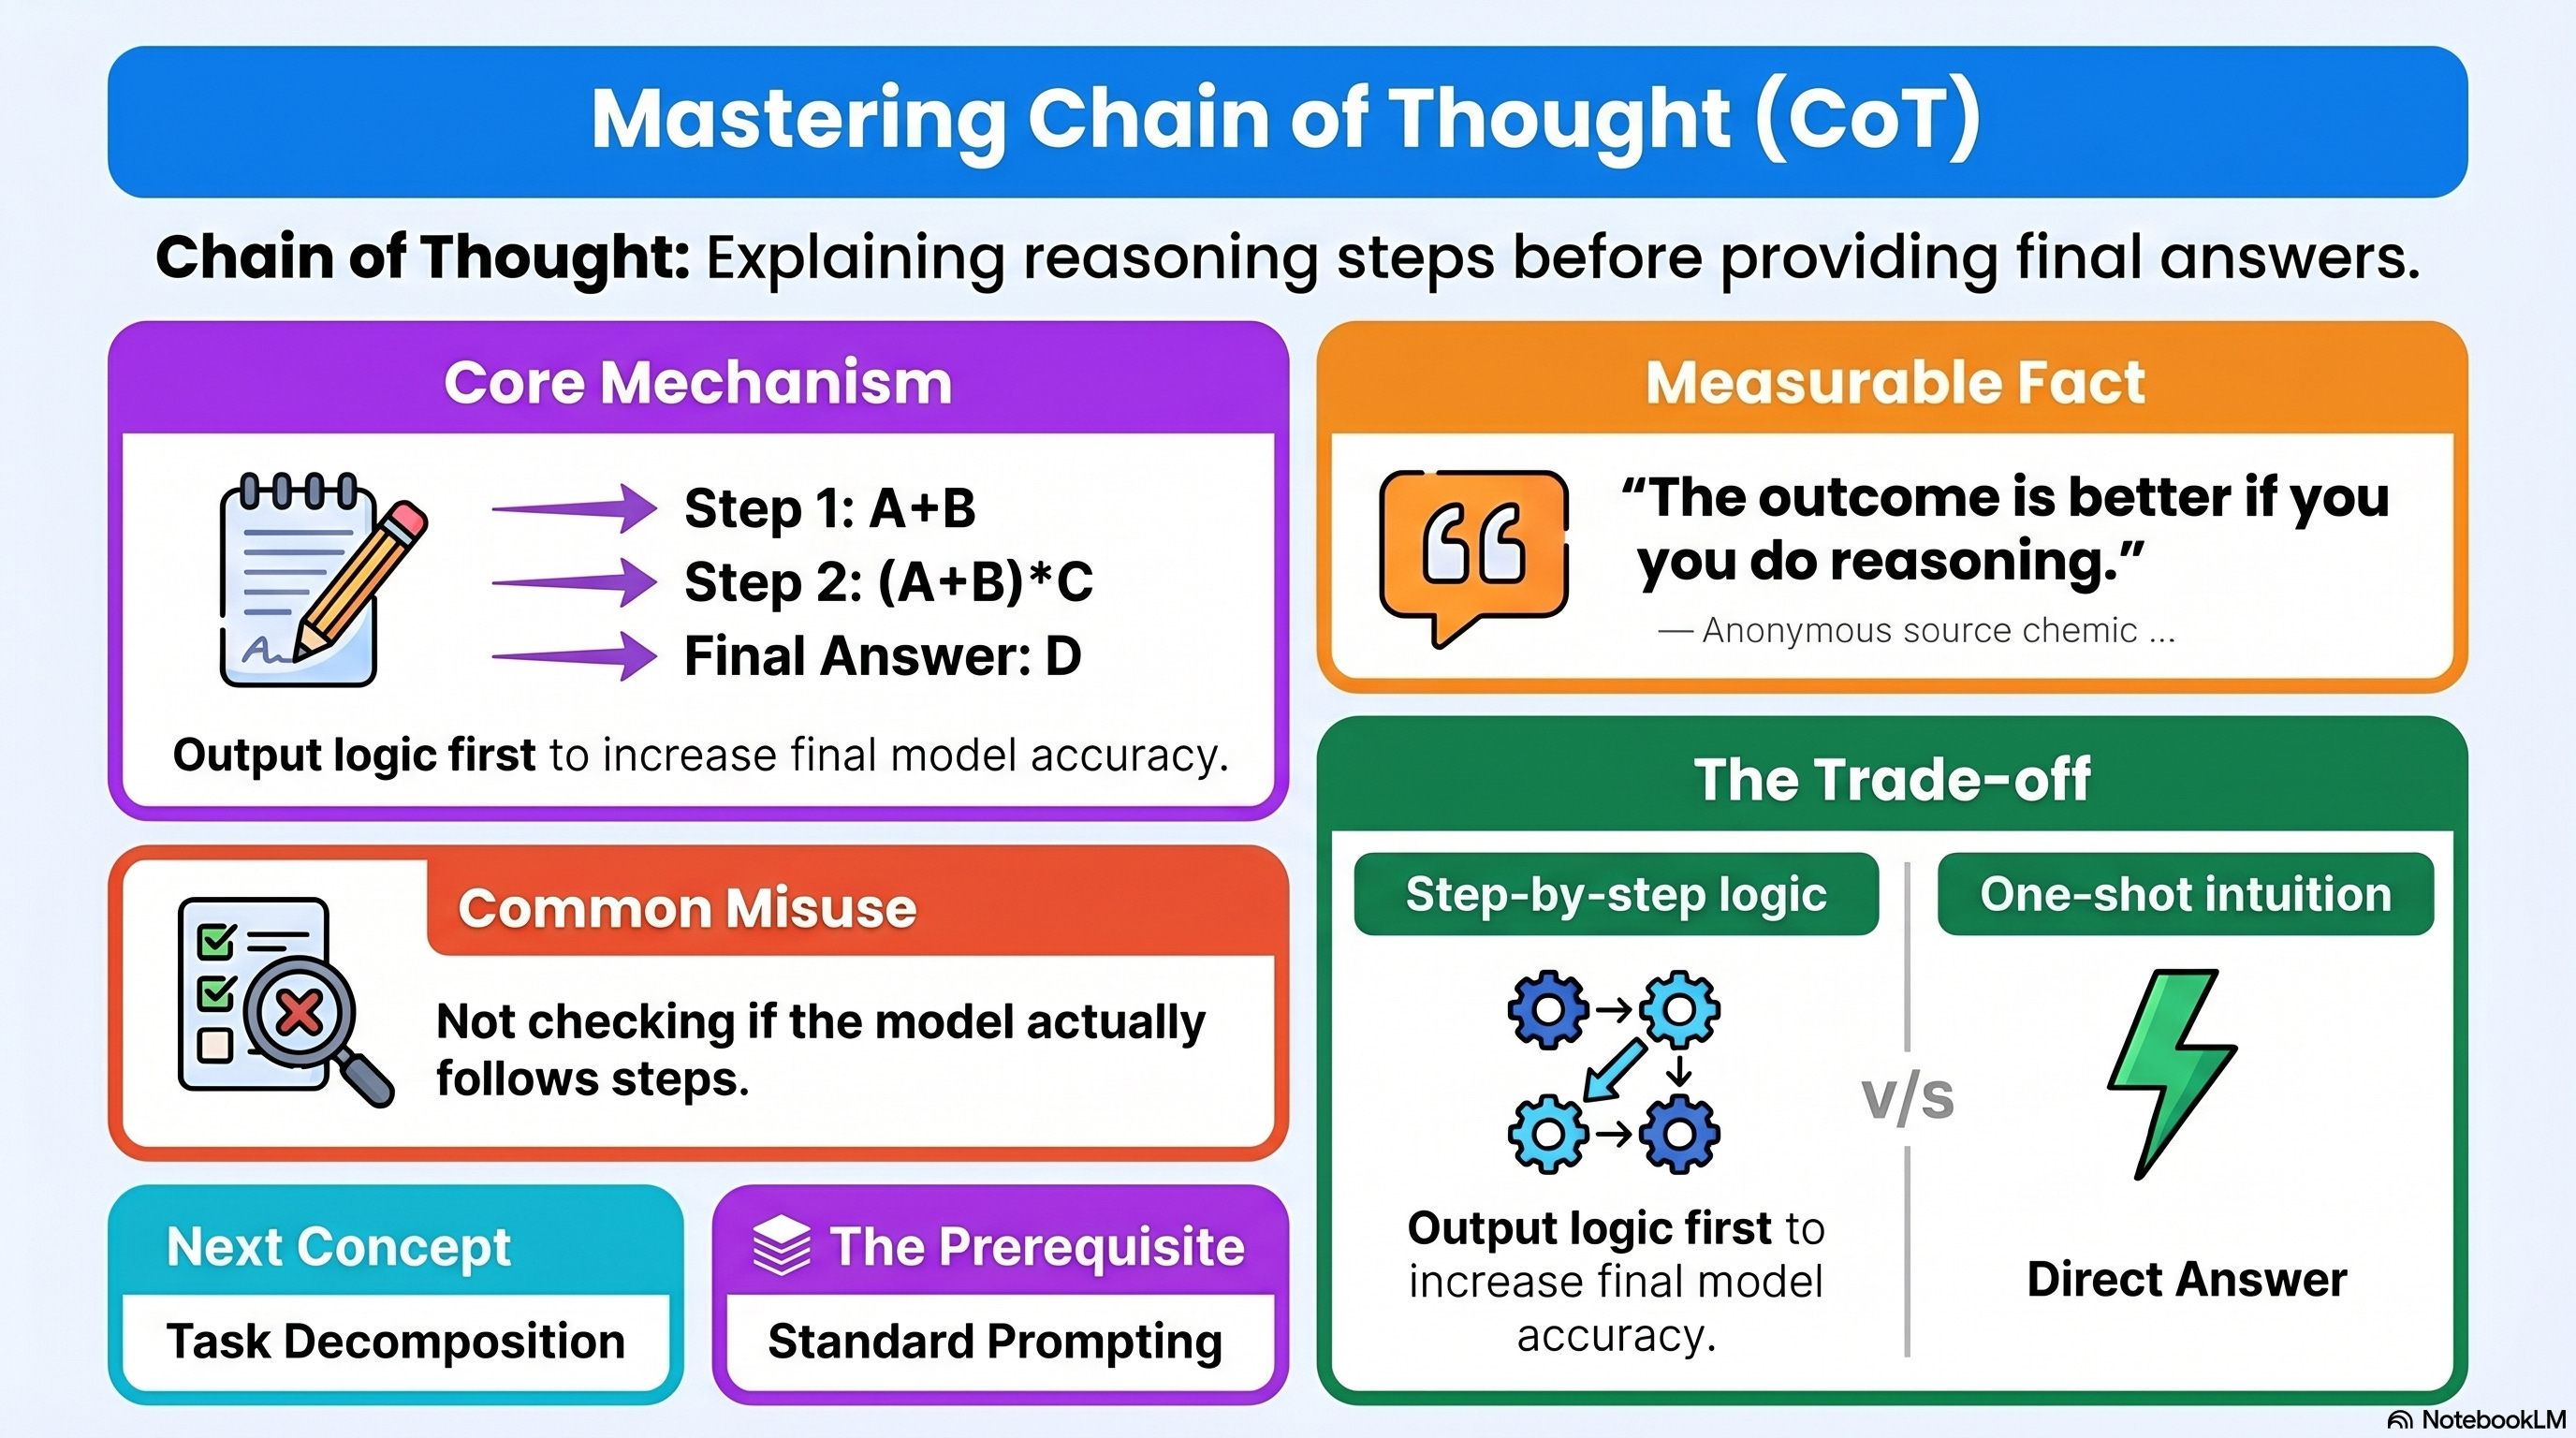
Six blocks. One concept. Zero filler.
The Block 2 statistic rule is the catch.
Most beginner study materials skip the data and stay vague.
Forcing one hard fact per concept builds the habit of grounding every claim.
Run this for the three or four concepts you struggle with most.
Save the output as a one-screen reference. Open it before every study session.
10. Data Table That Compares Every Model, Framework, or Tool
NotebookLM Feature: Data Table
UI selections: Language → English.

When you learn AI from zero, the loudest noise is comparison. GPT vs Claude vs Gemini. RAG vs fine-tuning. LangChain vs LlamaIndex. Pretrained vs RLHF. Every blog post compares two things. Every comparison uses different criteria. You end the week with twenty opinions and zero clarity.
A Data Table fixes this. You define the criteria once. The model fills the rows from your sources. Same columns for every option. Apples to apples.
This works for any comparison your sources cover — models, frameworks, prompting techniques, training methods, deployment patterns. Pick the category. Define the columns. Let the table do the work.
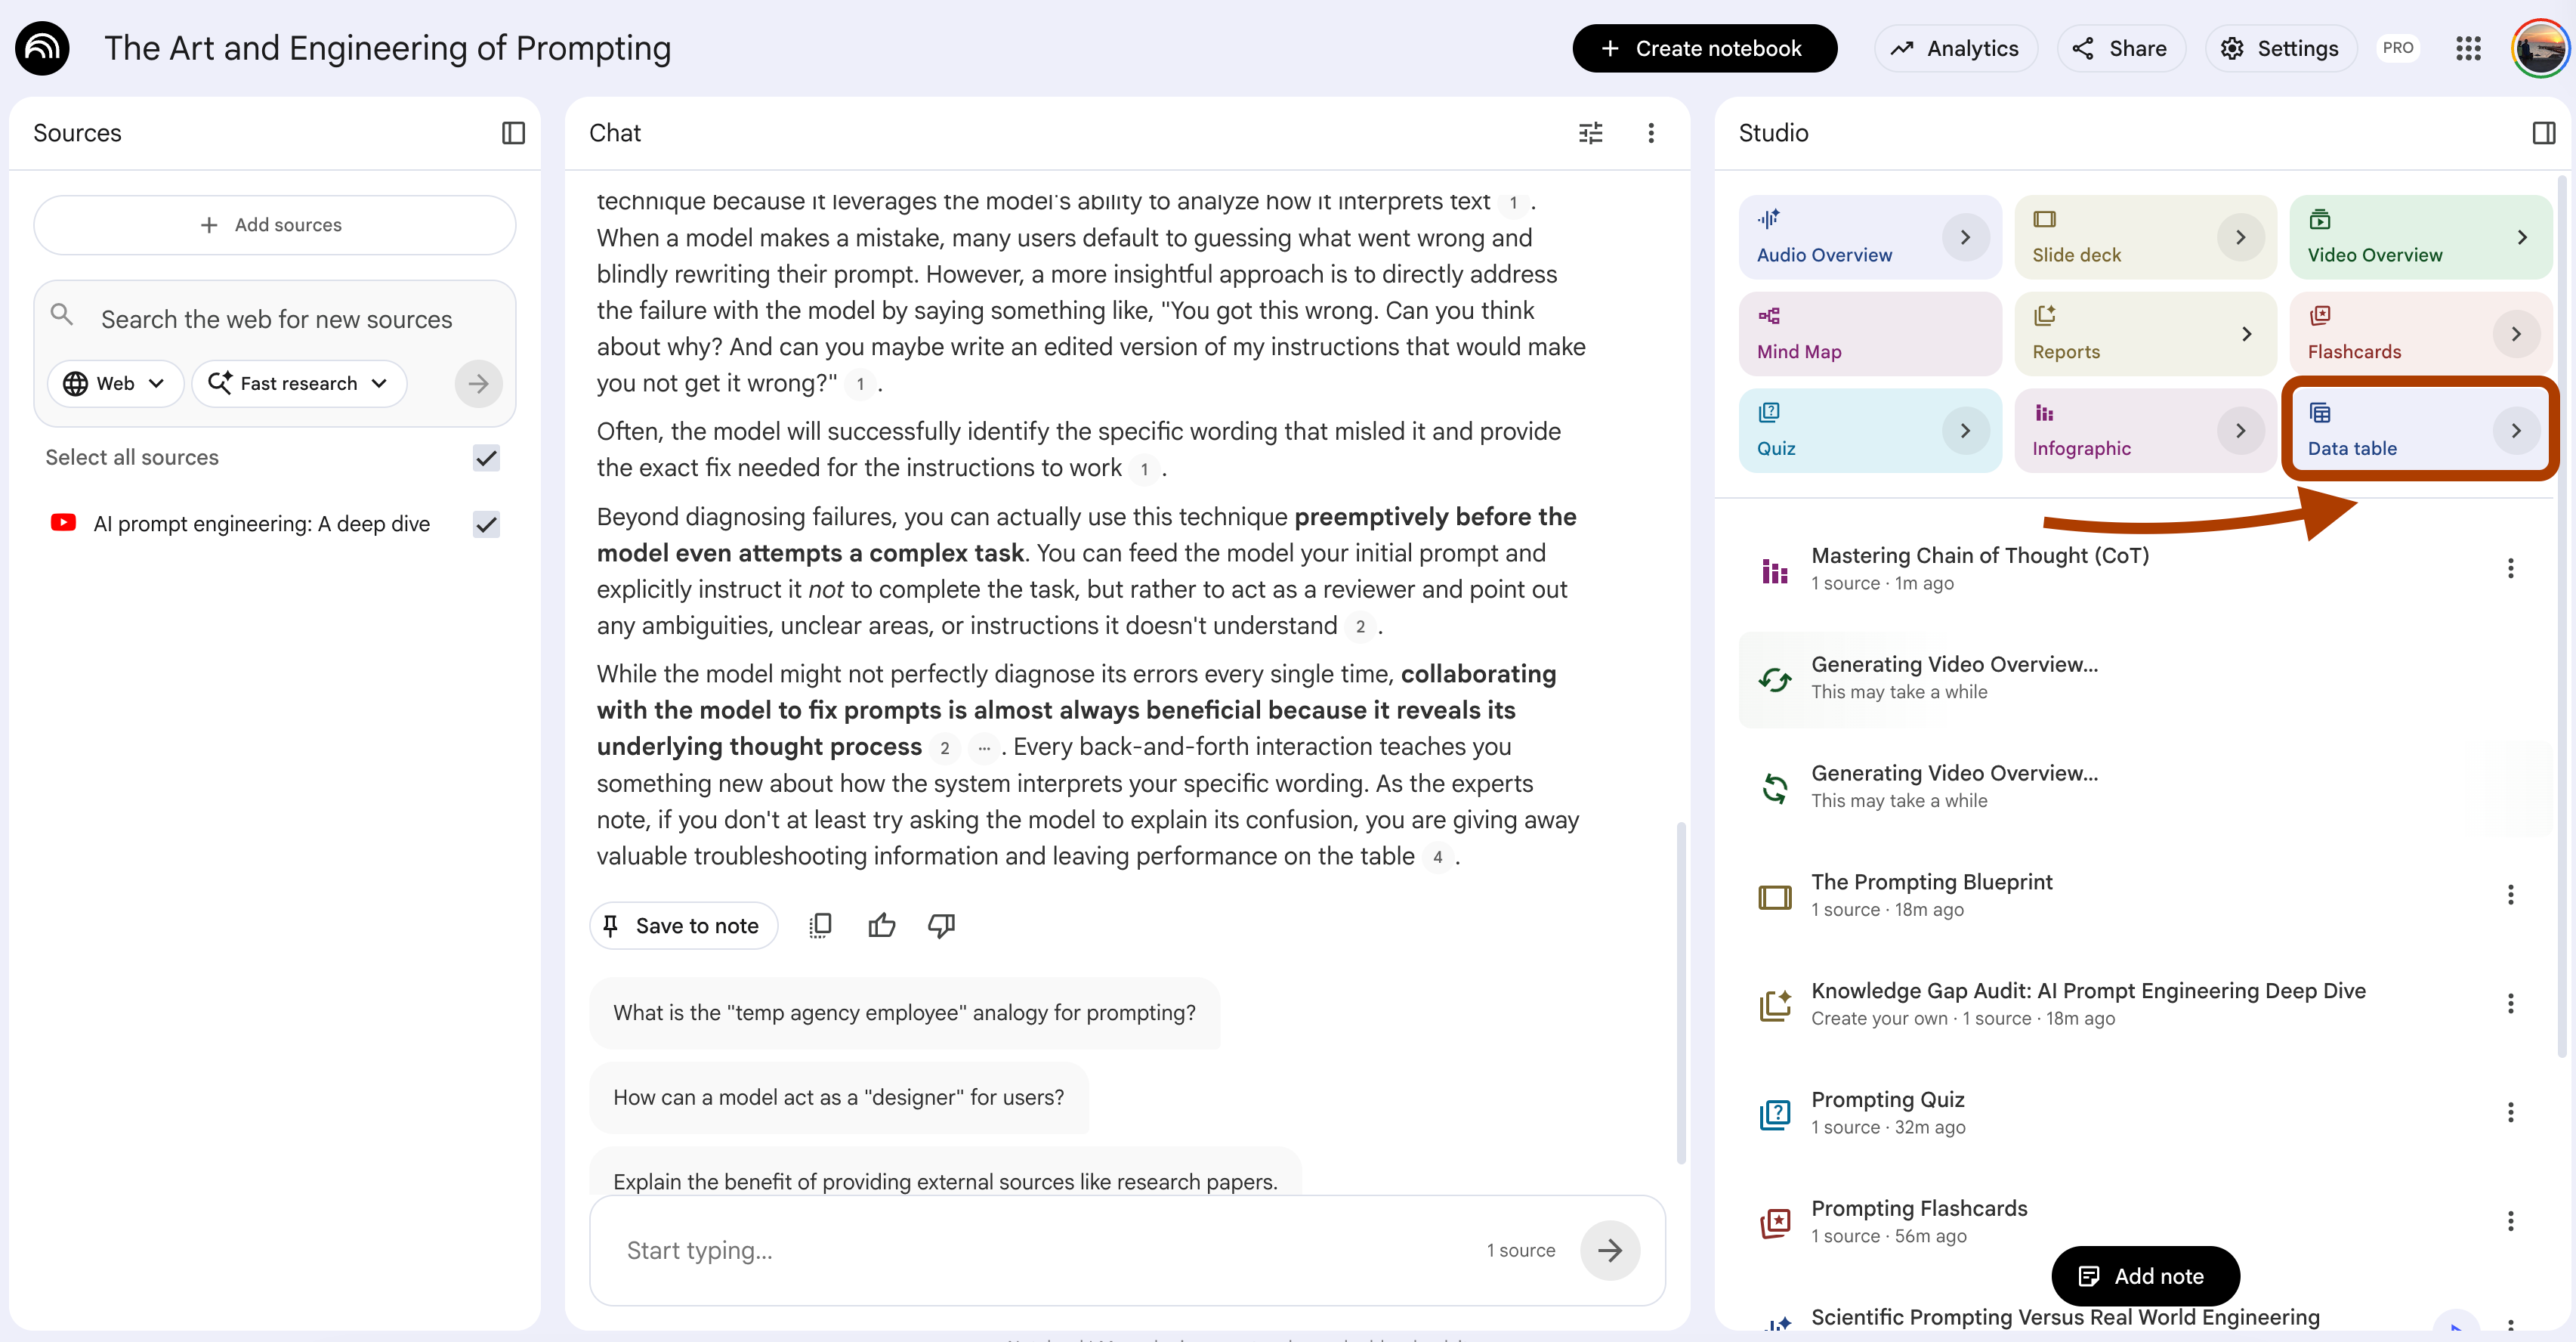
Open your notebook. In Studio, click Data Table.
Extract a comparison table from the sources for the category:
{comparison_category}.

Use these exact columns.

Column 1. Name. The name of the option as it appears in the sources.

Column 2. Best for. The use case where this option wins, in 8 words or
less, grounded in source quotes.

Column 3. Trade-off. The cost or limitation of using this option. One
short phrase.

Column 4. Prerequisite knowledge. The concept the user must already
understand to use this option correctly.

Column 5. Source confidence. Mark "Direct" if the sources explain this
option in detail. Mark "Mentioned" if only referenced. Mark "Inferred"
if the comparison required combining multiple source statements.

Rules.

Do not invent options. Only include items the sources name explicitly.

If a cell cannot be filled from the sources, populate it with "N/A"
and do not guess.

Order the rows from most-covered in the sources to least-covered. The
first row should be the option the sources discuss most.

If two options are described as opposites, place them in adjacent rows
so the contrast reads clearly.
I tested this on the Anthropic notebook with {comparison_category} set to “model types and prompting approaches”.
Here is the trimmed table.

Six options. Same five columns. One screen.
The Source Confidence column is what makes this useful for learning.
“Direct” means you can study the option from this notebook.
“Mentioned” means you need external sources.
“Inferred” means the comparison is your own, useful, but not authoritative yet.
Run this every time you start a new topic.
The table tells you what your sources actually cover and what you still need to learn elsewhere.
What’s Next?
Now you know how to learn AI from zero with NotebookLM.
The hardest part of beginner learning is solved.
If you want more prompts before you move on, read 10 NotebookLM Prompts
That Put You Ahead of 99% of People.
Same format. Different angles.
Now it is time to build.
NotebookLM alone gives you a brain. To make it a builder, connect it to other tools. Here is the order.
Step 1. Connect NotebookLM to Gemini.
This is the easiest hop. Gemini turns your notebook into prototypes. Read how I Connected NotebookLM to Gemini to see the setup.
Step 2. Link it with Antigravity.
Free. Builds something real.
Read NotebookLM & Gemini & Antigravity for the connection pattern.
Step 3. Plug in Claude Code.
This is the serious version.
Read I Built a Self-Updating Trading Bot to see how Claude Code and NotebookLM connection can help you to wire it up.
Step 4. Ship a product.
If you are not just learning AI but actually building something to release, read Claude Code: Build. Ship. Repeat.
I’ll build 7 apps in 7 months.
And explain everything, here is the first one.
Thanks for reading!